










The order is due this afternoon. Your artwork looks clean on screen, the gang sheet exported without an obvious warning, and the first shirt comes off the press with a pale logo, a lifted corner, or a color that's nowhere near the customer's brand guide. The instinct is to change everything at once: more heat, more pressure, a longer dwell, fresh powder, another file export. That usually turns one unknown into five.
The fastest way through problems in printing is to start with the customer's deadline, not the printer part. Identify what the garment is doing wrong, test the smallest number of variables, and decide early whether the job is recoverable or whether a replacement transfer will cost less than another wasted afternoon. The workflow below is built for that decision.
When a Perfect File Still Prints Wrong
A familiar failure starts with confidence. You open the PNG, zoom into the logo, and see sharp edges, clean transparency, and the right dimensions. The transfer prints. You press it onto a shirt. Then the red looks muddy, a thin halo appears around the white underbase, or one edge refuses to bond.
The file may be fine. The failure can come from the substrate, ink delivery, film orientation, adhesive powder, press temperature, pressure, peel timing, humidity, or a supplier-side print defect. A screen preview only describes the file. It doesn't prove that a nozzle fired correctly, that the powder coated evenly, or that the press delivered the temperature shown on its display.
I've found that troubleshooting by printer component wastes time because the same symptom can have unrelated causes. Banding might point to a clogged nozzle, an ink-delivery problem, or a file that was rasterized badly. Peeling might come from insufficient heat, poor pressure, the wrong garment surface, or a defective transfer. The symptom has to come first.
Start with the garment, not the machine
Look at one finished shirt under good light. Don't reload the whole stack. Ask four questions:
- What changed visually? Is the defect a line, shift, color change, edge failure, texture problem, or complete lack of adhesion?
- Did it happen before pressing? If the printed transfer already has missing lines or incorrect alignment, the heat press isn't the first suspect.
- Is the failure isolated? One bad transfer points toward the transfer or handling. A repeated defect across every piece points toward a process variable.
- What does the deadline allow? A cosmetic issue on an internal event shirt has a different decision threshold from a logo reorder for a brand customer.
Shop-floor rule: Change one variable, test one transfer, and record what happened. A rushed operator who changes temperature, pressure, dwell, and peel method together learns nothing.
For a practical companion on the inspection side, use this print quality guide. The useful mindset is simple: narrow the suspect list before touching the press settings. That protects the order, the garments, and your Saturday.
How DTF Transfers Actually Stick to Fabric
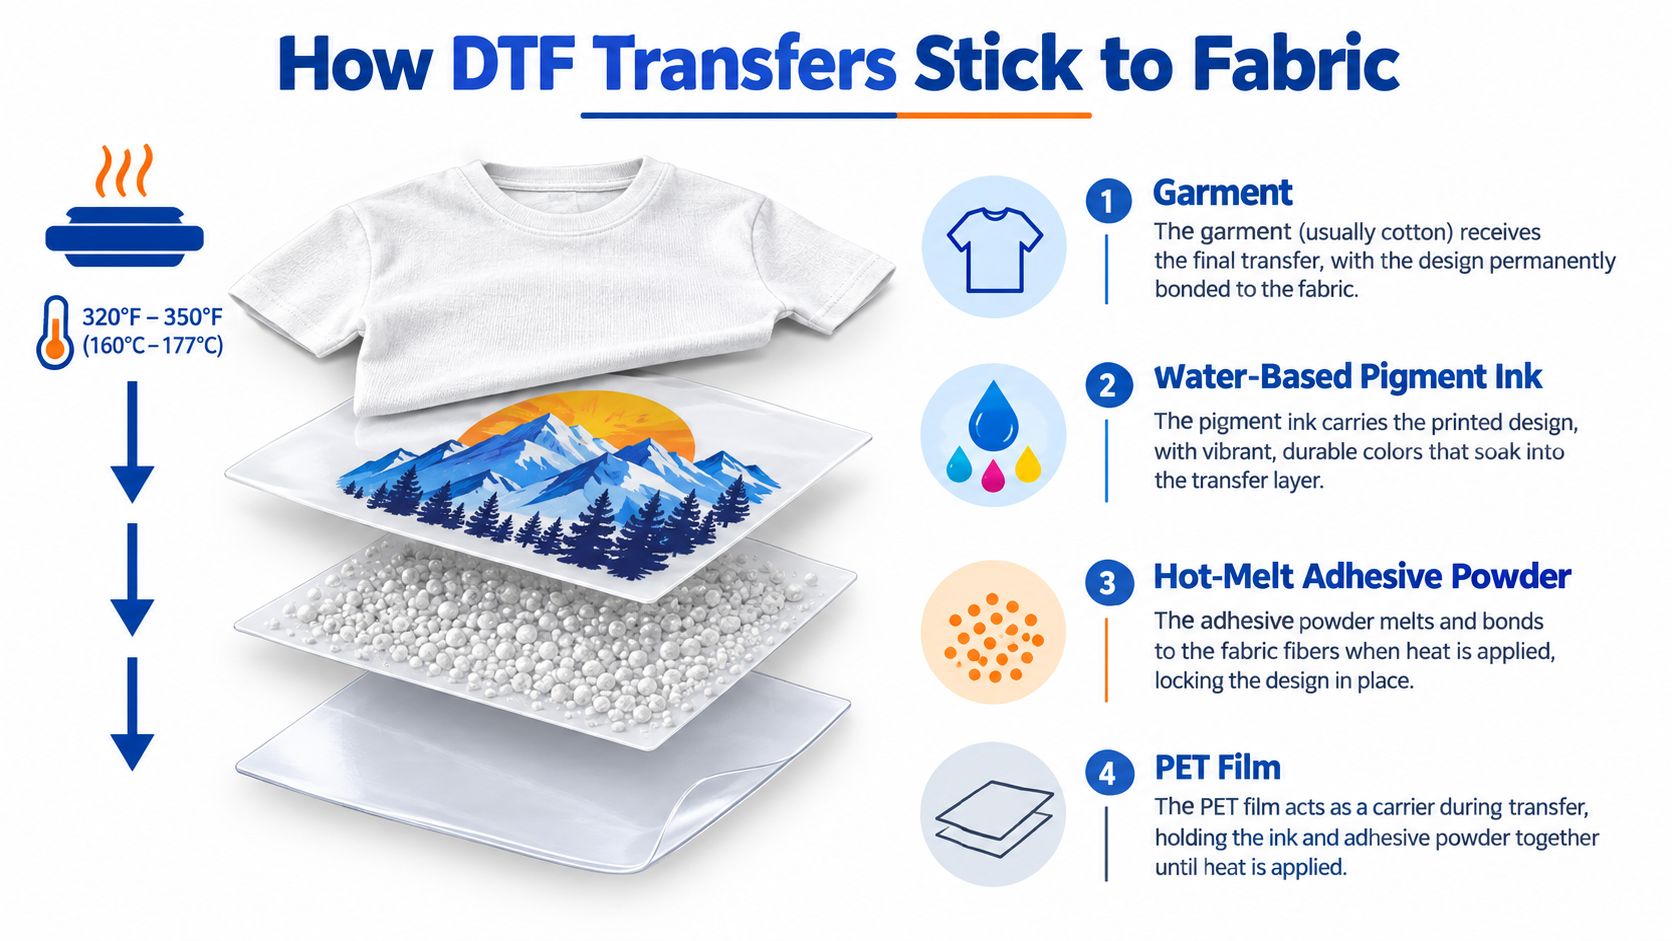
A DTF transfer is a layer system, not just ink on plastic. Understanding the stack makes the corrective action more predictable.
The four layers
PET film carries the design through printing and pressing. It gives the wet print a stable surface, then releases when the transfer has reached the correct bonding condition. Film orientation matters. Pressing the wrong side can prevent the adhesive and ink from contacting the garment as intended.
Water-based pigment ink forms the visible image. The white underbase sits beneath the colors so they don't disappear into a dark or highly colored garment. If the underbase is weak, the design may look dull even when the color artwork is technically correct.
Hot-melt adhesive powder is the bonding layer. It needs even coverage and enough heat to melt into the garment surface. Too little powder can produce weak edges and premature lifting. Too much can create a heavy, stiff hand feel and may contribute to excess adhesive showing around fine details.
The garment receives the melted adhesive. Cotton, polyester, blends, coatings, texture, dye behavior, and surface preparation all influence the result. A transfer can be printed correctly and still fail if the garment surface, temperature, or pressure doesn't support the bond.
Why the process has limits
Temperature controls whether the adhesive softens and flows. Dwell time gives that heat time to work through the film and powder. Pressure helps bring the adhesive into contact with the fibers, but pressure can't compensate for a transfer that was under-powdered, contaminated, or printed with missing jets.
Pressing too cool often leaves a weak bond, visible edge lift, or peeling after handling. Pressing too aggressively can over-melt the adhesive, flatten the intended finish, increase bleed-through, or damage heat-sensitive fabric. The fix has to match the layer that failed.
Nozzle condition belongs upstream of the press. Inkjet nozzle clogging alters droplet trajectory and ejection rate, producing nonuniform coverage, banding, and missing lines; detached material from a partial clog can also contaminate later droplets and spread the defect across every pass. The mechanics are described in this peer-reviewed nozzle-clogging research.
For a fuller process explanation, see how DTF transfers work. The practical conclusion is more useful than memorizing terminology: inspect the printed layer before trying to cure the pressed layer.
The Five Defects That Show Up in Almost Every Shop
A finished garment usually gives you enough evidence to choose the first test. Don't treat every defect as a press-temperature problem.
A 2025 study reported that color mismatch, blurred output, and print misalignment together represented 77.36% of recorded defects in a commercial printing MSME, with links to calibration, ink and substrate variation, proofing, cleanliness, and environmental conditions. See the study of printing defects and their causes.
Symptom to First-Cause Reference
| Symptom on garment | Most likely cause | Fastest first test | Fix in under 10 min |
|---|---|---|---|
| Horizontal or vertical banding | Weak or missing nozzles, uneven ink delivery, or a damaged print file | Run a nozzle check and inspect the transfer before pressing | Clean or recover the affected head if the check identifies missing jets |
| Ink adhesion failure | Incorrect press conditions, contaminated garment surface, or unsuitable fabric finish | Press one transfer on a scrap or inside area using the approved setting | Pre-press the garment, verify pressure, and repeat the approved cycle |
| Color mismatch | Color-management settings, substrate behavior, white-ink variation, or inconsistent source artwork | Compare the transfer with a physical approved sample, not only a monitor | Stop changing random RGB values and isolate the file, transfer, or garment |
| Ghosting or doubled edges | Film movement, garment movement, uneven pressure, or misregistration in the transfer | Inspect the transfer before pressing and check platen contact | Reposition carefully, stabilize the garment, and test pressure contact |
| Peeling or cracking | Incomplete adhesive melt, wrong peel timing, poor coverage, or fabric stretch | Flex a cooled test area and inspect the edge | Repeat with verified heat and pressure, then stop if the same transfer fails |
Banding is often the quickest defect to misdiagnose. If the lines are already visible in the transfer, don't keep adjusting the heat press. Check the nozzle pattern and ink delivery first. Continuing to print with a missing jet can repeat the same defect across every pass.
Adhesion failure shows up as lifting corners, weak edges, or a design that releases during the first stretch. A single test on a scrap garment can separate a process problem from a bad transfer. If the transfer fails with verified press conditions, more pressure may only damage the shirt.
Color mismatch needs a reference, not an argument with your monitor. Screens vary, and the garment changes perceived color through its base tone, texture, and reflectivity. For a brand reorder, compare a physical approved sample and define what variation the customer will accept before production.
Ghosting usually means movement. The film, shirt, or transfer shifted while the platen closed or opened. It can also begin in the printed transfer through registration error. Check the transfer first, then stabilize the press setup.
Peeling and cracking are related but not identical. Peeling points to bond failure. Cracking can result from an over-stretched design, a brittle finish, insufficient cure, or a garment whose surface moves more than the transfer. The correct first test is a controlled press and flex inspection, not automatically increasing dwell.
Use this heat press troubleshooting reference when the defect appears only after application. It helps separate uneven platen temperature and pressure from problems that arrived in the transfer.
A Five Minute Diagnostic Flow Before You Repress
When a customer is waiting, the best diagnostic is short, controlled, and boring. Boring is good. It prevents a defective transfer from becoming a stack of defective shirts.
Minute one, inspect before pressing
Hold the transfer under direct light. Confirm the printed side and carrier orientation. Look for missing lines, streaks, specks, weak white areas, or visible registration problems. If the defect is present before heat, don't waste garments trying to repair it with the press.
Check the garment too. Remove lint, confirm the decoration area is clean, and pre-press if moisture or surface unevenness may interfere with contact.
Minutes two and three, verify the press
Don't trust the display alone. Check the platen with an infrared thermometer and confirm that the actual surface temperature is close to the setting required for the transfer. Verify pressure across the platen, especially at the corners. A press can show the correct temperature while delivering uneven contact.
Peel according to the transfer specification. A hot-peel transfer and a cold-peel transfer don't use the same release decision. Pulling at the wrong time can make a good bond look like a failed one.
Minutes four and five, run one controlled test
Use a single transfer on a scrap or low-risk garment. Change only one variable. If you adjust temperature, leave pressure, dwell, garment, and peel method unchanged. If you adjust pressure, don't also change the film or artwork.
A 2025 industry survey found that 63% of DTF operators identified equipment maintenance as a main challenge, 57% reported color consistency problems, and 66% of customers prioritized fast turnaround while 65% of providers said they always met promised delivery timelines, according to this industry report on hybrid print shops. Under deadline pressure, maintenance and decision discipline protect delivery better than repeated guesses.
If the same defect appears after a verified one-variable test, stop. Reorder or escalate to the supplier when the transfer itself is visibly wrong, multiple pieces fail in the same location, or the correction would require sacrificing customer garments without a confirmed cause. A replacement transfer is cheaper than a full stack of uncertain reprints.
Preparing Artwork and Gang Sheets the Right Way
Many reprints begin before the press is warm. A file can be technically openable and still be wrong for production because the dimensions, transparency, color handling, or layout creates avoidable risk.
Keep the source artwork consistent. Don't export one logo in a color-managed workflow and another in a different profile, then expect them to match on the same garment. Preserve transparent backgrounds, check fine details at production size, and inspect white elements that may depend on the underbase.
Hand-arranged gang sheets create another variable. Designs can be scaled accidentally, placed too close to one another, rotated inconsistently, or exported with extra transparent space that wastes film. Manual layout also makes it harder to identify which file produced a defect when a customer orders a mixed sheet.
Make layout a production control
Use a consistent upload-and-layout workflow. A gang sheet should make the sheet easier to inspect, not merely fuller. Leave sensible separation between designs, keep small details away from neighboring artwork, and label files so the operator can match each transfer to the order.
Lion DTF Transfers' Auto-build gang sheet builder is designed to arrange multiple graphics on one printable area, which supports easier handling and more cost-effective material use. It removes a manual placement step, but it doesn't remove the need to inspect artwork. Auto-layout can't fix a low-resolution logo, a wrong color expectation, or a transparent edge that was exported incorrectly.
The waste problem is larger than DTF. A 2025 roll-to-roll printing study found that automatic pasting and start-up losses together accounted for more than 63% of recorded waste, while paper represented an estimated 20–25% of total newspaper-production expenses, as reported in this roll-to-roll printing study. The lesson applies directly to smaller shops: errors made during setup consume material before a customer ever sees the finished product.
Before sending a sheet to print, inspect it as an operator would:
- Confirm dimensions: Make sure each design matches the ordered garment size.
- Check transparency: Look for unwanted boxes, halos, or semi-transparent edges.
- Review brand colors: Compare against a physical approved sample when consistency matters.
- Inspect spacing: Keep designs separated enough for cutting, weeding, and pressing.
- Save the final proof: Keep the sheet preview with the order record.
Good artwork preparation doesn't guarantee a perfect transfer. It does eliminate a category of preventable failures, which is exactly what a deadline-driven workflow needs.
Press Settings, Material Behavior, and When More Heat Hurts
More heat is not a universal repair. It can improve a weak bond when the adhesive hasn't melted properly, but it can also push the adhesive past a clean working range, affect the garment, and change the hand feel.
Start with the transfer supplier's approved setting. As a general starting reference shown in the press comparison, many operators work within 240–280°F, 40–PSI, and 7–10 seconds, but those values are not a substitute for the specification of the actual transfer and garment. Verify the press physically and test one piece before committing the order.
What each setting changes
Temperature activates the hot-melt adhesive. Too little heat leaves the layer under-melted. Too much can increase bleed-through, damage a sensitive garment, or create an unnecessarily heavy finish.
Pressure creates contact between the transfer and fabric. Insufficient pressure leaves gaps, especially over seams, texture, or uneven garment areas. Excess pressure can flatten the design and stress the fabric without solving a bad print.
Dwell gives the adhesive time to melt and contact the fibers. A longer cycle can help an under-cured transfer, but it won't repair a missing nozzle, wrong film side, contaminated surface, or registration error.
Cotton, polyester blends, and tri-blends can react differently. Polyester may show dye migration or heat sensitivity. Textured garments may need more careful contact than a smooth cotton surface. A pre-press can remove moisture and flatten the application area, but it isn't a replacement for correct transfer chemistry.
Humidity deserves attention because it changes how materials behave. Damp garments, film, powder, and ink can produce inconsistent results. Store materials sealed, keep the application surface dry, and don't assume that a setting that worked yesterday will behave identically in a different room.
A digital-printing defect study identified inaccurate color reproduction as the second most frequent defect in its dataset, with 300 occurrences, and linked it partly to raster-image-processor glitches and incorrect color-management settings. The digital printing defect research reinforces the point that heat settings can't repair an upstream color problem.
Pressure test: Place a sheet of paper under the platen and close the press. If the contact mark varies noticeably across the corners, calibrate or service the press before blaming every transfer.
When more heat doesn't solve the defect after a controlled test, stop increasing it. The next useful action is to isolate the transfer, garment, or supplier.
An Operator Checklist for Consistent Transfers
Keep this beside the press. It should be quick enough to use during a rush.
- Inspect the artwork: Confirm size, transparency, fine detail, and the approved color reference before printing.
- Build the gang sheet consistently: Use repeatable spacing and verify every design is present and correctly oriented.
- Check the transfer before pressing: Look for missing jets, streaks, weak white, specks, and misregistration.
- Confirm film orientation: The carrier and printed side must face the garment as specified.
- Pre-press when appropriate: Remove moisture and flatten the application area without scorching the fabric.
- Verify actual temperature: Use an infrared thermometer rather than relying only on the press display.
- Check pressure at the platen: Uneven contact can cause edge failure and inconsistent adhesion.
- Follow the specified peel method: Hot peel and cold peel are process steps, not preferences.
- Test one garment first: Change one variable at a time and record the result.
- Inspect after pressing: Check edges, fine details, color, hand feel, and stretch response.
- Decide early: If the same defect repeats with verified settings, contact the supplier instead of consuming the remaining order.
The checklist works because it separates input quality from press behavior. That makes the next decision evidence-based rather than emotional.
Quick Answers for the Questions You Ask Right Before Pressing
When should I reprint? Reprint when the defect affects the logo, readability, adhesion, or customer-facing appearance. Don't gamble on a repeated failure.
Does hot peel versus cold peel matter? Yes. Follow the transfer specification. The wrong peel timing can disturb a bond that otherwise received proper heat and pressure.
How do I judge a brand-color shift? Compare it with a physical approved sample under consistent lighting. A screen preview isn't a production tolerance.
What if the gang sheet arrives misprinted? Photograph the defect before pressing, keep the sheet and order details, and contact the supplier. Don't cut or apply a visibly defective sheet.
For a simpler starting point, use an Auto-build gang sheet builder to reduce manual layout errors and make material planning easier.
Lion DTF Transfers offers custom DTF transfers, gang sheets, UV DTF stickers, ready-to-press collections, and online artwork upload tools for shops working under deadlines. Visit Lion DTF Transfers to prepare a gang sheet, order transfers by size, or get support when a print problem should be replaced rather than repressed.
Email orders@LionDTF.com or Text or Call: 833-350-5466