










You've got the artwork ready, the blank shirts stacked beside the heat press, and a customer waiting for delivery. Then the doubt starts. Should you use DTF, HTV, sublimation, or transfer paper? The wrong choice can leave you with peeling edges, wasted garments, slow production, or a print that doesn't match the customer's expectations.
Heat transfers aren't interchangeable. Each method responds differently to fabric, artwork, order size, equipment, and application settings. The most reliable decorators don't choose based on the trend of the moment. They match the transfer to the job before they press the first shirt.
Starting Your Heat Transfer Journey
A small apparel business often reaches this decision at the worst possible time. A local team needs names and numbers on shirts, an online customer wants a full-color illustration, and a crafter has a short run of cotton totes to finish before the weekend. The heat press is available, but the production method isn't obvious.
One shop owner might reach for HTV because the design has clean lettering. Another might choose DTF because the artwork contains gradients and fine details. A polyester sports shirt may call for a different process altogether. The material that works beautifully on one garment can create disappointing results on another.
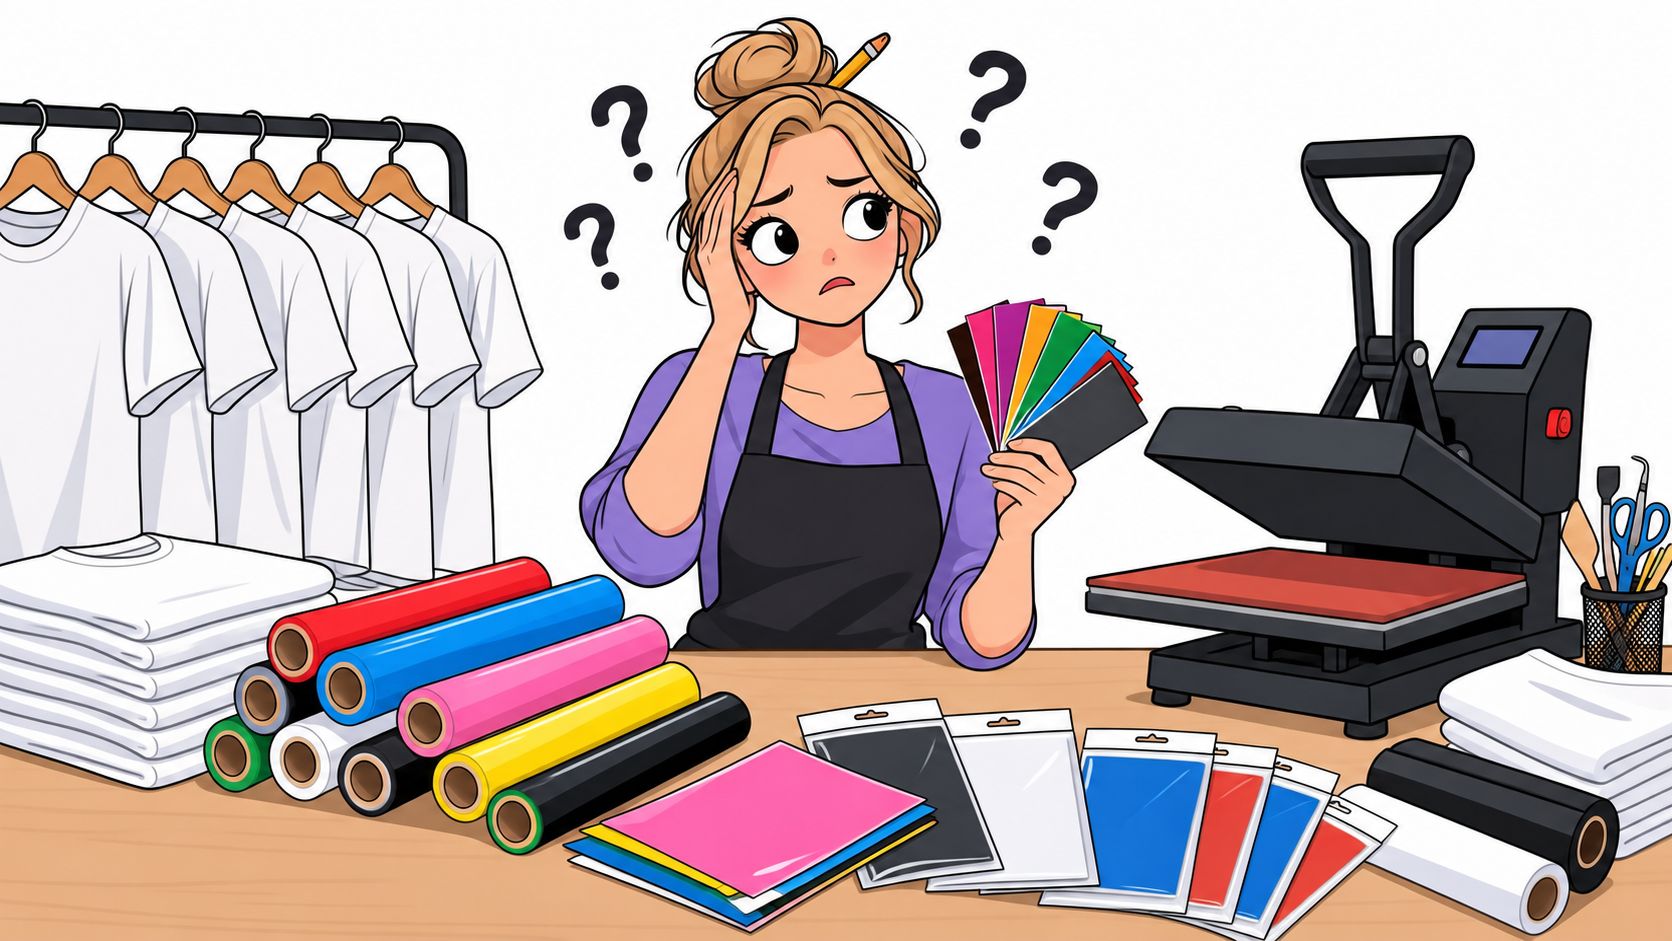
The decision affects more than appearance. It changes your setup time, material usage, labor, rework risk, and order economics. A method that looks inexpensive at the start may become costly if every design requires extensive weeding or if a failed application ruins a premium blank.
Start with the job, not the machine
Before choosing a transfer, answer four practical questions:
- What fabric are you decorating? Cotton, polyester, and blends behave differently under heat and pressure.
- How complex is the artwork? Simple names and numbers don't need the same workflow as photographic artwork.
- How many garments are you making? A one-off project may justify a simple process, while repeat orders need consistency.
- What does the customer expect? Ask whether they value softness, color detail, stretch, speed, or a specific finish.
Practical rule: Test the transfer on the actual garment blank before committing to a production run.
A good choice reduces surprises. You spend less time correcting peeling corners, color problems, and uneven adhesion, and more time producing shirts that can leave the shop with confidence.
How Heat Transfers Actually Work
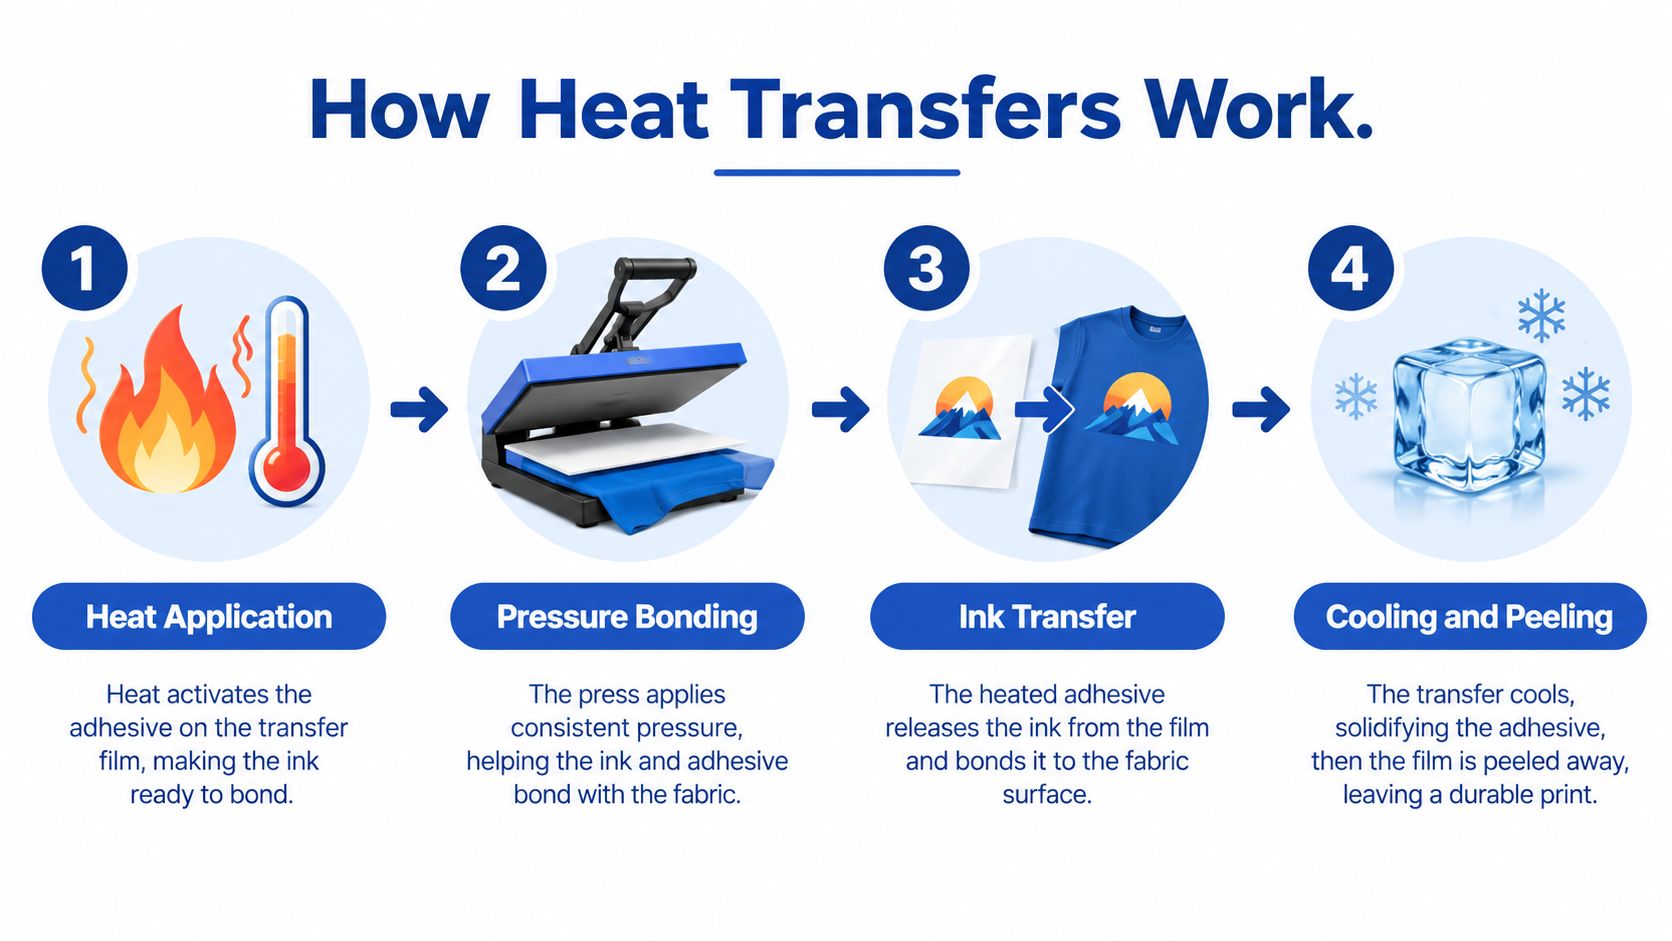
A heat transfer joins artwork to fabric through a controlled combination of heat, pressure, and dwell time. The press does not just warm the shirt. It changes the behavior of an adhesive, film, ink, or dye while pressure brings the transfer into close contact with the textile.
The basic mechanism is conduction. Heat moves through the heated platen, into the transfer and garment, and then through the material in contact with it. Physics references describe conduction as heat transfer through stationary matter by physical contact, and explain that the net rate rises as the temperature difference increases. If two objects reach the same temperature, the net heat-transfer rate becomes zero. See the OpenStax explanation of heat-transfer mechanisms/University_Physics_II_-Thermodynamics_Electricity_and_Magnetism(OpenStax)/01:_Temperature_and_Heat/1.07:_Mechanisms_of_Heat_Transfer) for the underlying principle.
Follow the heat path
- The platen supplies energy. The press transfers heat through its upper surface. Uneven platen temperature can produce inconsistent adhesion across the same design.
- Pressure closes the interface. Pressure pushes the transfer against the textile, helping the adhesive contact the fibers or surface.
- The transfer activates. HTV softens and bonds, DTF adhesive melts into a film, and sublimation dye changes state and bonds with suitable polyester fibers.
- Cooling completes the handling step. The correct peel temperature depends on the transfer system. Peeling too early or too late can disturb the bond.
Convection and radiation also exist around the press, but the direct platen-to-garment contact is the practical factor decorators control most closely. That's why a press can display the correct temperature while a thick seam, cold spot, or uneven pressure still causes failure.
When a print peels, don't immediately increase the temperature. Check pressure, dwell time, garment moisture, surface contamination, and peel instructions first. Excess heat can discolor fabric or damage the transfer without correcting a pressure problem.
Comparing Main Heat Transfer Types
The four common choices solve different production problems. DTF handles detailed, colorful artwork across many common apparel fabrics. HTV suits cut lettering, numbers, logos, and small runs where manual preparation is manageable. Sublimation is designed around polyester and works especially well when the design should become part of the fabric rather than sit as a separate layer. Transfer paper offers an accessible entry point for basic home production, although its finish and workflow depend heavily on the paper and printer combination.
| Method | Best Fabrics | Setup Cost | Durability | Learning Curve |
|---|---|---|---|---|
| DTF | Cotton, polyester, and many blends, subject to product specifications | Requires printed film, adhesive, or outsourced ready-to-press transfers | Strong when matched with the garment and applied correctly | Moderate |
| HTV | Fabrics approved for the selected vinyl | Cutter, vinyl, weeding tools, and press | Depends on vinyl type, fabric, and application | Low to moderate |
| Sublimation | Light-colored polyester and compatible coated products | Sublimation printer, ink, paper, and press | Dye bonds into suitable polyester rather than forming a separate surface layer | Moderate |
| Transfer paper | Printer-compatible cotton or blend garments, depending on paper | Compatible inkjet or laser printer, paper, and press | Usually more sensitive to washing and handling than professional transfer systems | Low |
Match the method to the artwork
DTF is the flexible production choice when you need full-color detail, small quantities, or artwork that includes shading and complex shapes. It can be ordered ready to press, which removes printing and powder-handling equipment from your shop.
HTV works best when the design is deliberately simple. Names, jersey numbers, single-color marks, and bold lettering are practical examples. It gives you direct control, but cutting, mirroring, weeding, and layering add labor.
Sublimation makes sense when the garment and artwork support it. It performs well on suitable polyester because the dye integrates with the textile. It isn't the universal answer for dark cotton apparel.
Transfer paper is useful for testing an idea or producing occasional work. Printer compatibility and surface preparation matter, and the result may not have the same professional appearance as a purpose-made transfer.
For a broader discussion of the production trade-offs, compare screen printing and heat transfer methods before buying equipment.
Manufacturing and Application Processes
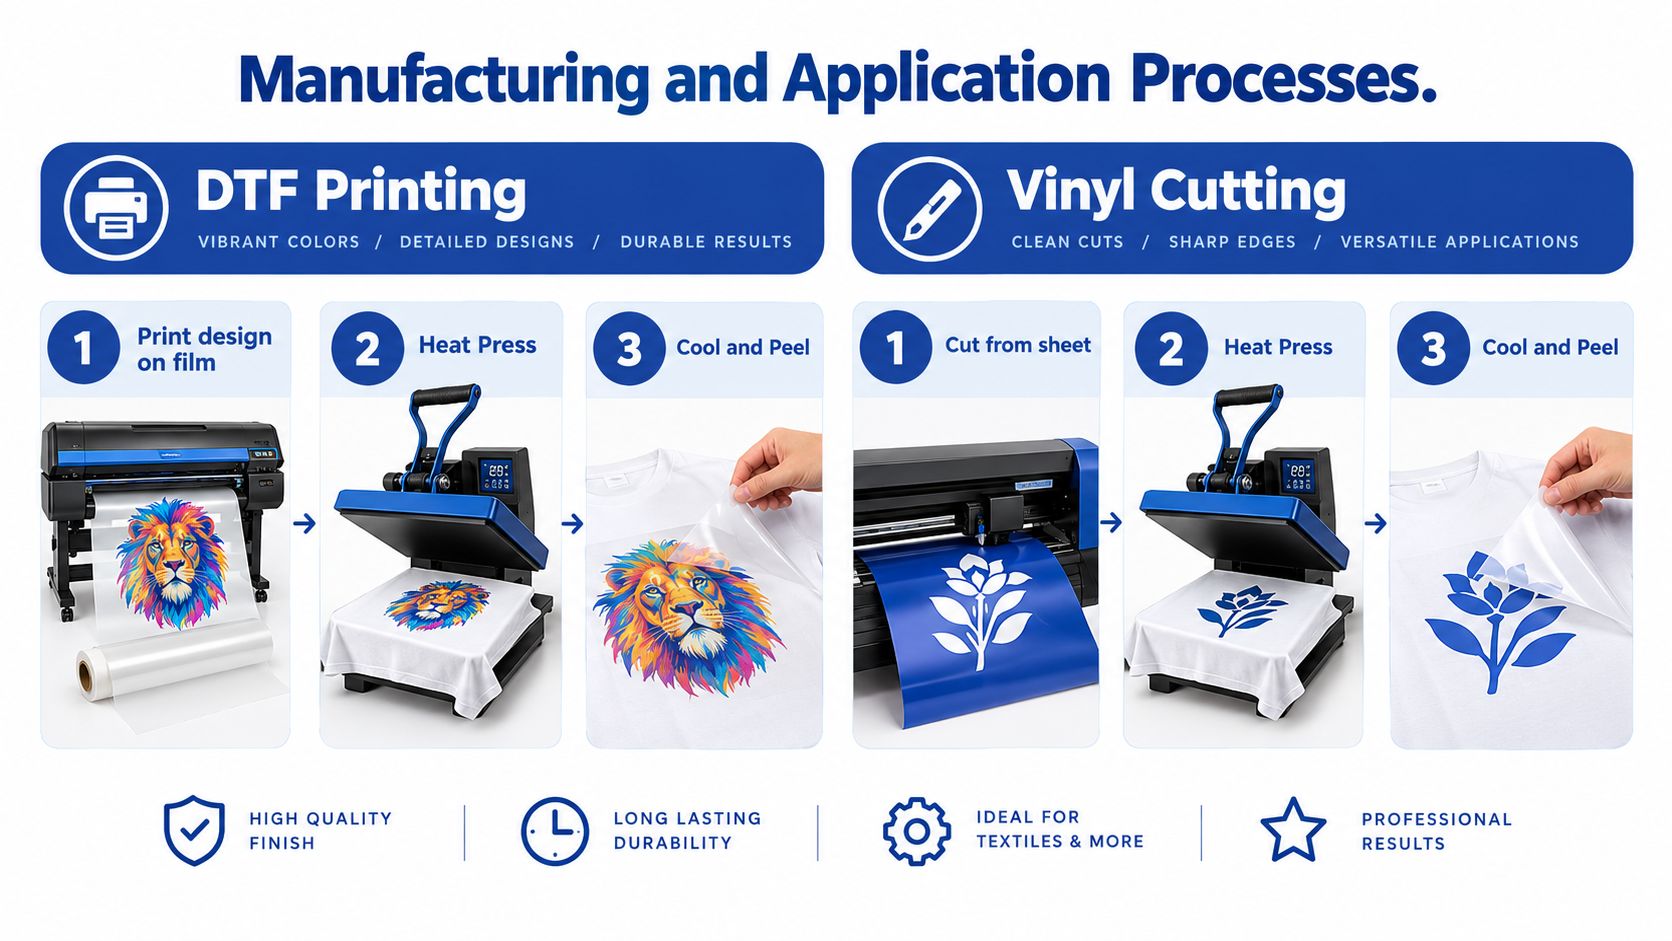
Each transfer type has a different chain of preparation. Most avoidable failures happen before the press closes, when the artwork is mirrored incorrectly, the garment is damp, the adhesive is uneven, or the transfer is placed on a seam.
DTF workflow
A DTF job starts with a print-ready file. The design is printed onto specialized film, adhesive powder is applied to the printed area, and the powder is cured before the transfer reaches the garment. During curing, TPU particles melt and coalesce into a continuous transparent adhesive film. A DTF powder curing guide reports curing at about 160–170°C, while another benchmark places curing at 300–325°F, or 149–163°C, for 60–90 seconds. It warns that temperatures above 350°F can yellow the film or scorch the design.
For application, pre-press the garment briefly to remove moisture and flatten the surface. Position the transfer, cover it with suitable protective material, and use the supplier's temperature, pressure, dwell, and peel instructions. A hot-peel system must be peeled while the adhesive remains in its intended bond window. Do not assume that a setting that works for one film works for every film.
HTV workflow
Choose vinyl for the garment and finish, then mirror the artwork before cutting. Weed away excess vinyl, keep the carrier intact, and position the design with heat-resistant tape if the layout needs extra security. Press according to the vinyl manufacturer's settings, then follow the specified hot, warm, or cold peel instruction.
Sublimation and transfer paper
For sublimation, print mirrored artwork onto sublimation paper, secure it to a compatible polyester surface, and press with firm, even contact. The paper must not shift while the dye is transferring. Transfer paper requires a compatible printer, correct paper loading, and careful attention to whether the design should be mirrored.
A neutral garment-decoration guide places common heat-transfer application conditions around 150–170°C for 10–20 seconds under firm pressure, with hot or cold peeling depending on the product. See the heat-transfer application guide for that general process.
Sportswear often uses an indirect transfer process. Fujifilm describes printing onto specialized transfer paper, pressing around 160–170°C at about 60 psi for 10–15 seconds, and peeling only after full cooling in its sportswear transfer guide. Workwear may need a different profile. Its industrial workwear guide gives an example of 190–200°C, about 60 psi, and 15–30 seconds, with maximum adhesion at the higher temperature range.
Those differences are why a test swatch matters. Record the garment, transfer type, press temperature, pressure, dwell, peel method, and result. A simple production log turns guesswork into a repeatable process. For a closer look at the DTF workflow, see how DTF transfers work.
Durability and Washability Standards
A customer sees a clean finished shirt and asks how long it will last. Give a practical answer rather than a fixed promise. Fiber content, fabric texture, adhesive chemistry, press calibration, application pressure, laundering, and drying all affect durability.
Start with the garment and transfer pairing. A smooth, compatible textile gives the adhesive a better surface to bond with. Texture, fabric finishes, moisture, cool areas on the platen, or uneven pressure can leave a weak interface that looks fine immediately and fails after washing. Press temperature matters, but it cannot correct poor contact or an unsuitable material combination.
Set care expectations clearly
Give customers care instructions they can follow:
- Wash inside out: This limits direct abrasion against the printed surface.
- Use a gentle wash approach: Harsh handling and excessive heat can shorten the life of a decorated garment.
- Avoid aggressive drying: Follow the transfer supplier's care guidance when choosing a drying method.
- Inspect the garment construction: Seams, zippers, pockets, and textured areas can prevent even pressure during application.
For small production runs, keep a sample from each garment and transfer combination. Wash it using the recommended care routine, then check adhesion, cracking, edge lift, and color before accepting a larger order. For expected lifespan and care factors, see how long DTF transfers last.
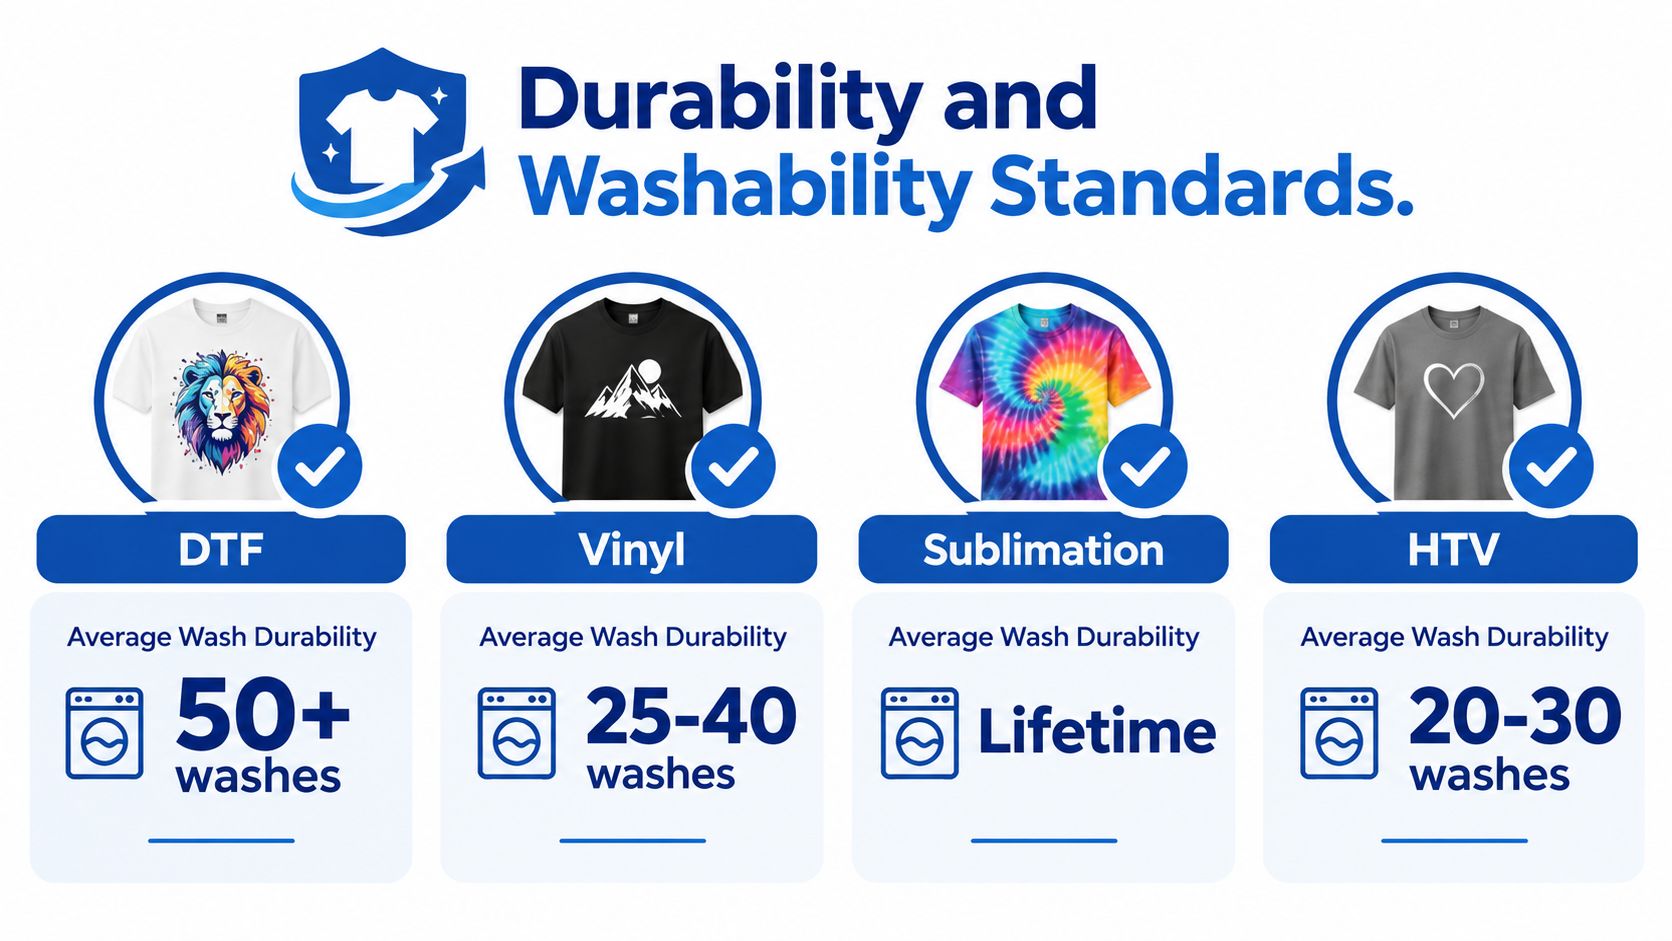
Sublimation behaves differently from a surface film because suitable dye becomes integrated with the polyester material. DTF and HTV remain bonded layers, so their performance depends on the interface between transfer and textile. Transfer paper and printer combinations also vary, which makes sample testing important before promising repeatable results.
A 2026 study on thermal-transfer printing for textile electrodes used a dual-crosslinked conductive composite to produce mechanically strong, wash-durable textile electrodes. Its broader lesson applies to apparel decoration: the study of wash-durable thermal-transfer textiles connects durability with material chemistry, substrate behavior, and the heat-transfer interaction, not press time and temperature alone.
A durable print starts with a compatible material system. The press only completes the bond.
Troubleshooting Common Problems
When a transfer fails, diagnose the symptom before changing settings. Randomly adding heat can scorch fabric, distort vinyl, yellow adhesive, or make a weak application look acceptable only temporarily.
If the edges lift
Check whether the platen covered the full design and whether the garment sat flat. Seams, collars, pockets, and thick hems can prevent even pressure. Repress the affected area with the correct protective sheet and application settings. If the edges still lift, test a fresh garment and inspect the transfer before blaming the press.
If the design cracks
Look at the fabric stretch, transfer compatibility, and application profile. A rigid decoration on a highly elastic garment may crack when the textile moves. Excessive heat can also damage some films, while insufficient bonding leaves the surface vulnerable to abrasion.
If the print looks dull or scorched
Reduce the temptation to keep increasing temperature. Check whether the transfer was cured correctly, whether the protective sheet is clean, and whether the garment contains a finish that affects color. DTF curing guidance specifically warns that excess heat can yellow adhesive film or scorch the design, so follow the product profile rather than treating temperature as a cure-all.
If placement or color is wrong
Use a ruler, alignment guide, and heat-resistant tape for repeat jobs. For multilayer HTV, press each layer according to the vinyl instructions and avoid exposing earlier layers to unnecessary heat. For DTF, inspect the printed film before pressing so you don't discover a file or color problem after the garment is already decorated.
Keep one rejected shirt from each problem batch. Label it with the settings and garment details. These samples become a useful reference when the same blank or transfer appears in a future order.
Buying and Ordering Tips for Success
A supplier should make your workflow more predictable, not add another source of uncertainty. Before ordering, check the minimum quantity, available sizes, file requirements, turnaround expectations, shipping options, and support process. Ask how the supplier handles a damaged transfer or a file that needs correction.
Request samples when you're testing a new garment or artwork style. Press the sample yourself, wash it according to the intended care instructions, and inspect the edges, surface, stretch, and color. A small test order costs less than discovering that an entire batch doesn't suit your blanks.
Build orders around material efficiency
Gang sheets can improve ordering efficiency when you have several small designs. Instead of buying each graphic separately, arrange compatible artwork on one sheet and reduce unused film. An Auto-build gang sheet builder makes this easier by automatically organizing designs into an efficient layout, which can reduce manual setup and support more cost-effective ordering.
Look for practical evidence rather than broad promises:
- Color control: Ask how the supplier manages color consistency between orders.
- Adhesive reliability: Confirm that the transfer is ready to press and comes with clear application instructions.
- File handling: Check whether transparent backgrounds, fine details, and small text are reviewed before production.
- Support access: Fast answers matter when a customer deadline is close.
- Sample consistency: Compare multiple samples if you expect repeat orders.
Lion DTF Transfers offers ready-to-press DTF transfers, custom gang sheets, an Auto-build gang sheet builder, and apparel pressing services for businesses and makers. Treat any supplier as part of your production system, then validate its materials on your garments before scaling an order.
Key Takeaways and Next Steps
The right heat transfer method depends on the job in front of you. Fabric, artwork complexity, order size, equipment, finish, and delivery deadline matter more than a generic claim that one process works for everything.
Use this quick check before you order or press:
- Fabric first: Confirm that the transfer suits the fiber content, color, texture, and stretch.
- Artwork second: Choose DTF for detailed color work, HTV for cut shapes and lettering, sublimation for compatible polyester applications, and transfer paper for suitable entry-level projects.
- Workflow next: Include printing, cutting, weeding, powder curing, peeling, and quality control when calculating labor.
- Test before scaling: Press a sample on the actual blank and record the settings.
- Protect the margin: Use an Auto-build gang sheet builder when multiple designs can share a sheet and reduce unused space.
- Document the result: Keep successful settings attached to the garment and transfer combination, not just to the artwork file.
DTF and HTV are practical starting points because they cover many small-business jobs without requiring the same production path. That doesn't make either method universal. A polyester sports garment, a cotton hoodie with a detailed illustration, and a single-color work shirt may each deserve a different decision.
The craft improves through controlled testing. Change one variable at a time, save examples of both successful and failed applications, and listen to what the garment tells you. Once your settings, suppliers, and ordering process become repeatable, heat transfers stop feeling like trial and error and start functioning like a reliable production system.
Lion DTF Transfers offers ready-to-press DTF transfers, custom gang sheets, UV DTF stickers, and pressing support for apparel projects of different sizes. Visit Lion DTF Transfers to upload your artwork, build an efficient gang sheet, and order transfers for your next test or production run.