










DTF is water-based ink printed on PET film and heat-pressed onto fabric, and local pricing can start at $0.017 per square inch with 24-hour printing and same-day pickup options. For a small Lexington order, it's usually the quickest way to get detailed artwork onto cotton, polyester, or blends without committing to a large screen-printing run.
You're probably looking at a blank stack of shirts, a deadline that's closer than you'd like, and artwork that still needs arranging. Maybe you're preparing for a craft fair, outfitting a school group, testing a merch idea, or replacing a design that didn't print cleanly the first time. The transfer itself is only part of the job. You also need the right file, placement, fulfillment lane, gang-sheet layout, and press process.
Lexington buyers have several practical options, from local studios and pickup counters to shipped transfers and owned equipment. This guide gives you the workflow I'd recommend at a print-shop table: choose the method, prepare the file, build the sheet efficiently, select fulfillment, and press the garment so the result holds up.
What DTF Transfers Are and Why Lexington Buyers Use Them
DTF, or Direct-to-Film, uses water-based ink jetted onto PET film, followed by hot-melt adhesive powder, then heat-pressed onto fabric. The transfer carries the complete image, including its white underbase, so you aren't weeding vinyl or pretreating a shirt as you would with some other decoration methods.
That matters for Lexington makers because the same basic process works across cotton, polyester, blends, and dark garments. A detailed illustration, small lettering, gradient, or multicolor logo can move from a prepared file to a press-ready transfer without the color limitations and setup burden associated with a traditional screen-printing run.
Local pricing can start at $0.017 per square inch, with 24-hour printing and same-day pickup options available. Check the final quote carefully, because the square-inch rate isn't the whole order. Rush handling, shipping, pickup, artwork services, and the amount of unused film can change the final cost.
Why DTF fits short Lexington runs
DTF is a strong choice when you need small quantities, detailed artwork, or multiple designs without ordering a large batch. A craft-fair seller may need several different graphics. A boutique owner may want to test a design before putting it into regular inventory. A team or school may need names, logos, or variations that would make screen setup cumbersome.
The local labor market also gives Lexington a substantial regional customer base. The Lexington-Fayette civilian labor force reached 282,465 people in 2025, up from 278,555 in 2024 and 272,356 in 2023, according to BLS labor-force data reported by FRED. That doesn't tell you which decoration method to choose, but it does help explain why local demand spans small creators, businesses, teams, events, and print professionals.
Shop-floor rule: Choose DTF when your artwork is complex and your run is modest. Choose another method when its specific strengths, such as embroidery texture or high-volume screen printing, matter more than speed and flexibility.
The rest comes down to execution. A good file and a clean press matter more than the word “DTF” on the invoice.
Where to Order DTF Transfers in Lexington
Lexington buyers generally choose among local print shops, online transfer specialists, and in-house DTF equipment. None is automatically best. Your deadline, quantity, available workspace, and tolerance for troubleshooting should decide.
| Lane | Best For | Turnaround | Trade-Off |
|---|---|---|---|
| Local print shop or studio | Small batches and urgent pickup | Same-day or short local turnaround, when offered | Pickup depends on shop hours and capacity |
| Online specialist | Broader size and transfer choices | Ships to your address, with transit time added | You lose local pickup and take on carrier risk |
| In-house printer | Established shops with steady production | Controlled by your own queue | Equipment, maintenance, humidity, and learning are your responsibility |
A local studio is my first recommendation for a maker who needs a short run quickly. You can ask questions before production, clarify the garment and placement, and collect the transfers without waiting for a carrier. A Lexington print studio lists no minimum order requirement and offers DTF apparel at its Fayette Mall location, Suite A-130, 3401 Nicholasville Road, Lexington, KY 40503, with hours listed as Monday through Saturday, 10:00 a.m. to 8:00 p.m., and Sunday, 12:00 p.m. to 6:00 p.m. Verify availability before driving over through the Lexington print studio's current location and hours.
Match the lane to the job
Online ordering makes more sense when you need unusual sizes, repeatable reorders, or a selection that local counters don't stock. Read the proof carefully and allow time for transit. “Printed quickly” doesn't mean “in your hands quickly.”
Buying a printer outright is a different business decision. It can suit an established shop with dependable weekly demand, but the machine is only the beginning. You'll need room for film, powder, curing, maintenance, ink handling, humidity management, and failed test prints. Don't buy equipment just to avoid placing a small transfer order.
For a useful overview of what customers typically mean by local DTF service, compare the custom DTF transfers near me guide with the actual shop's proofing, and reprint policies. Ask who handles color questions, what file format they prefer, and whether a rush promise applies to printing only or to completed pickup.
Preparing Print-Ready Files That Actually Print Right
Most rejected DTF files fail before the printer ever starts. The dependable starting point is a PNG with a transparent background, 300 DPI at the final placement size, and CMYK color mode. Remove extra canvas, unnecessary bleed, and hidden objects that can confuse the RIP software.
CMYK is the practical working space for this workflow. A late CMYK conversion can make bright colors look dull or muddy on film, especially when the original artwork was built for a screen. Send the file in the color mode your printer requests, and ask how the shop handles conversion rather than guessing.
Clean the artwork before upload
Flatten the visible artwork once the design is approved, but keep the transparency clean. Flattening prevents stray hidden layers from being interpreted as unintended shapes, while a transparent background stops the printer from producing a box around a logo or illustration.
Use these fixes for common problems:
- Convert text to outlines: Fonts can substitute or shift when the shop opens your file. Outlining locks the letterforms into the artwork.
- Expand strokes: Very thin lines may disappear during printing, powdering, or pressing. Expanding strokes gives delicate details a usable filled shape.
- Leave the white underbase to the printer: Don't bake a white layer into the art unless the shop specifically asks for one. The printer's RIP and workflow should create the underbase for the garment and artwork.
- Export at final size: A tiny file enlarged for a large hoodie print will show soft edges. A large canvas with the design occupying only a small corner also creates confusion about intended dimensions.
- Check transparency at the edges: A faint halo, semi-transparent shadow, or accidental background pixel can become visible after pressing.
Before you upload: Open the PNG over a dark background, confirm the intended width, and inspect small text at actual print size. A file can look perfect while zoomed in and still be unusable on a shirt.
The pre-upload check
Confirm the artwork is CMYK, transparent, flattened, correctly sized, and free of hidden elements. If the transfer will be mirrored for a particular application, follow the printer's instructions rather than mirroring automatically. Most apparel artwork is supplied readable as viewed, but specialty applications can differ.
A quick proof is cheaper than a replacement garment. This is especially important when you're paying by square inch and using the $0.017 per-square-inch entry price, because a rejected sheet still consumes time and production capacity. The technical behavior of DTF ink also depends on controlled viscosity and particle dispersion, as described in this DTF ink technical data sheet.
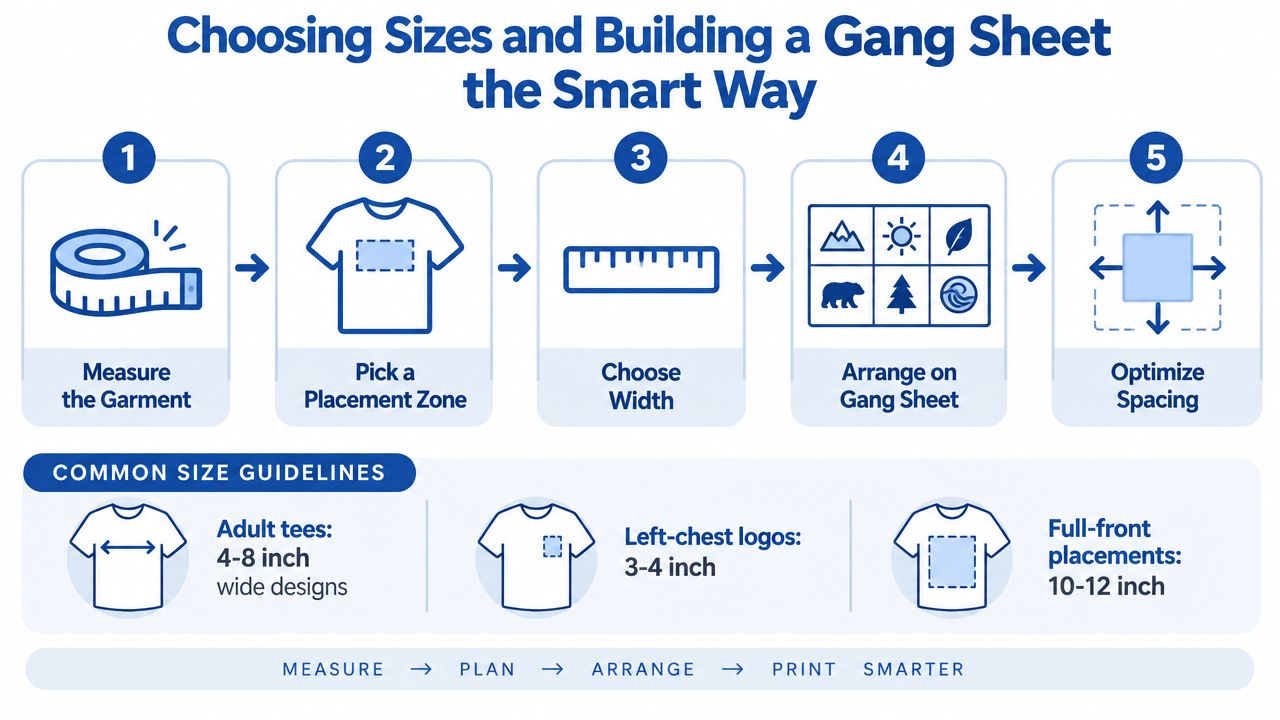
Choosing Sizes and Building a Gang Sheet the Smart Way
Measure the garment first. Don't size the design based on the empty film area or the dimensions of the file window. A design that looks balanced on a monitor can overwhelm a small tee or disappear on a large hoodie.
For common apparel placements, use these starting points:
- Adult tees: 4 to 8 inches wide for a standard front design.
- Left-chest logos: 3 to 4 inches wide.
- Full-front hoodie placements: 10 to 12 inches wide.
Those are working ranges, not laws. Hold a paper mockup against the garment before ordering if the placement carries the identity of the brand, team, or event.
Build the sheet without creating a cutting problem
A gang sheet lets you combine designs on shared PET film instead of ordering every transfer separately. A common layout uses a 22 by 36 inch sheet, but the best sheet depends on your artwork and the printer's available widths. Leave a quarter-inch margin around every cut edge, and keep designs at least one-eighth inch apart so a knife or scissors can separate them without clipping the adhesive area.
For small orders of 5 to 20 pieces, a 12 by 12 inch sheet often makes more sense than a full-roll layout. The per-square-inch rate becomes more useful as you fit more sellable artwork onto the same film, and the exact break-even point depends on the shop's pricing and your design sizes.
The easiest route is an Auto-build gang sheet builder. Upload transparent PNGs, choose the sheet width, and let the builder arrange, rotate, and gap the designs. That removes the layout work and helps prevent the two expensive mistakes I see most often, oversized empty space and artwork packed too tightly to cut.
Use the DTF gang sheets guide when you're deciding whether to order individual transfers or combine several graphics. For a first order, prioritize clean cutting and usable placement over squeezing every last inch.
Shipping, Next-Day Air, and Same-Day Pickup Options
Your fulfillment choice should follow the event date, not the seller's most attractive production promise. A transfer printed today still has to travel, arrive, get inspected, and reach the heat press.
| Lane | Typical Turnaround | Best For | Cost Notes |
|---|---|---|---|
| Standard ground shipping | 2 to 4 business days | Planned orders without a hard deadline | Usually the lowest shipping cost, but transit adds uncertainty |
| Next-day air | Next business day after dispatch | School events, Saturday markets, and hard deadlines | Shipping costs more, but protects the calendar |
Standard ground shipping from regional printers is the sensible default when you have breathing room. Transfers remain in transit while your cash and production schedule wait, so don't use ground for an event you can't reschedule.
Next-day air is the insurance option for a fixed deadline. It may cost substantially more than ground, but a missed event can cost more than the shipping upgrade. Confirm the cutoff, dispatch time, and whether the promise covers production, shipping, or arrival.
Keep the artwork press-ready and the quantity modest. For larger jobs, ask for a realistic production schedule instead of forcing a same-day promise. The BLS Lexington metro page reports a 3.4% unemployment rate in April 2026, with 3.7% in February and March 2026 and 4.4% in July 2026, alongside a labor force rising from 277.6 thousand in February to 285.8 thousand in July. That data describes the region's employment environment, not printer capacity, so use it only as context for Lexington's role as a busy regional market.
Pressing and Washing So Prints Actually Last
The heat press decides whether a transfer bonds properly. Use a flat heat press, not a household iron, and make sure the platen closes evenly across the entire design. A quick pre-press also removes moisture from the garment, which helps prevent streaking and weak adhesion.
For the common starting settings in this workflow, press cotton at 280°F and polyester blends at 260°F. Use 10 seconds with medium-firm pressure, then wait 5 to 10 seconds before a warm peel if the film instructions call for it. Hot-peel film should be removed immediately while it's still hot, so always follow the supplier's film specification rather than applying one peel rule to every transfer.
A reliable pressing sequence
- Pre-press the garment: Remove moisture and flatten the application area.
- Position the film: Place the printed side and adhesive against the garment as directed, checking that the design is straight.
- Apply firm, even pressure: A partially covered design won't bond consistently.
- Peel according to the film: Use warm peel, cold peel, or hot peel based on the supplied instructions.
- Finish with a cover sheet: Place parchment over the design and press for another 5 seconds to reinforce the bond.
The guide to pressing DTF transfers is useful at the press because it keeps temperature, pressure, timing, and peel method together. Test one garment before pressing an entire order. If an edge lifts during the test, fix the pressure or temperature before wasting the rest of the batch.
Washing is part of the process
Turn garments inside out and wash with cold or warm water. Skip bleach and fabric softener, and keep high-heat tumble drying away from the print. Hang drying or low heat is kinder to both the transfer and the garment fibers.
Independent durability guidance reports that properly applied DTF transfers can last 50 or more wash cycles, with many exceeding 70 to 80 washes, depending on fabric and care. The same guidance lists 50 to 80-plus washes on cotton, 50 to 70 on polyester blends, 40 to 60 on 100% polyester, and 30 to 50 on technical fabrics in its DTF transfer durability guide. A separate 100-wash DTF test report says its transfer stayed bright and intact after 100 wash cycles without cracking, peeling, or fading.
Costs, Turnaround, and a Quick Pre-Order Checklist
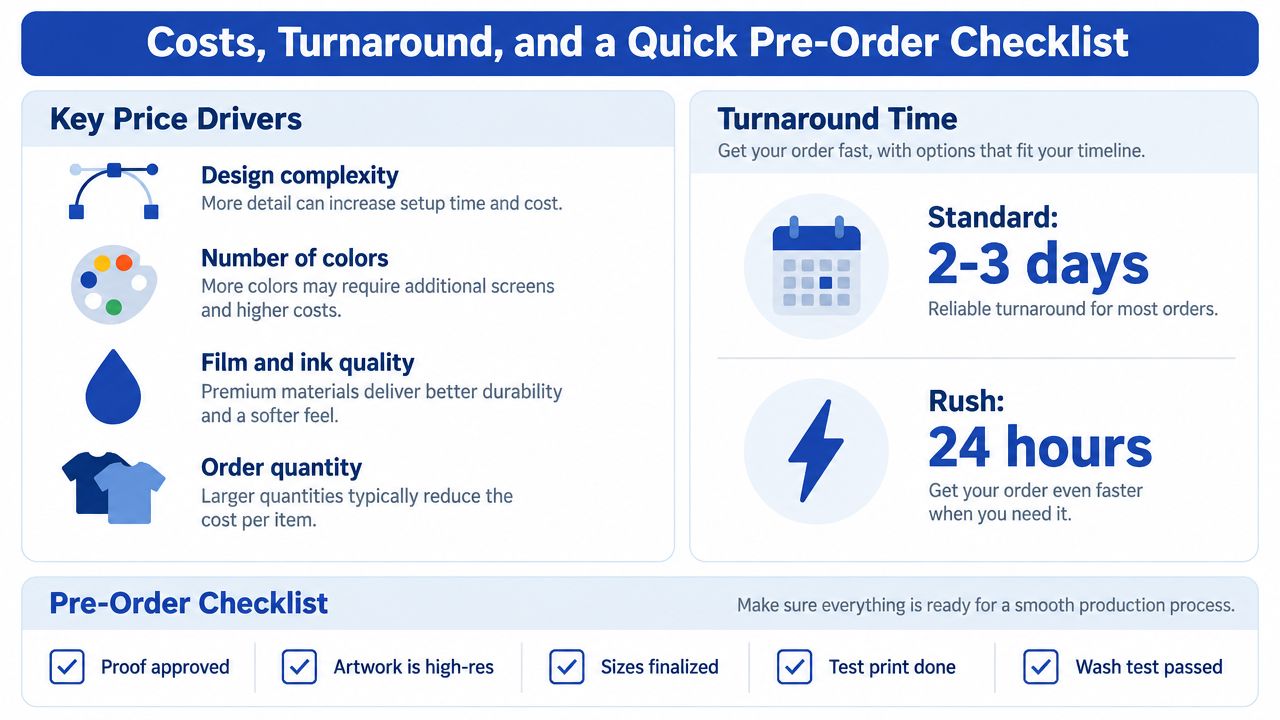
The lowest line item does not always produce the lowest finished-garment cost. Start with the artwork's square-inch footprint, then account for unused film, gang-sheet layout, rush handling, shipping, pickup, and a test press. A compact design placed efficiently can cost less than a larger sheet, even when both orders contain the same number of graphics.
Use a worked example before approving the quote. A 10-inch by 8-inch front design placed on a 12 by 12 inch sheet costs about $1.36 per transfer at the entry rate, before rush handling or shipping. Ask whether the price includes layout, cutting, file review, delivery, and rush service. Those details decide whether a low advertised rate remains low at checkout.
Make the choice by deadline and workload
Choose local pickup when shirts must be pressed quickly and you can meet the shop's collection window. Confirm that window before paying. Same-day pickup only helps if the order is ready while the counter is open.
Choose standard shipping when the schedule has room. Choose next-day air when the event date is fixed and a carrier delay would put the job at risk. Owned equipment makes sense only with steady production and the time to manage the full print environment.
The common first-order mistakes are simple:
- Mirroring automatically: Mirror only when the application or supplier requires it.
- Using the wrong color mode: Keep the file in the printer's requested RGB workflow instead of making a last-minute CMYK conversion.
- Sizing from the canvas: Measure the actual design and approve a proof at final width.
- Skipping the test press: Test the garment, pressure, peel, and finish before running the whole order.
- Storing film carelessly: Protect transfers from moisture and humidity, which can affect powder and handling.
- Packing the gang sheet too tightly: Preserve the cutting gap and edge margin.
Run this checklist before submitting
- Proof approved: Review the design on the intended garment color.
- Artwork is high-resolution: Confirm 300 DPI at final placement size.
- Transparency is clean: Remove backgrounds, hidden objects, and accidental halos.
- Sizes are finalized: Record adult front, left-chest, sleeve, or hoodie dimensions.
- Gang sheet is efficient: Use the Auto-build gang sheet builder to arrange designs and reduce wasted film.
- Fulfillment is selected: Confirm pickup, ground shipping, or next-day air against the event date.
- Press plan is ready: Have the correct temperature, pressure, timing, peel method, and parchment.
- Wash test is planned: Test one pressed garment before selling or distributing the batch.
For a first DTF Lexington order, judge the full workflow, not only the quoted rate. A clean file, efficient Auto-build layout, confirmed pickup plan, and disciplined press routine save more money than forcing extra graphics into a poorly arranged sheet.
For fast, color-accurate transfers, gang sheets, and an Auto-build gang sheet builder that handles the layout for you, visit Lion DTF Transfers. Upload your artwork, order by size or sheet, and choose the printing and fulfillment option that fits your Lexington deadline.
Email orders@LionDTF.com or Text or Call: 833-350-5466