










You're comparing a DTG quote with pre-treatment, calculating how long HTV will take to weed, and looking at screen-print setup costs before you've even made the first shirt. You need full-color artwork, a flexible fabric choice, and a process that won't force you into a large production run.
DTF transfers often fit that middle ground. A supplier prints the design onto PET film, applies a hot-melt adhesive powder, and sends you a ready-to-press graphic. You supply the garment and heat press the transfer onto it. That distinction matters: DTF, or Direct to Film, is a transfer method, not a type of shirt.
The process is quick to learn, but the result depends on more than the artwork. Film construction, powder curing, fabric type, pressing temperature, pressure, peeling method, and washing habits all affect performance. The easiest path to consistent results is to choose the right transfer format, prepare the file carefully, and use an Auto-build gang sheet builder when you have multiple designs to arrange.
What DTF Transfers Are and Why They Took Off
A DTF transfer starts as a digital design, not as a finished garment. The printer lays down color onto coated film, adds a white underbase where needed, and bonds adhesive powder to the ink. You then position the finished transfer on a shirt, tote, sweatshirt, or other compatible item and activate the adhesive with a heat press.
That workflow solved several practical problems for creators. You don't need to weed each letter by hand as you would with HTV, and you don't need screens, emulsion, or a large setup for a short run. DTF can also reproduce photographic artwork and detailed gradients across cotton, polyester, blends, and many performance fabrics.
Production rule: DTF is only as reliable as the supplier's printing and curing process, plus your application settings.
The technology became a mainstream textile-decoration method in the mid-2020s. Market reporting placed the global direct-to-film printing market at about USD 2.72 billion in 2024, with a projection of about USD 2.93 billion in 2025 and USD 3.92 billion by 2030, according to the State of the DTF Market Report 2025. Another market summary estimated that more than 7.2 billion DTF prints were produced globally in 2024, almost 30% higher than the prior year, showing how quickly the workflow expanded.
Why creators adopted the method
DTF answered a common production mismatch. Screen printing can be efficient for large, repeatable runs, but setup becomes harder to justify for small batches or multiple designs. HTV works well for simple one-off graphics, but cutting and weeding detailed artwork consumes time. DTG offers direct full-color printing, yet it generally requires more specialized equipment and garment preparation.
DTF offers a practical alternative:
- Full-color artwork: Photos, gradients, small details, and multicolor illustrations can be transferred without manual weeding.
- Broad fabric compatibility: Cotton, polyester, blends, and performance garments can all be candidates, provided the transfer and settings suit the material.
- Flexible quantities: You can order individual graphics or combine designs on one gang sheet.
- Soft, flexible finish: A correctly processed transfer uses a thin adhesive layer that bends with the garment.
- Low equipment burden for the buyer: You need a suitable heat press, but you don't need to own the printer or curing system.
DTF still has limits. A dark polyester garment may show weak white underbase opacity if the supplier under-cures or the application settings are wrong. The transfer also requires controlled heat and pressure, so a household iron isn't the same as a calibrated heat press. DTF is best understood as a flexible middle option between HTV labor and screen-print setup, not as a universal replacement for every decoration method.
How DTF Transfers Actually Work
The finished transfer is a small production stack. Each layer has a job, and a weakness in one layer can show up as poor coverage, cracking, peeling, or an uneven surface.
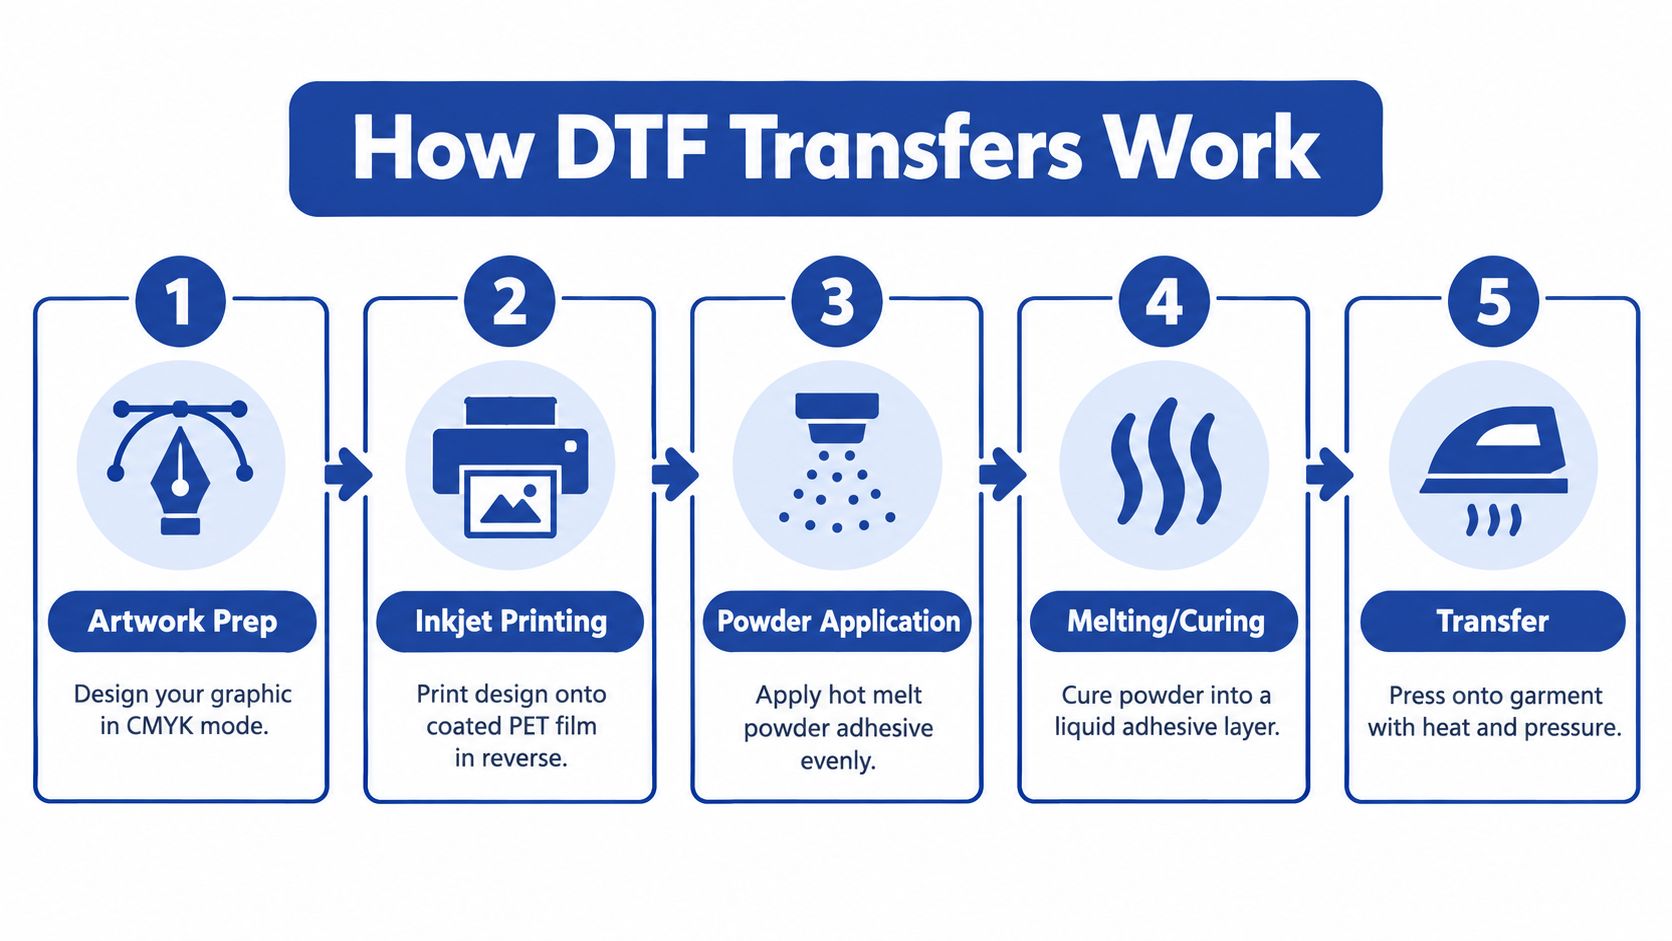
The artwork is prepared for printing and sent to a modified inkjet system. The machine prints the image in reverse onto coated PET film, usually placing CMYK color layers and a white layer in the sequence required by the printer's RIP software. Reversing the image means the design faces the garment correctly after you turn the transfer over for pressing.
The adhesive layer controls the bond
While the printed ink is still ready to receive powder, the supplier applies a hot-melt adhesive. This powder is commonly based on polyurethane or copolyester. It must cover the wet image evenly, without leaving bare areas or creating heavy clumps around fine details.
The coated film, printed image, and adhesive layer then pass through a curing stage. Heat melts the powder into a continuous TPU-like adhesive film. During pressing, that layer melts again, flows into the garment surface, and bonds as it cools.
Technical references describe carrier film around 75 micrometers for finer detail or 100 micrometers for heavier white builds. They also describe adhesive melt onset around 110 to 130°C and cured TPU elongation of at least 300%, which helps explain why a properly processed transfer can flex with fabric rather than immediately cracking. These material details are discussed in this technical guide to DTF film thickness and selection.
Press settings turn the film into a garment print
Application windows vary by transfer construction and fabric, but independent application guidance commonly clusters around 150 to 165°C for 10 to 15 seconds at medium to firm pressure. A separate technical baseline describes 145 to 155°C for about 10 seconds at medium-to-high pressure. The exact supplier instructions should take priority because film, powder, ink load, and curing can differ.
The press supplies enough heat to re-melt the adhesive. Pressure pushes the design into contact with the garment, and cooling lets the adhesive lock around the textile surface. Hot-peel and cold-peel films change the workflow and can affect the surface gloss and hand feel, so confirm which type you received before lifting the film.
For a supplier-side explanation of the layers and sequence, see how DTF transfers work. The visible result should be a detailed, flexible print, but that result depends on correct curing before the transfer ever reaches your press.
DTF vs DTG, HTV, and Screen Printing
Choosing a print method gets easier when you compare the whole workflow rather than only the finished appearance. DTF shifts printing and curing to the supplier, while the buyer handles placement and pressing. DTG prints directly onto the garment, HTV cuts a film that you weed and press, and screen printing pushes ink through prepared screens.
| Method | Setup Cost | Fabric Range | Detail/Color | Durability | Best Run Size |
|---|---|---|---|---|---|
| DTF | Heat press required, no screens or garment pre-treatment for the buyer | Cotton, polyester, blends, nylon, and performance wear, with testing for specialty fabrics | Photographic detail, gradients, and full color | Flexible and durable when correctly cured and pressed | 1 to 500 |
| DTG | Direct-to-garment printer and pre-treatment equipment | Favors high-cotton garments | Photographic detail and full color | Strong on suitable garments, with fabric and pre-treatment affecting results | Short to medium runs |
| HTV | Cutter, transfer film, and manual weeding | Broad, but some nylons require specialty materials | Solid shapes and vector artwork, with limits on fine detail | Can be durable, though thickness and edges remain noticeable | One-offs and very small runs |
| Screen printing | Screens, emulsion, setup, and drying equipment | Excellent on cotton, with specialty inks for polyester | Strong spot colors and bold artwork | Very durable when properly printed and cured | Larger repeat runs |
Where DTF earns its place
DTF handles the kind of design that makes HTV slow: a detailed illustration with several colors, small lettering, and a white edge on a dark shirt. It also avoids the direct-to-garment limitation of printing ink into the fabric itself. That makes DTF useful when you need one design across different garment compositions.
DTG can offer a natural printed feel on appropriate cotton garments, but the garment usually needs pre-treatment and careful curing. Screen printing can deliver an excellent result on a large repeat order, yet each additional design, color, and placement adds setup considerations.
Compared with HTV, DTF is generally thinner and less labor-intensive for detailed graphics. Compared with many screen prints, it can feel softer and more flexible, although screen printing remains compelling for bold graphics and established high-volume production. This DTF and DTG comparison covers the practical distinction between printing onto film and printing directly onto fabric.
A simple decision rule works well:
- Choose HTV for a one-off name, number, or simple logo.
- Choose DTF when you need detailed color, mixed fabrics, small batches, or fast design changes.
- Choose DTG when you have suitable cotton garments and want direct garment printing.
- Choose screen printing when you have a repeatable design and enough volume to justify setup.
The run-size ranges above are useful working guidance, not a guarantee. Your supplier's pricing, equipment, artwork, and deadline can move the decision.
Ordering Transfers, Gang Sheets, and File Prep
A first-time order goes more smoothly when you decide the finished print size before choosing the sheet. A small chest logo, A4 graphic, A3 front print, and full-sheet design fit different garment placements. One design may be easiest to order as an individual transfer. Several designs can share a gang sheet, giving you better control over the film area you purchase.
Prepare each file before uploading:
- Use a transparent PNG: Remove mockups, shirt backgrounds, shadows, and hidden white rectangles.
- Work at 300 DPI: Match the resolution to the intended physical size. Raising the setting on a low-resolution file will not restore lost detail.
- Confirm color handling: Follow the provider's requested color workflow. Bright screen colors may print differently in physical ink.
- Set the scale deliberately: Measure the garment's print area, then size the artwork before placing it on the sheet.
- Inspect fine details: Tiny text, hairline outlines, and compressed web images can appear clear on screen yet fail in production.
The easiest route for many first-time buyers is an Auto-build gang sheet builder. Select the available sheet size, upload the designs, and let the tool arrange them to reduce unused space. Review the result before checkout. Each design still needs a clean cutting channel, and artwork must not overlap.
Why layout changes the cost
A gang sheet is priced by total sheet area, not by the number of designs. One supplier's published sheet pricing lists 22 by 24, 22 by 48, and 22 by 96 inch sheets at roughly $0.053, $0.045, and $0.040 per square inch, respectively, as shown by RollDTF's gang sheet pricing. Treat those figures as an illustration of volume pricing, not as market averages. Tighter, sensible packing can lower the effective material cost of each graphic.
Do not fill every gap so tightly that cutting becomes uncertain. Place the largest designs first, then use safe open areas for sleeve marks, pocket logos, labels, or smaller graphics. Before submitting, review the custom DTF transfer ordering guide to check file requirements and order format.
Pressing and Caring for DTF Transfers
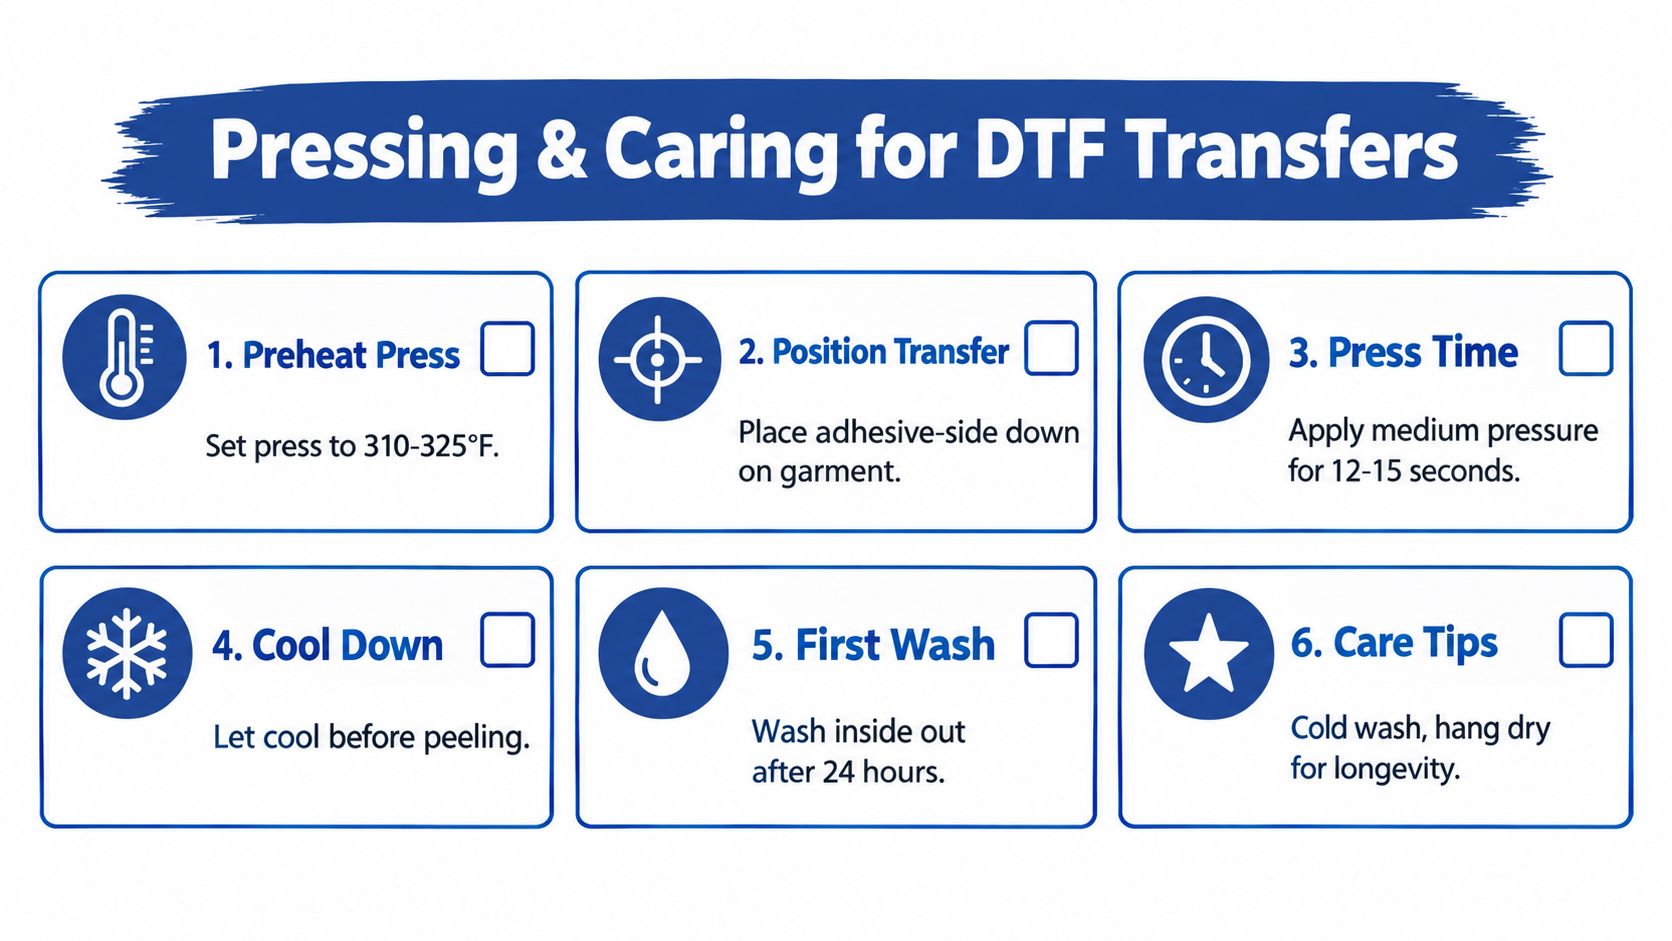
A good transfer can still fail if the press never reaches the adhesive correctly. Start with a clean garment, remove lint, and pre-press briefly to flatten the surface and release moisture. Place the transfer with the adhesive side against the garment, then apply even pressure across the full design.
For a general cotton starting point, set the press between 310 and 325°F, use medium pressure, and press for 12 to 15 seconds. These settings align with common practical guidance, but the supplier's instructions should override a generic baseline. A poorly cured transfer may peel early, while excessive heat can make the bond brittle or affect the garment.
Use the peel type as part of the process
After pressing, follow the film instructions. A hot-peel film can be lifted while warm and may produce a different surface feel from a cold-peel film, which must cool before removal. If you peel at the wrong time, you can lift parts of the design before the adhesive has secured itself.
After removing the film, cover the design with parchment or another approved protective sheet and repress for about 5 seconds when the supplier recommends it. This second pass helps settle the adhesive into the fabric and smooths the finish.
For polyester, lower heat may help reduce scorching or dye migration. Practical guidance often places polyester around 285 to 300°F, while tri-blends may need a shorter dwell time. Test unfamiliar garments before producing a customer order.
Wash the finished garment inside out in cold water. Avoid bleach and fabric softener, use low heat or hang drying, and don't iron directly over the transfer. Independent guidance reports a wide range of real-world outcomes, from peeling after 5 washes after poor pressing to lasting through 80 or more washes on cotton with correct application and cold-care routines, as outlined in this DTF durability guide. The variation is why the press record and care label matter more than a broad durability promise.
Real Cost Breakdown for Gang Sheets and Singles
A DTF order is priced by the printable area you buy, not by how complicated the artwork feels. A simple logo can become expensive when it sits alone on a large sheet with unused space around it. An Auto-build gang sheet builder reduces that waste by arranging several graphics into one workable layout, giving a first-time buyer a clearer path to professional results.
The pricing example cited in the ordering section shows how larger sheets can reduce the material rate. It demonstrates the calculation method, not a universal price list. Supplier rates, minimums, shipping, and artwork requirements still vary.
| Format | Example calculation | What the math helps you judge | Best fit |
|---|---|---|---|
| 22 by 24 inch gang sheet | 22 × 24 × $0.053, about $27.98 | Total material cost before garments and labor | Mixed designs and short apparel runs |
| 22 by 48 inch gang sheet | 22 × 48 × $0.045, about $47.52 | Whether extra layout space lowers the cost per usable graphic | Reorders and broader SKU mixes |
| 22 by 96 inch gang sheet | 22 × 96 × $0.040, about $84.48 | Whether a planned batch can use most of the sheet | Larger production batches |
| Single transfer | Supplier-specific size and rate | The convenience cost of ordering one defined graphic | One-offs, samples, and replacements |
A sheet total becomes useful only after you divide it by the graphics you can cut and press. For example, eight designs sharing a 22 by 48 inch sheet would put the material at about $5.94 per design before blanks, pressing, shipping, packaging, or failed applications. If the layout uses only half the sheet, the effective cost per usable graphic rises because the unused area still has to be purchased.
When a gang sheet makes sense
Gang sheets work well when an order contains several front logos, back graphics, sleeve marks, names, or size variations. Instead of paying separate handling and material charges for every design, you combine compatible artwork into one printable area and divide the sheet cost across the finished pieces.
The Auto-build builder helps most when artwork sizes differ. Place the large back print first, then fill suitable spaces with chest marks, sleeve logos, or labels. Keep enough separation for cutting and pressing. Packing every corner can create more errors than savings, especially when small transfers are difficult to weed, handle, or position.
Choose a single sheet when the design is one-off or when speed matters more than material efficiency. Choose a gang sheet when the graphics share a production run and the layout can be used without forcing awkward placements.
Best Use Cases for Different Buyers
The right DTF format depends on how often you produce, how much artwork changes, and how hard the garments will be used. A hobbyist making one sweatshirt has a different risk profile from a team coordinator ordering names and numbers for repeated washing.
| Buyer Profile | Recommended Format | Typical Run Size | Key Benefit |
|---|---|---|---|
| Apparel shop | Mixed gang sheets and repeat-size transfers | Short to medium production runs | Quick reorders and flexible garment choices |
| Merch seller or Etsy shop | Auto-build gang sheets | Small drops and mixed SKU batches | Combines designs while reducing wasted sheet area |
| School, sports team, or club | Individual names, numbers, and grouped sets | Variable team or event orders | Handles unique graphics without screen changes |
| Hobby crafter | Singles or small gang sheets | One-offs and personal projects | Gets finished graphics without owning a DTF printer |
| Event or small-run brand | Gang sheets for campaign artwork | Samples, launches, and limited collections | Tests colorways and placements before scaling |
| Promotional product company | Planned gang sheets with repeat placements | Short to medium branded runs | Supports multiple client graphics in one workflow |
Shops and merch sellers
An apparel shop benefits when a customer wants a fast reorder in a new garment color or a small quantity of a new design. DTF lets the shop hold printed transfers rather than committing every design to a screen setup. For merch sellers, the Auto-build gang sheet builder is useful when a drop includes several related graphics, because one sheet can contain the front, back, sleeve, and label artwork.
If you sell mixed sizes or colorways, name each file clearly before uploading. A clean naming system reduces the chance of pressing the wrong design onto the wrong blank.
Teams, schools, and clubs
Names and numbers create a strong DTF use case. Each player may need a different name, number, or position mark, making traditional screen setup impractical for the full set. Arrange those unique pieces on a gang sheet, leave safe spacing for cutting, and group them by garment or wearer before pressing.
Performance wear deserves extra testing. Polyester can respond differently to heat, and dye migration may affect light-colored transfers. Approve one sample before pressing a complete order.
Crafters and small brands
A home heat press owner can use ready-to-press transfers for sweatshirts, totes, caps, and other projects without buying ink systems or maintaining a printer. A small brand can also test a collection with samples before committing to a broader production method.
Match the provider tier to the consequence of failure. A flexible personal project can tolerate experimentation. A dated event, uniform order, or customer launch needs clearer guidance on curing, peel type, replacement policy, and delivery timing. Some current market coverage describes the DTF market as splitting between low-cost commodity providers and premium, value-added workflows, with ready-to-press demand and specialty effects contributing to projected 2026 interest, as discussed in this DTF design market overview.
FAQs and Your Next Step
Do I need to order a large quantity?
No. You can order individual transfers for a one-off project or use a gang sheet when you have several graphics to combine. The economical choice depends on how much printable area you can use, not just on the number of designs.
What file should I upload?
Use a transparent PNG prepared at the requested physical size and resolution. Check the color workflow, remove hidden backgrounds and mockups, and inspect small text before uploading.
Can DTF transfers go on any fabric?
DTF works across many cotton, polyester, blended, nylon, and performance garments, but compatibility isn't automatic. Polyester may need lower heat, tri-blends may need adjusted dwell time, and specialty fabrics should be tested before a production run.
How long will the print last?
Durability varies with powder curing, press temperature, pressure, fabric, washing, and drying. Independent guidance reports outcomes ranging from peeling after 5 washes after poor application to 80 or more washes on cotton with correct pressing and cold-care routines, so treat supplier settings and a test garment as essential rather than relying on one headline claim.
Will the colors match my screen?
Not perfectly in every case. Screens emit light, while transfers use physical pigment, so bright RGB colors may shift during production. For important brand colors, request the supplier's color guidance and approve a sample before a larger order.
Choose gang sheets for mixed SKUs, singles for one-offs, and standard sizes when you already know the placement. Before checkout, confirm the actual print dimensions, transparent background, resolution, garment type, press temperature, dwell time, and peel method. The Auto-build gang sheet builder is the simplest route when you need to arrange several designs without manually calculating every gap.
Upload your artwork to the builder when layout efficiency matters, or browse standard transfer sizes when the project is straightforward. A careful file and a controlled press will do more for the finished garment than choosing a sheet solely because its advertised price looks low.
Lion DTF Transfers offers custom DTF transfers by size, ready-to-press gang sheets, an Auto-build gang sheet builder, and support for preparing artwork and pressing finished designs. Visit Lion DTF Transfers to upload your artwork for a mixed layout or choose a standard size for your next project.