










A Honolulu event is days away, the artwork is ready, and the question is simple but urgent: who can turn that colorful design into wearable merchandise without making you wait for a mainland shipment? A local maker might need tote bags for a pop-up, a school might need team shirts, or a small shop might be testing a seasonal logo with a short run. In each case, DTF Honolulu decisions come down to more than finding a printer. You need the right decoration method, accurate files, dependable pressing, and a fulfillment plan that fits island timelines.
Introduction to DTF Honolulu for Makers and Businesses
Honolulu buyers serve a wide mix of customers. Small brands create limited merch collections, tourism businesses refresh designs for visitors, schools and teams order branded apparel, and hobby makers press one-off pieces at home. Those projects often share the same challenge: the artwork may be detailed, the quantity may be modest, and the deadline may be close.
That's where direct-to-film printing, usually called DTF, fits well. Instead of printing ink directly onto the finished garment, a provider builds a transfer on film. You can then apply that transfer to a compatible shirt, hoodie, tote, or other fabric with a heat press. The approach supports full-color designs and avoids the large setup commitment that can make some traditional methods less practical for short runs.
Honolulu also has a large service-oriented customer environment. The Honolulu metropolitan area had a civilian labor force of 476,179 people in 2025, compared with 472,137 in 2024 and 470,210 in 2023, according to the Federal Reserve's Honolulu labor-force series. The same source lists a 2.8% unemployment rate in July 2026 and total nonfarm employment of 457.2 thousand, figures that help explain why local events, retail activity, hospitality, and service businesses create ongoing demand for branded apparel.
This guide follows the practical path from idea to finished garment. You'll learn what DTF transfers are, when DTF makes more sense than screen printing, DTG, or embroidery, how to use a gang sheet, how to prepare files, how humidity and fabric affect pressing, and how to think about pickup versus mainland shipping. Local fulfillment options such as Lion DTF Transfers can be part of that plan, but the useful decision starts with understanding the production process.
For a deeper introduction to transfer basics, see this guide to DTF transfers.
What DTF Transfers Are and How They Work
A Honolulu shop preparing ten colorful event shirts can print the artwork on film first, then press each finished transfer onto a compatible garment. The result is a thin decoration that works somewhat like a professionally made sticker, with heat and adhesive powder bonding it to the fabric.
The process starts with a digital image. A printer sends a mirrored CMYK image to PET film and adds a white underbase. Mirroring places the design correctly when the film is pressed face down. The white layer provides an opaque foundation, especially on dark garments, so the shirt color does not visually interfere with the printed colors.
Core idea: DTF puts the color on film first, not directly onto the shirt. Heat transfers that finished image from the film to the fabric.
After the color and white layers are printed, thermoplastic polyurethane hot-melt powder is applied to the wet ink. The powder is then fused. During pressing, it softens and bonds the transfer to the garment. The PET film carries the image, while the powder forms the connection between the print and textile. This explanation of how DTF transfers work shows the sequence in more detail.
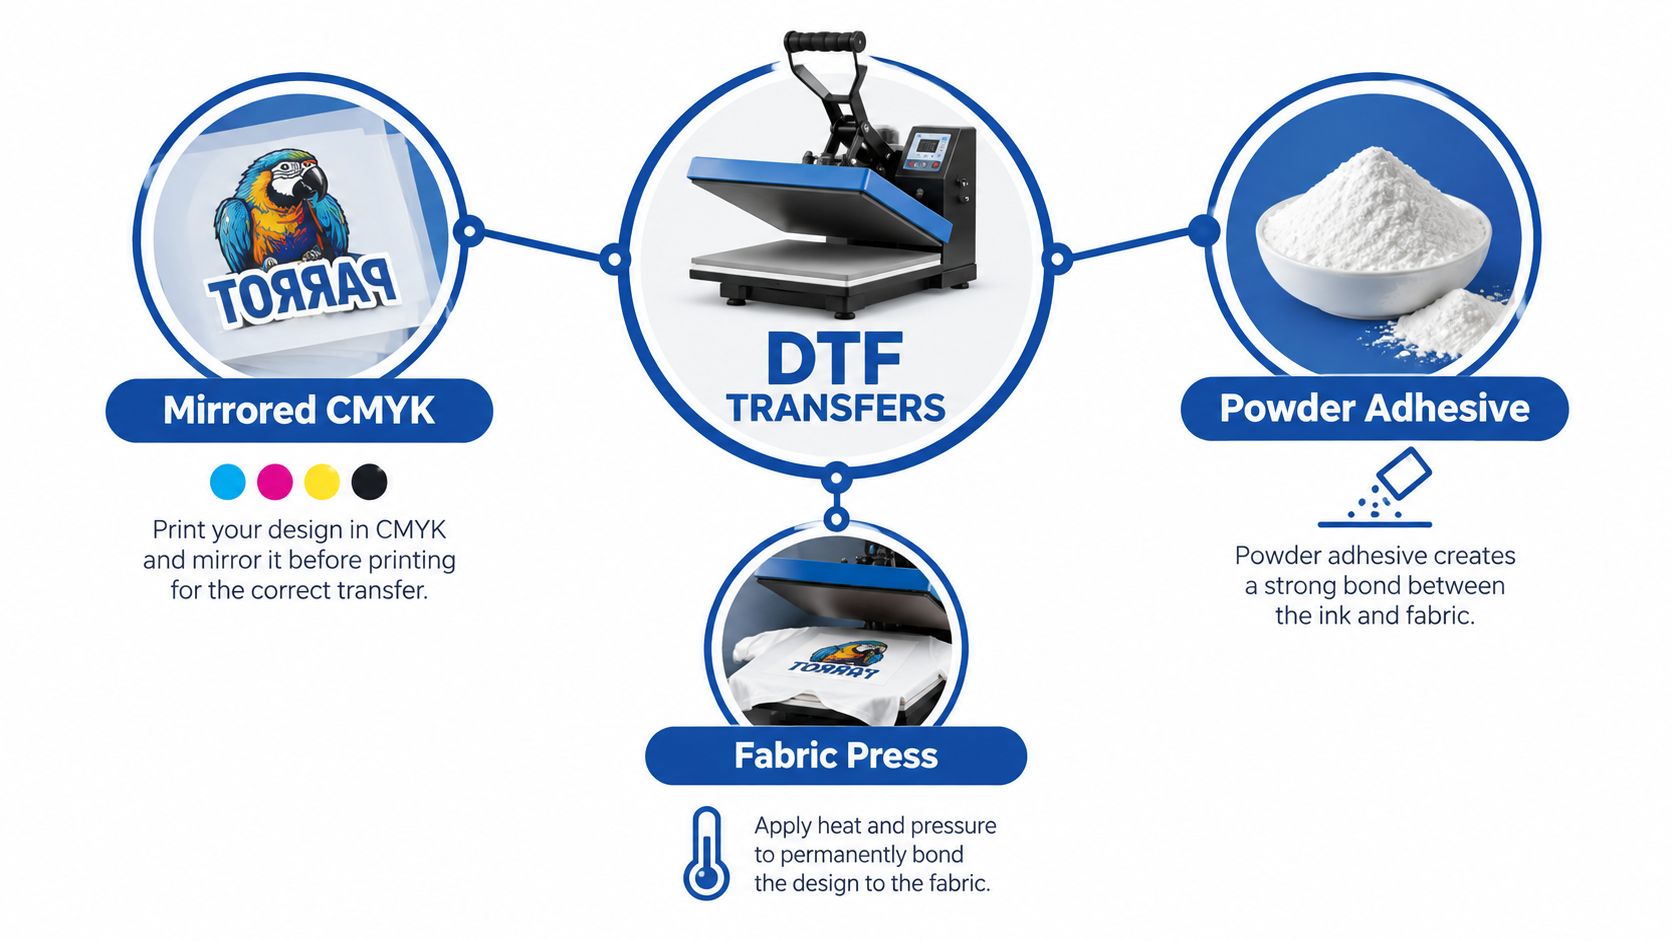
The film serves more than a packaging role. Technical references specify about 75 ± 5 µm film thickness and roughly 89 ± 5 µm total thickness, as shown in this DTF transfer film technical reference.pdf). Film thickness and stability can affect powder coverage, registration, peeling, and how consistently the design releases during a hot-peel or cold-peel workflow.
Fabrics and transfer behavior
DTF suits many projects using cotton, polyester, and blends, including Honolulu shirts and uniforms. Fabric still affects the result. A smooth, stable surface usually makes placement easier, while textured material can make adhesion and edge coverage more demanding. Humidity can also affect how powder and garments handle in the shop, so controlled storage and a fully heated press matter for consistent bonding.
Hot-peel and cold-peel films follow different procedures. Remove a hot-peel carrier soon after pressing. Let a cold-peel transfer cool before removing its film. Follow the supplier's instructions rather than treating every carrier the same.
The working sequence is: mirror the artwork, print CMYK, add white, apply powder, fuse the adhesive, press onto fabric, peel the film, and finish the bond. If a design looks weak, lifts, or shows uneven edges, check these stages one at a time. That approach makes DTF troubleshooting more practical for a Honolulu deadline.
When DTF Is the Right Choice in Honolulu
DTF isn't a cheaper version of screen printing. It's a different production path, with its own strengths and compromises. The best choice depends on the artwork, quantity, fabric, desired feel, and deadline.
A small Honolulu brand testing a colorful logo may prefer DTF because it can reproduce gradients, fine details, and multiple colors without requiring a separate screen for each color. A sports group may use it for names, numbers, and varied artwork. A seasonal event may benefit from ordering only what it needs rather than committing to a large inventory run.
Screen printing can be a strong fit for larger quantities of a simple design. It often produces a familiar printed feel and can make sense when the same artwork will be repeated across a substantial run. DTF tends to be more flexible for short runs and complex images, but the transfer layer can feel different from ink absorbed into fabric.
DTG, or direct-to-garment printing, places ink directly onto the textile. It can suit detailed artwork on compatible garments, especially when the fabric and pretreatment are controlled. DTF separates image production from garment decoration, which can make transfers easier to store, ship, and apply later.
Embroidery belongs in a different category. It's usually a natural choice for caps, polos, uniforms, and classic left-chest branding. It gives a raised stitched appearance, but it isn't ideal for photographic artwork, tiny details, or large soft printed areas.
Choosing based on the job
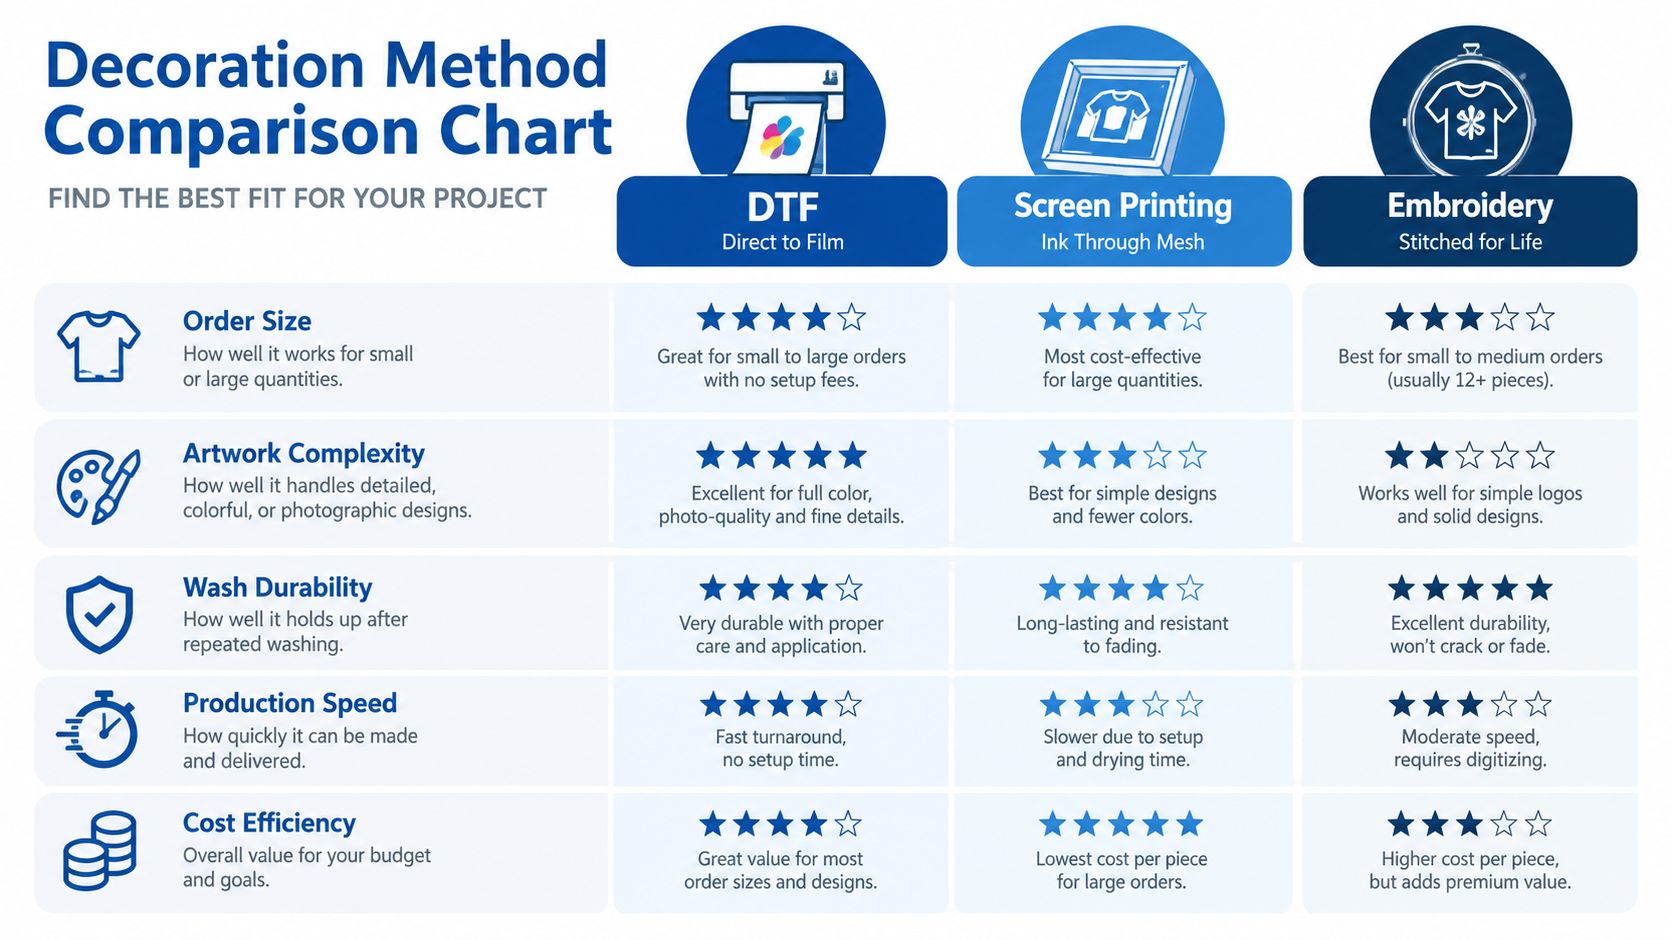
| Method | Best For | Watch Out For |
|---|---|---|
| DTF | Short runs, full-color logos, complex artwork, names, numbers, and quick seasonal merchandise | The printed layer can feel different from screen print, and pressing technique affects the result |
| Screen printing | Repeated designs, bold graphics, and larger production runs | Setup and color separation can be less convenient for small or highly varied orders |
| DTG | Detailed artwork printed directly onto compatible garments | Fabric choice and pretreatment affect the final appearance |
| Embroidery | Caps, polos, uniforms, and traditional logo placement | Fine artwork and large designs may not translate cleanly into stitching |
Local providers sometimes offer multiple methods and may substitute DTG or DTF when an artwork file doesn't meet the requirements for the originally selected process. That makes it important to ask before ordering: Which method will be used, what will the print feel like, and will the shop contact you before changing the production path?
Practical Honolulu examples
Choose DTF when a school needs different player names, a café wants a full-color seasonal illustration, or a small retailer needs a limited run with several designs. Choose screen printing when the artwork is simple and the order is large enough to justify its setup. Choose embroidery for a structured cap or a polished polo logo.
For wash performance, properly applied DTF transfers typically last 50 or more wash cycles, and some can exceed 70 to 80 washes before noticeable wear, according to this DTF transfer durability guide. Care still matters, especially in a warm, humid environment where garments may be washed frequently.
How to Choose a DTF Provider and Save With Gang Sheets
A reliable DTF provider should answer operational questions clearly before taking payment. Ask how the shop handles transparent artwork, whether it can preserve small details, what pressing instructions accompany the transfers, and when your order will be ready for pickup or shipment.
Look closely at the ordering interface. A useful system should let you upload print-ready artwork, order by finished design size, and see how multiple images will fit together. Clear communication matters just as much. If the deadline is tied to a school event, market, tournament, or visitor arrival, “fast” isn't enough. You need a stated production window and a shipping or pickup method that matches it.
Why gang sheets reduce waste
A gang sheet places multiple transfer designs on one larger sheet of film. You might combine a front logo, sleeve mark, staff name, and several small seasonal graphics rather than ordering each image separately. The approach can reduce unused film and make layout preparation more efficient.
Online gang sheet tools can also reduce setup overhead. One pricing comparison lists a pay-per-export model with a direct cost of $0.15 per sheet for one builder, as described in this gang sheet builder pricing comparison. That figure applies to the referenced builder model, not to every provider or to the full cost of printing.
The Auto-build gang sheet builder is useful when you don't want to drag and resize every image by hand. Upload your artwork, allow the Auto Builder to arrange the designs for efficient use of the sheet, review the layout, and export it for production. That combination of ease of use and cost effectiveness is especially helpful for short-run Honolulu orders with several unrelated designs.
If you're comparing workflow options, this guide to DTF gang sheets covers the layout concept in more detail. Lion DTF Transfers offers online gang sheet building, DTF by size, print-ready uploads, and a “We Build a Gang Sheet for You” service. Treat those as workflow options, then compare turnaround, communication, material specifications, and fulfillment terms with any other provider you're considering.
Ordering and File Prep Made Simple
A Honolulu shop may need one chest logo for a staff shirt and a large graphic for an event tee on the same deadline. Prepare those designs separately. Decide the finished width and height for each placement, write down the measurements, and build the files to match. A sleeve mark, youth-size design, and full front graphic should not share one default size.
Use a transparent PNG when the artwork has no background. That keeps an unwanted rectangle from printing around a logo or illustration. Check the file at its actual output size, especially small text, thin outlines, distressed textures, and semi-transparent effects. A graphic that looks sharp on a large monitor can show weak edges after it is reduced for a shirt.
Build the layout before you submit
The Auto-build gang sheet builder handles repetitive arrangement work. Upload each design, confirm its size, let the Auto Builder place the artwork, then inspect the exported sheet before checkout. Keep enough separation for cutting and handling, especially when several designs have irregular contours.
Color needs a clear conversation with the provider. Digital color settings, the garment, white underbase, ink set, and printer profile can all affect the finished appearance. If a brand color must stay consistent, send a reference and ask how the shop manages color matching. A screen preview is a guide, not a promise of an exact garment color.
A blurry logo or low-resolution image with important small text may need cleanup before submission. Enlarging a tiny raster file does not restore lost detail. Redrawing or vectorizing it can produce cleaner edges and more readable lettering.
Prevent adhesion and peeling problems
Your file preparation also affects how the transfer performs. Ask the supplier which bleed and knockout settings they recommend for fine text, narrow gaps, and small enclosed shapes. Their answer should match the film, powder, printer, and workflow they use. Confirm how white areas and transparent effects will be interpreted before production.
Before submitting, run this preflight check:
- Background: Remove unwanted backgrounds and confirm transparent areas.
- Sizing: Verify each design's finished width and height.
- Edges: Inspect fine text, thin lines, and transparent effects at output size.
- Layout: Review the Auto Builder export and confirm every design is present.
- Deadline: Share the event date and state whether you need Honolulu pickup or mainland shipping.
- Garment: Identify the fabric type and test an unfamiliar blank before producing the full order.
Humidity makes clear communication more useful. Tell the provider what garments you plan to use, especially polyester or blends, and ask whether their file or production settings need adjustment. Keep the order details, artwork dimensions, garment notes, and deadline together so a busy shop can review them quickly.
A careful preflight catches a wrong size before printing, when correction is still simple.
Pressing Instructions and Care Tips for Island Conditions
Pressing is where a well-made transfer either becomes a durable garment decoration or develops lifting and cracking problems. Begin with a clean, dry garment and a properly heated press. Place the transfer with the printed side against the fabric, cover it as recommended, and apply firm, even pressure.
A standard supplier FAQ lists pressing at 285°F to 300°F for about 12 seconds with medium to high pressure, followed by an immediate hot peel and a second press for about 10 seconds, as described in this DTF pressing and care FAQ. Those settings are a reference, not a universal replacement for the instructions supplied with your specific film, powder, and garment.
Humidity deserves attention in Honolulu. Moisture in the garment or workspace can interfere with a clean bond and may contribute to uneven results. Let blanks acclimate in a dry, controlled area, avoid pressing damp fabric, and use a short pre-press when appropriate to remove surface moisture and wrinkles. Polyester and blends can also respond differently from cotton, so test an unfamiliar fabric before decorating an entire order.
Most important care rule: Wait 24 to 48 hours before the first wash, then wash the garment inside out on a cool cycle, following the supplier's care guidance.
High heat accelerates wear. A durability guide notes that washing at 60°C or higher and high-heat tumble drying can shorten transfer life, while another source places quality DTF performance at 50 to 80 or more wash cycles with proper care and says poor curing or budget materials can reduce that result to 20 to 40 washes. Review the DTF durability and wash-test guide for that range.
Troubleshoot by matching the symptom
- Lifting edges: Check whether the press reached the intended temperature, whether pressure was even, and whether the garment contained moisture.
- Cracking: Review curing, pressing time, and wash temperature. Excessive heat during drying can also accelerate wear.
- Dull colors: Confirm that the design was prepared correctly, the white underbase printed properly, and the transfer received full, even pressure.
- Film that won't release cleanly: Follow the specified hot-peel or cold-peel process. Peeling at the wrong stage can disturb the bond.
A small test press can reveal problems before you commit a full batch, especially for coated, textured, stretchy, or heat-sensitive fabrics.
Pricing Turnaround and Honolulu Fulfillment Options
Pricing can be calculated by finished design size, transfer area, or gang sheet format. Ask whether the quoted amount includes layout, trimming, file cleanup, and shipping. A gang sheet can be cost-effective when you're combining several designs, but the best layout depends on the actual dimensions and spacing, not just the sheet's apparent size.
Turnaround needs separate answers for printing, dispatch, transit, and pickup. A local Honolulu provider may advertise fast service but have limited business hours or appointment-only access. A mainland supplier may print quickly yet still leave you dependent on air transit and delivery timing. For a deadline under 24 to 48 hours, ask for the order cutoff, production completion time, pickup availability, carrier service, and backup plan before you pay.
Lion DTF Transfers lists 24-hour printing, 1 to 2 business day shipping, same-day pickup, and next-day air options where available. It also offers support through call, text, email, and website chat. Those options give Honolulu buyers several fulfillment paths, but availability should be confirmed for the specific order and destination.
Your practical plan is straightforward: select DTF when the artwork and quantity fit, use the Auto-build gang sheet builder to arrange multiple designs efficiently, submit clean files, confirm the press method for your fabric, and choose pickup or shipping based on the actual cutoff rather than a general delivery promise.
Lion DTF Transfers offers custom DTF transfers, gang sheets, DTF-by-size ordering, print-ready uploads, and help building a sheet when you don't want to arrange it yourself. For a Honolulu deadline, review your artwork and fulfillment needs, then visit Lion DTF Transfers to build your order and confirm the available pickup or shipping option.