


Getting the t-shirt design size right is the first, and honestly, most critical step for any print project. If you’re just starting out, a good rule of thumb for a standard adult t-shirt is a full-front design that’s about 10 to 12 inches wide. For something smaller, like a left-chest logo, you’re usually looking at 2.5 to 5 inches wide.
Nailing these dimensions is what makes your artwork look balanced and professional on the final garment, not like a last-minute iron-on.
Why Accurate T-shirt Design Size Matters
Perfecting your design dimensions isn't just a technical detail; it’s the foundation of a high-quality product that people actually want to wear. An incorrectly sized graphic can make an entire batch of apparel look amateurish. We’ve all seen it: a huge logo on a small tee or a tiny design floating on a 2XL. It leads to wasted inventory and can really damage a brand’s reputation.
Pinpoint accuracy, on the other hand, ensures every garment looks intentional, professional, and visually appealing.
This directly impacts a few key areas of your business:
- Customer Satisfaction: A well-proportioned design meets expectations, which leads to happy customers, positive reviews, and repeat business.
- Brand Perception: Consistent, professional sizing across your entire product line builds trust and reinforces your brand's commitment to quality.
- Profitability: Getting it right the first time eliminates the painful cost of reprinting and wasted materials, protecting your bottom line.
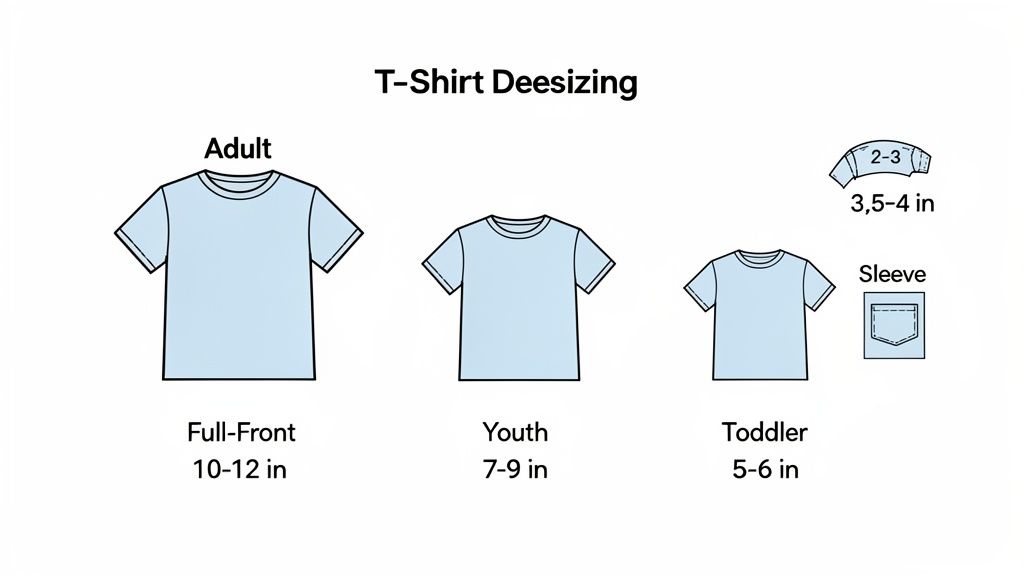
Common Design Sizes At a Glance
To get started, it’s helpful to have a quick reference for the most common placements. While sizing is never a one-size-fits-all rule, these industry standards provide a solid starting point for various garments. This quick guide will help you visualize the canvas you're working with before you get into the nitty-gritty of file prep.
A common mistake is using the same design size for every shirt from a Small to a 3XL. A graphic that looks great on a small shirt can appear tiny and lost on a 3XL, compromising the look. Creating size variants is key.
Here’s a simple table to bookmark for your next project. It covers the most frequent placements you'll run into, from standard adult tees to smaller items like youth shirts and pocket logos.
Standard T-Shirt Design Size Recommendations
This table is a great cheat sheet for the most common apparel sizes and placements. Use it as your starting point, but always remember to print a test or use a template to see how the design looks on the actual garment before you go into full production.
| Garment Size | Apparel Type | Recommended Design Width (Inches) | Common Placement |
|---|---|---|---|
| Adult (S-XL) | Standard T-Shirt | 10-12" | Full Front |
| Adult (2XL+) | Plus-Size T-Shirt | 12-14" | Full Front |
| Youth (M-XL) | Youth T-Shirt | 7-9" | Full Front |
| Toddler | Toddler T-Shirt | 5-6" | Full Front |
| All Sizes | T-Shirt / Polo | 2.5-5" | Left Chest |
| All Sizes | T-Shirt / Hoodie | 2-3" | Sleeve |
These recommendations give you a professional baseline, helping ensure your designs look great no matter the size or style of the apparel you're printing on.
Streamlining Your Workflow
Understanding these dimensions is step one, but making your process efficient is just as important. For projects involving multiple designs of different sizes—say, a full-front logo, a left-chest version, and a sleeve print—ordering them all separately is slow and expensive.
This is exactly where tools designed for bulk printing become invaluable.
Our Auto-build gang sheet builder completely simplifies this process. It lets you arrange all your different design sizes onto a single sheet, which drastically cuts down your cost per print. It’s the smart, easy-to-use, and cost-effective way to scale your production without making your workflow a nightmare.
Preparing Your Artwork for Perfect DTF Printing
A killer design on your screen is one thing, but getting it to look just as good on a t-shirt? That all comes down to the digital file. Before you even start thinking about placement, you have to get your artwork prepped for Direct-to-Film (DTF) printing. This is the technical step you absolutely can't skip—it’s where you ensure the final print is as crisp and vibrant as you imagined.
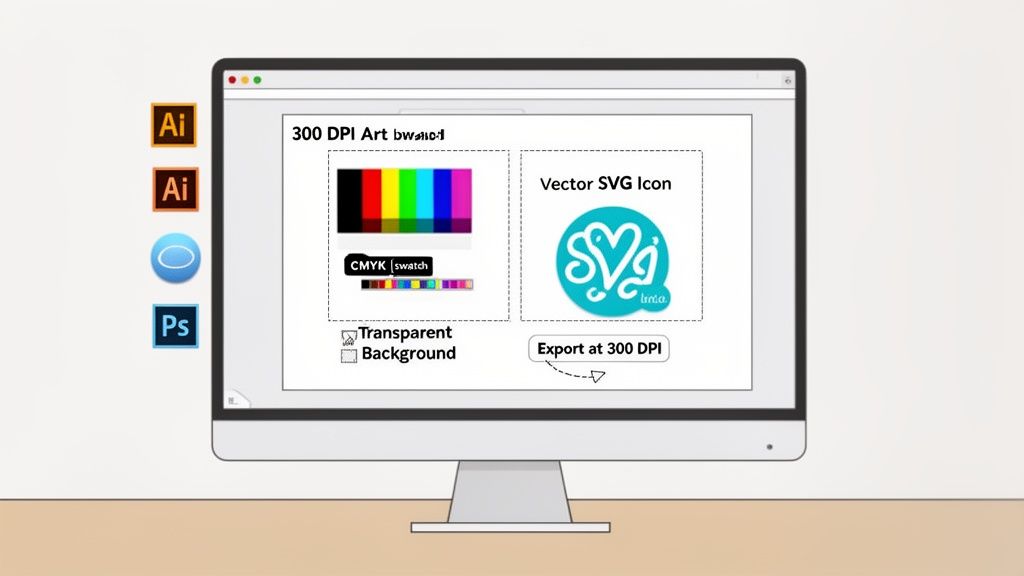
The first, and most important, rule is resolution. Your artwork must be created at 300 Dots Per Inch (DPI). This is the industry standard for high-quality printing, and it’s non-negotiable. If you use a lower DPI, like the 72 DPI common for web images, you'll end up with a blurry, pixelated mess on the final shirt.
Setting Up Your Canvas Correctly
To lock in that sharp, professional look, you need to start your project with the right settings from the very beginning. It doesn't matter if you're using Adobe Illustrator, Photoshop, or Canva—your art-board setup is crucial.
First off, make your art-board dimensions match the final t-shirt design size you want to print. If the design needs to be 11 inches wide on the shirt, your canvas should be exactly 11 inches wide. This simple step prevents weird scaling issues down the line.
Next, double-check that your resolution is set to 300 DPI.
- In Photoshop, you can set this in the "Resolution" field when creating a new document.
- In Illustrator, it’s a bit different since it's vector-based. You’ll want to set your "Raster Effects" to 300 DPI under
Effect > Document Raster Effects Settings. - In Canva, when you download your file as a "PNG," make sure you choose the highest quality option. You can also verify the pixel dimensions to confirm they match up with a 300 DPI output for your intended print size.
A classic mistake is designing on a small, low-res canvas and then trying to blow it up. That just stretches the pixels you already have, causing a huge drop in quality. Always start your design at the final print size or even a little larger.
Another critical detail is making sure your design has a transparent background. DTF printing is all about printing only the design, not a white or colored box around it. Exporting your file as a .PNG with transparency enabled is the way to go.
Understanding Color Profiles and File Types
The colors you see on your backlit screen often look different when printed with ink on a shirt. That’s usually because of a color profile mismatch. Your design software typically works in RGB (Red, Green, Blue), which is perfect for digital displays. Printers, however, run on CMYK (Cyan, Magenta, Yellow, Key/Black).
For the best color accuracy with DTF, it's actually better to design and export your final file in the RGB profile. Modern DTF software is built to handle the RGB-to-CMYK conversion on its own, and it does a great job of keeping your original colors vibrant.
Choosing the right file type is just as important. For maximum flexibility, vector files (.AI, .SVG, .EPS) are king. A vector graphic is made of mathematical paths, not pixels, so you can scale it from a tiny 3-inch pocket logo to a massive 15-inch back print with zero loss of quality.
If you have to use a pixel-based (raster) format, a high-resolution PNG is the industry standard. As you dive deeper, our guide on creating custom heat transfer designs can offer some more advanced tips.
Getting your artwork ready is easily the most important part of managing your tshirt design size. It’s what ensures your vision translates perfectly from the screen to the fabric, giving you a professional product every single time.
Sizing and Placement Across Different Garment Types
Once your files are prepped and ready to go, the real fun begins: applying your design to the garment. Let's get one thing straight—there’s no single magic number for a t-shirt design size. It’s a dynamic decision that has to change based on the apparel itself. A design that looks killer on an adult medium tee will completely overwhelm a toddler shirt, and a small logo that looks sharp on a pocket will get lost on the back of a hoodie.
Think of every garment as its own unique canvas. An adult t-shirt gives you a wide, open space to work with, while a youth shirt is a much smaller, condensed area. Your job is to respect these differences to create a product that looks intentional and professional, no matter who's wearing it. Honestly, this kind of attention to detail is what separates the standout brands from the rest of the pack.
Mastering Standard Placements
For a standard adult t-shirt, anything from a Small to an XL, a full-front design usually lands between 10 to 12 inches wide. This size gives you great coverage without crowding the collar or creeping into the armpits. It's the sweet spot for band merch, bold graphic tees, and event apparel.
When you move down to youth shirts, that printable area shrinks quite a bit. A width of 7 to 9 inches is much more fitting here. Go any larger, and the design starts to look like a sticker just slapped on the front. For toddler and infant sizes, the sweet spot is even smaller, typically around 5 to 6 inches wide. This keeps the graphic as the focal point without distorting the shape of the tiny garment.
There's a timeless placement trick you’ll hear from just about any seasoned printer: the "three-finger rule."
To set the vertical placement for a front design, place three of your fingers together horizontally, right below the collar. The top of your design should start just beneath your fingers. It’s a simple trick, but it gives you a consistent, visually balanced starting point every time.
Sizing for Specialty Garments and Placements
The world of apparel is huge, and your sizing strategy needs to be just as flexible. Hoodies, with their front pockets and generally larger frames, are a totally different beast than a simple tee. Oversized back prints on hoodies are huge right now and can be as large as 14 to 16 inches wide, creating a powerful visual statement that really stands out.
Of course, smaller, more subtle placements have their own set of rules.
- Left-Chest Logos: This is a classic, perfect for corporate branding or polos. You'll want to keep these between 3.5 to 4 inches wide—big enough to be legible but small enough to look refined.
- Sleeve Artwork: Designs on short sleeves are typically pretty small, around 2 to 3 inches wide. This is a great spot for secondary logos, icons, or a little bit of text.
- Plus-Size Apparel: A standard 11-inch design can look tiny and out of place on a 2XL or 3XL shirt. For these larger garments, scaling the design up to 12 to 14+ inches wide is absolutely crucial for maintaining visual balance. Forgetting to adjust for plus sizes is a common mistake that can make your products look poorly planned.
To really get this right, it also helps to have a solid grasp of how apparel sizing standards work and how clothes fit different body types, including understanding what 'true to size' means for apparel. This knowledge adds another layer of expertise to your design decisions.
Optimizing Your Sizing for Production
Thinking about all these different sizes might seem like a headache, but it’s a critical part of running a professional operation. The blank apparel market is massive—we're talking $15.23 billion in 2024, with projections to hit $24.04 billion by 2033. For a business like Lion DTF Transfers, getting the t-shirt design size right is essential to tapping into this growth, especially since t-shirts and tanks make up 48.39% of that market. That standard 10-12 inch front design is a workhorse, covering the XS-4XL sizes that account for over 60% of most production runs.
Instead of ordering each size variant as a separate transfer—which is slow and expensive—smart designers group them together. This is where our Auto-build gang sheet builder becomes an absolute game-changer. You can easily arrange your 12-inch adult designs, 8-inch youth designs, and 4-inch chest logos all onto a single sheet for maximum cost effectiveness. This approach slashes your cost per print, minimizes waste, and makes your entire production workflow far more efficient.
For a deeper dive, be sure to check out our comprehensive DTF sizing chart to really dial in your approach.
Using DTF Gang Sheets to Maximize Profitability
Knowing the right t-shirt design size is one thing, but turning those sizes into actual profit is where the real strategy comes in. If you're ordering individual transfers for every single design and garment size, you're leaving money on the table. It's just inefficient. This is exactly where a DTF gang sheet becomes a game-changer for your business.
A DTF gang sheet is simply a large sheet of transfer film where you group—or "gang"—multiple designs together. Instead of paying per design, you pay for the entire sheet. This lets you mix and match different designs and sizes in one order, which dramatically slashes your cost per print and cuts down on wasted material.
This isn't just a small-time trick; it's fundamental to scaling a print operation. The global T-shirt market is massive—we're talking around 22 billion units in 2024 alone. To get a piece of that action, you have to be smart about production. For us, that means using gang sheets effectively. Our online builder lets you price out custom sizes for as low as $0.017 per square inch, which is perfect for scaling designs across S-3XL blanks—the sizes that make up 70-80% of most sales.
Streamlining Your Workflow with an Auto-Builder
Let's be real: manually arranging dozens of designs on a sheet to fit perfectly is a tedious puzzle. To get rid of that headache, we developed our intuitive Auto-build Gang Sheet Builder. It’s a simple tool that lets you upload your artwork, tell it how many of each design you need, and then it automatically arranges everything for maximum efficiency and cost effectiveness.
It’s built to save you time and money, whether you've been in the game for years or are just getting started. The builder removes the guesswork from optimizing your layout, ensuring you squeeze the most value out of every single square inch of transfer film. If you want to dive deeper, you can learn more about how DTF gang sheets can completely transform your workflow.
The visual below breaks down how design sizing changes across different types of apparel. This is exactly the kind of thinking that helps when you're planning your gang sheet layout.
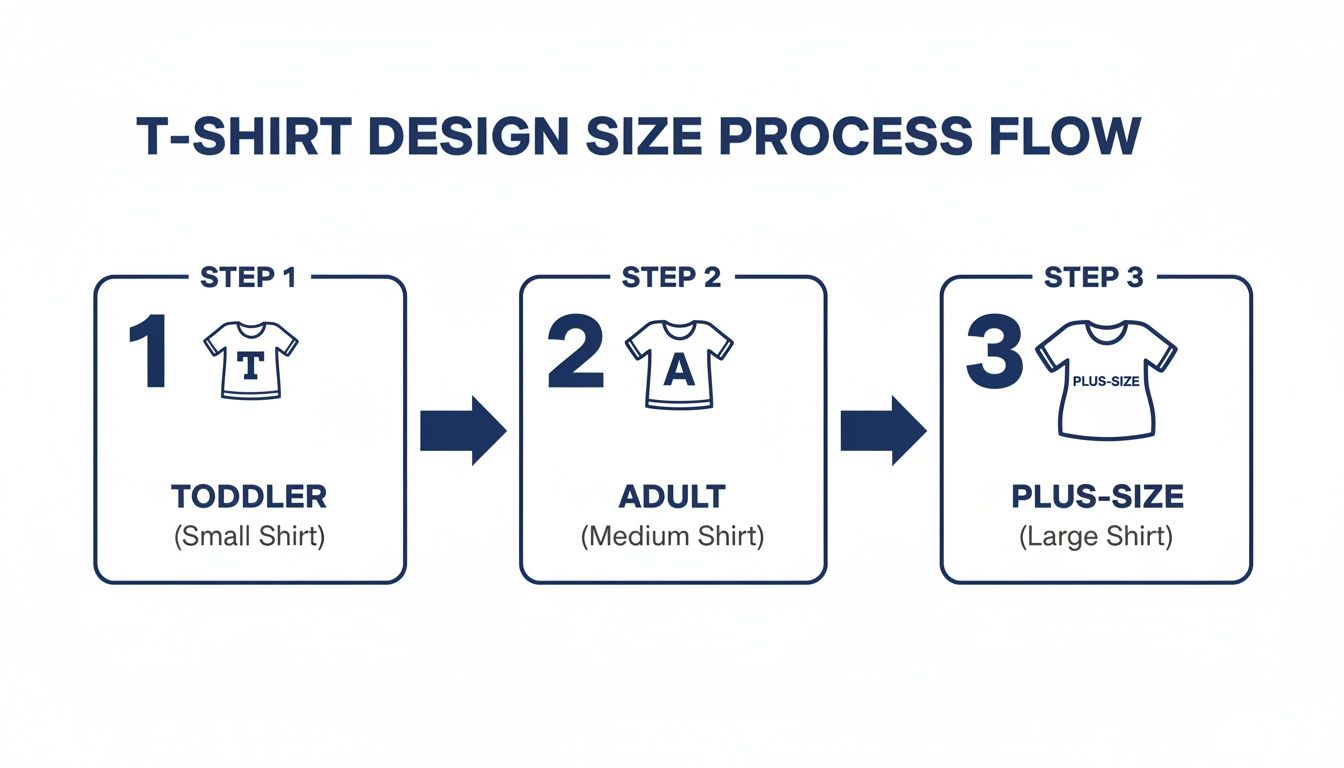
This process highlights the need for different size variants, all of which can be ganged together on one sheet to keep costs low.
A Real-World Gang Sheet Scenario
Let's walk through a common example. Imagine a clothing brand has an order that needs a mix of designs and placements.
Here's their transfer list:
- 10 Full-Front Logos (11 inches wide)
- 15 Left-Chest Logos (4 inches wide)
- 20 Sleeve Designs (3 inches wide)
Ordering these as 45 separate transfers would be a financial nightmare. The shipping costs alone would pile up, not to mention the per-item price for smaller transfers is always higher.
But by using our Auto-build Gang Sheet Builder, all 45 of these designs can be perfectly arranged onto a single 22x60 inch sheet. The builder is smart—it places the big graphics first, then fills in all the empty gaps with the smaller chest and sleeve designs. It turns what would have been a logistical mess into one simple, cost-effective print run. The savings are huge compared to ordering one by one.
Pro Tip: One of the best ways to maximize space is "nesting." This means tucking smaller designs, like neck labels or sleeve art, inside the negative space of your larger graphics. For instance, the empty area inside a circular logo or between big letters can often fit a small icon, turning potential waste into another usable transfer.
Beyond Production Efficiency
This method does more than just cut your material costs; it improves your whole business model. When you lower your cost-per-print, you can either offer more competitive pricing to your customers or just pocket a higher profit margin. It also gives you the flexibility to print small batches of various designs without getting hit with the high costs of individual orders.
Of course, smart production is only one piece of the puzzle. To really maximize profitability, you need to combine efficient gang sheet usage with a sharp sales strategy. Keeping an eye on your numbers with a conversion rate calculator is key. When you pair smart production with a clear understanding of your sales performance, you create a powerful engine for growth.
From Ordering to Pressing for a Perfect Finish
Once your files are prepped and your gang sheet is dialed in, it's time to bring your designs to life. This is where all that careful planning pays off, turning a digital concept into a professional, ready-to-sell garment. Let’s walk through the final steps: ordering your transfers and nailing the heat press process.
We’ve made ordering as flexible as possible. If you've already laid out a print-ready file, you can upload your completed gang sheet directly. But if you want the most efficient, cost-effective route, our Auto-build gang sheet builder is the way to go. It lets you upload multiple designs, set the quantities for each, and automatically arranges them to maximize every square inch of film, saving you both time and money.
Mastering the Heat Press for Flawless Application
Getting your DTF transfers in the mail is exciting, but the application is where precision really counts. A perfect press comes down to three things working in harmony: temperature, pressure, and time. Get this trifecta right, and your design will adhere perfectly and hold up through dozens of washes.
For our hot-peel DTF transfers, the sweet spot is usually:
- Temperature: 280°F
- Time: 10 seconds for the press
- Pressure: Medium to firm
Here's a pro tip: always pre-press your garment for 3-5 seconds before applying the transfer. This quick step gets rid of any hidden moisture and smooths out wrinkles, creating a perfect canvas for the adhesive. After the main press, peel the film while it's still hot, cover the design with parchment paper, and give it a final 5-second press to lock it in for good.
Troubleshooting Common Pressing Issues
Even with the best prep, you might run into a snag now and then. The good news? Most pressing problems are easy to fix once you know what's causing them. A failed transfer is almost always a sign that one of the three key variables—temperature, pressure, or time—is off.
A common mistake I see is people thinking "more is better" when it comes to heat. If your temperature is cranked too high, you risk scorching the fabric or melting the adhesive, which leads to a weak bond or a shiny, messy outline around your design. Always start within the recommended range.
Here are a few frequent issues and how to solve them:
- Poor Adhesion (Design Won't Stick): This is the number one problem people face, and it's almost always due to not enough pressure. Make sure your press is clamped down firmly. If you’re positive the pressure is right, then your temperature might be a bit too low.
- Glossy Outline or Melted Look: This happens when your press is too hot. The adhesive is basically over-cooking, leaving a shiny residue. Dial your temperature down by 10-15 degrees and try again.
- Uneven Application: If some parts of the design stick perfectly while others peel up, that’s a dead giveaway for uneven pressure. This is common with bulky items like hoodies, especially near seams, pockets, or zippers. A pressing pillow is your best friend here—it helps create a flat, even surface.
- Cracking After Washing: This usually means the design didn't fully cure during the press. The cause could be not enough pressure, time, or heat. That quick final press after peeling is non-negotiable if you want long-term durability.
Perfecting your heat press technique is the final, crucial step in managing your t-shirt design size and overall production. It’s what ensures all the hard work you put into your digital files and gang sheets translates into a finished product you can be proud of.
Common Questions About T-Shirt Design Sizing
Getting your t-shirt design size just right can feel like a guessing game, especially when you're aiming for that perfect, professional finish. I get it. Over the years, I've seen the same questions pop up time and time again.
Think of this as a cheat sheet for the most common challenges you'll face. We'll cut through the confusion on everything from file formats to scaling designs, making sure you have the answers you need to print with confidence and avoid those costly mistakes.
What Is the Best File Format for My T-Shirt Designs?
If you want the absolute best results, vector formats are king. Files like .AI, .EPS, or .SVG are built with mathematical lines, not pixels, which means you can scale them up or down to any size imaginable without losing a single bit of quality. This flexibility is a game-changer, letting you create every transfer size you need from one master file.
Working with pixel-based art instead? No problem. A high-resolution .PNG file saved at 300 DPI with a transparent background is your next best bet. Our printers are dialed in to work perfectly with these formats, so your final prints come out sharp, clean, and vibrant every single time.
How Do I Size One Design for Both Small and 3XL Shirts?
This is a big one. The most effective approach is to create a few different size versions of your design. A 9-inch wide graphic that looks perfectly balanced on a small tee will look tiny and awkward on a 3XL. It's a classic mistake that can make your plus-size options feel like an afterthought.
We always recommend creating at least two versions: a standard one (around 9-11 inches wide) for sizes S-XL, and a larger version (12-14 inches wide) for 2XL and up. This simple step ensures a consistent, proportional look across your entire size range.
Planning ahead here is crucial. You can easily put both size versions on a single order to keep things consistent. Our Auto-build gang sheet builder is incredibly helpful for this, allowing you to combine different sizes in one easy and cost-effective print run.
Can I Use the Same Design Size for a Hoodie and a T-Shirt?
While it sounds like a good shortcut, it's generally not a great idea. Hoodies are bigger garments with a much larger canvas, especially on the back. A back graphic can be up to 14-16 inches wide for a really impactful look, and a standard 11-inch t-shirt graphic would just get lost in all that space.
On top of that, the front pocket on a hoodie eats up a lot of the vertical printing area, forcing a totally different placement strategy. Always take a minute to measure the actual printable area on each garment type and create an optimized file for each one. You'll be much happier with the results.
What Happens If My Artwork Resolution Is Below 300 DPI?
Submitting artwork with a resolution below 300 DPI is a recipe for a blurry, pixelated, or soft-looking print. The DTF process is incredibly precise and designed to capture fine details, which also means it will expose every flaw in a low-resolution file. There just isn't enough image data for the printer to create those sharp, crisp lines you're looking for.
To avoid this headache, always start your design on a 300 DPI canvas. Better yet, create your art in a vector program from the get-go. If you're not sure about your file's quality, our team can take a look. We even offer vectorization services to convert low-quality images into print-ready art, guaranteeing a flawless final product.
Ready to create stunning, perfectly sized DTF transfers without the guesswork? The Lion DTF Transfers Auto-build gang sheet builder makes it easy to combine all your designs onto one sheet, saving you time and money. Start building your custom gang sheet today.