










You pull a favorite graphic tee from the washer and find the artwork looking dull, cracked, or slightly lifted at the edges. The shirt itself may still fit perfectly, but the design has taken the abuse. That result usually comes from a combination of heat, friction, detergent, and print application quality, not from one bad laundry decision.
Learning how to wash graphic T-shirts properly starts before the wash cycle. Read the care label, identify the fabric and decoration method, then use a low-stress routine that protects both the textile and the printed surface. For print shops and small brands, the same discipline also helps reveal whether a damaged garment needs better customer-care guidance or a replacement blank and transfer.
Decoding Care Labels and Temperature Rules
The care label is the first authority for any graphic T-shirt. In the United States, the Federal Trade Commission's Care Labeling Rule requires covered textile apparel manufacturers and importers to provide care instructions. The rule was promulgated on December 16, 1971, and amended on May 20, 1983, as documented in the FTC care-labeling rule history.
Look for the five basic care symbols:
- Washtub: Washing method, including machine washing, hand washing, temperature, or cycle.
- Triangle: Whether bleaching is permitted.
- Square: Drying method and heat restrictions.
- Iron: Ironing temperature and limitations.
- Circle: Professional dry cleaning instructions.
A crossed-out symbol means you shouldn't use that process. The FTC also explains that most textile apparel must include regular washing or dry-cleaning instructions, and that a washing label should identify hand or machine washing plus an allowable water temperature when heat could cause damage. Its definition of cold water is cold tap water up to 80°F. Check the FTC requirements for textile care labels before overriding a label with generic advice.
Why cold water is the safer default
Cold washing isn't just a preference for delicate clothing. The American Cleaning Institute states that cold water is gentler on garments and helps protect against fading, shrinking, and color bleeding. Its guidance also notes that cold water is appropriate for treating some stains, including grass, makeup, and blood, because hot water can set them.
The same organization reports that approximately 90% of a washing machine's energy use goes toward heating water, and its Cold Water Saves program estimates that changing from warm or hot washing to cold can save more than $200 per year. Those figures come from the American Cleaning Institute's cold-water guidance and Cold Water Saves program information.
For a cotton, polyester, or blended shirt, start with the care label, then choose the coolest suitable setting. If you're comparing blanks for a new collection, study the differences between common T-shirt materials before standardizing your customer instructions. A graphic applied to a stretchy blend may need a different handling routine from one bonded to a dense cotton blank.
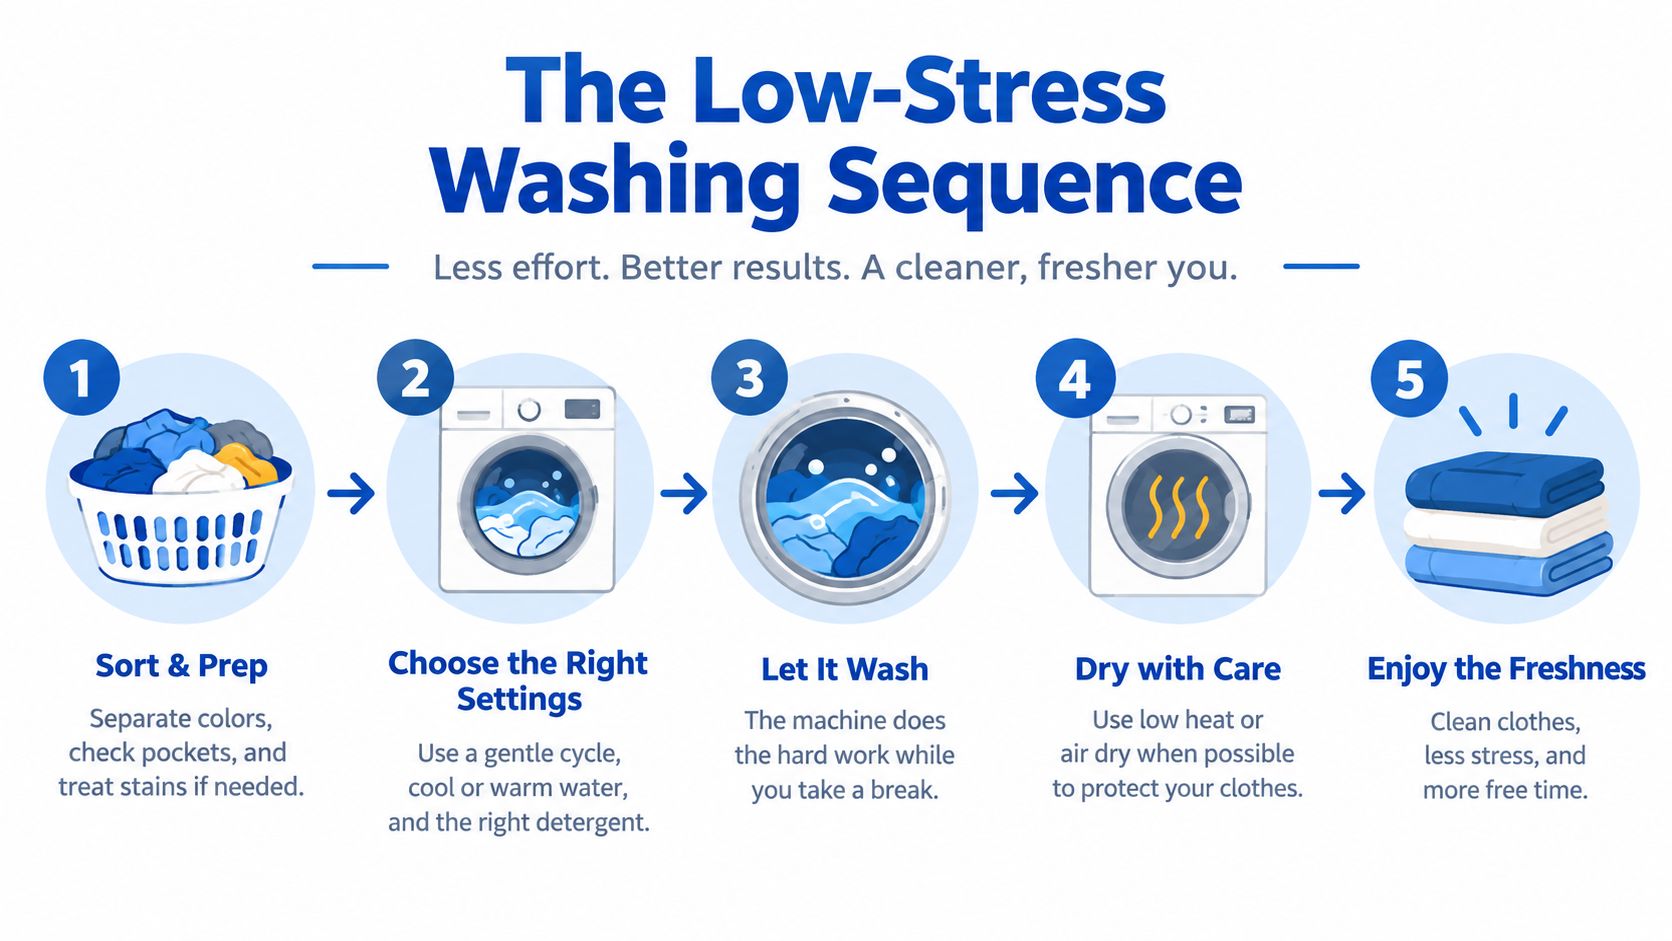
The Low-Stress Washing Sequence
The safest routine reduces three forms of stress: surface abrasion, chemical exposure, and heat. Start by checking the label and sorting the shirt with similar colors. Don't wash a printed tee with towels, denim, zippers, or rough workwear when you can avoid it. Those items create unnecessary contact with the graphic.
Follow this sequence:
- Turn the shirt inside out. The printed surface should face inward before it enters the washer. This limits rubbing against the drum and other garments.
- Use a small, balanced load. Overcrowding prevents garments from moving freely and increases contact between surfaces.
- Select a gentle cycle. Use normal or gentle agitation only when the care label allows it. Avoid heavy-duty cycles and prolonged soaking.
- Choose approximately 80°F. Use cold or lukewarm water within that range when the label permits. Cooler water is preferable for most graphic designs.
- Add a mild liquid detergent. Avoid optical brighteners, chlorine bleach, fabric softener, and aggressive powder detergents.
A study of digitally printed cotton found that optical-brightener powder detergents produced the strongest print changes. The researchers recommended up to 80°F washing with detergent without optical brighteners to help preserve color integrity, as described in the printed-cotton laundering research.
What the cycle is doing to the print
Washing combines water, detergent, movement, and time. Increasing the temperature, detergent concentration, cycle duration, or mechanical action can increase dye migration and fading. AATCC laundering tests illustrate that difference by comparing approximately 40 ± 3°C and 38 ± 3°C procedures with a more vigorous condition at approximately 60 ± 3°C. These are laboratory comparisons rather than universal household settings, but they show why hotter and harsher laundering places greater stress on textile color. See the AATCC TM61 accelerated laundering method for the test conditions.
Remove the shirt promptly after the cycle. Leaving it compressed and damp in the washer encourages creasing around the print and makes the next drying stage harder on the garment.
How Fabric Blends and Print Quality Affect Durability
A 100% cotton tee and a cotton-polyester blend don't behave identically in production or laundry. Cotton can respond noticeably to heat and shrinkage, while polyester changes the way moisture, dye, and transfer adhesives interact with the garment. Stretch content, fabric weight, surface texture, and the density of the graphic also influence how much movement the print experiences.
The application matters just as much as the blank. A transfer that wasn't pressed with suitable temperature, pressure, or dwell time may lift early even when the customer follows every care instruction. A well-applied design can still fade or show edge wear in a high-friction environment, but early cracking after limited washing should prompt a production review rather than an automatic blame on the wearer.
Production rule: A care label protects the garment, but it can't compensate for an under-cured ink layer or poorly bonded transfer.
Independent testing makes the variation clear. One study found that image durability differed substantially between samples. After 80 wash cycles, some samples showed insignificant color loss while others had more noticeable fading. After 100 cycles, visible discoloration and mechanical fabric damage appeared under the study's controlled conditions. The testing used a household machine, 40°C water, a 30-minute cycle, and an 800 rpm spin, as reported in the independent textile durability study.
Test the complete product, not just the transfer
For a small brand, test the exact blank, decoration system, and finishing process you plan to sell. A dark cotton tee with a large DTF graphic may produce different results from a light cotton-polyester shirt with a small chest mark. Record the fabric composition, transfer type, press settings, detergent, temperature, cycle duration, spin, and drying method.
A practical five-cycle check gives you a repeatable starting point. Photograph the design before washing, after the first cycle, and after the fifth. Inspect edge lifting, cracking, gloss changes, pigment transfer, and the loss of fine details. Compare air-drying with low-heat tumble-drying rather than claiming one universal wash life for every product.
For more transfer-specific production context, review how long DTF transfers last.
A shirt can remain structurally sound while its graphic loses color, develops a shiny patch, or begins lifting at a corner. Track those as separate failure points. That distinction helps you improve the application process and write more honest care instructions for customers.
Drying, Ironing, and Stain Removal Tactics
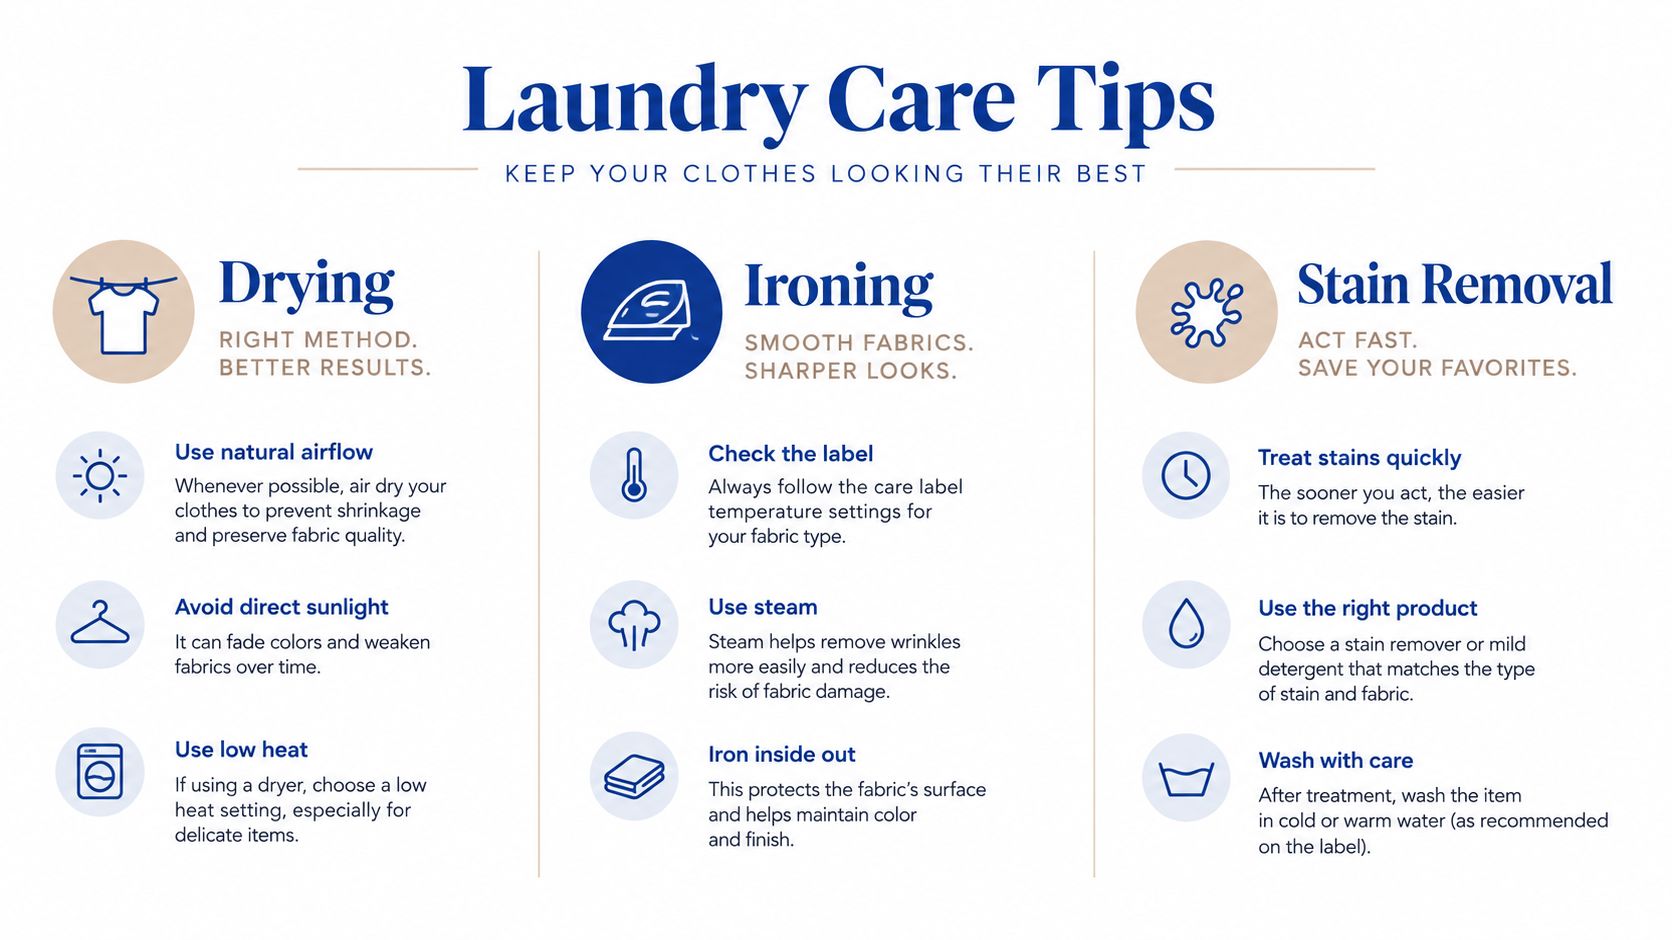
A careful wash can still be undone in the dryer. High heat stresses the printed layer, while tumbling adds repeated flexing and contact. Air-drying is the lowest-stress option when the care label permits it, especially for a thick transfer, a large graphic, or a shirt that already shows early edge wear.
Lay the shirt flat on a clean drying surface or use a supported rack. If you hang it, support the garment rather than leaving its full wet weight on the shoulders. Keep it away from direct high heat and strong sunlight, both of which can add thermal or fading stress.
If machine drying is allowed, use low heat and remove the shirt promptly. The National Park Service laundry recommendations support cold-water washing with cold-water detergent whenever possible, full loads, and the correct water-level setting for smaller loads. The garment's care label still controls whether machine drying is permitted and which temperature is suitable.
Ironing without flattening the artwork
Never place a hot iron directly on the graphic. Heat can distort ink, change the print's gloss, or weaken adhesive at the edges. Turn the shirt inside out and iron from the reverse side, or place a protective cloth between the iron and the garment.
Use the lowest suitable temperature for the fabric, and don't leave the iron in one place. For transfer-specific handling, keep the shirt pressing and care instructions with your production records so fulfillment staff and customers receive consistent guidance.
Treat stains before heat
Treat stains while the garment is still unheated. Blot or dab instead of scrubbing across the design, and apply a mild detergent to the fabric side where possible. Rinse with cold water, then inspect the shirt before drying.
Blood, grass, and makeup deserve particular caution because hot water can set some stains. If a mark remains, repeat the gentle treatment rather than sending the shirt through high heat and making the problem harder to remove. Store clean graphic tees folded with the printed surface protected from heavy pressure and unnecessary friction.
Smart Production and Replacing Damaged Inventory
No care routine can prevent all wear. Shirts used for work, sports, events, or frequent outdoor activity encounter more rubbing and stretching than occasional weekend apparel. When a customer needs a replacement or a small brand discovers damaged stock, the efficient response is to reproduce only what is needed instead of rebuilding a large mixed order.
Lion DTF Transfers offers DTF transfers, gang sheets, UV DTF stickers, ready-to-press designs, and custom upload options. Its Auto-build gang sheet builder arranges multiple replacement designs on one sheet, which makes it easier to use available film space and reduce wasted areas when preparing a small restock or mixed reorder. That is useful when one design needs replacement but the rest of the collection doesn't.
Cost-control principle: Group replacement graphics with upcoming orders whenever the sizes and artwork allow it. The production decision should account for film use, press time, blank cost, and the value of keeping sellable inventory available.
The builder also helps a shop separate the laundry problem from the production problem. If the transfer was applied correctly but a shirt has been worn through, replace the affected blank and press a fresh graphic. If the same edge lifts across several samples, pause reorders and review the press settings, fabric surface, and transfer handling first.
Keep a simple replacement record with the shirt style, color, size, graphic, blank supplier, transfer file, and reason for replacement. That record shows whether damage comes from isolated wear, a troublesome fabric blend, or a repeatable application defect. It gives you a better basis for customer support than a broad promise about how long every printed shirt should last.

Your Graphic Tee Care Checklist
Good graphic-tee care is consistent rather than complicated. The person washing the shirt needs a short routine, and the person producing it needs documented testing that matches the actual blank and decoration method.
Use this checklist at home or include it with customer orders:
- Read the label first: Follow the garment's washing, drying, bleaching, and ironing symbols.
- Turn the shirt inside out: Protect the printed surface from contact with the washer and nearby garments.
- Sort by color and texture: Keep printed tees away from rough towels, denim, zippers, and abrasive workwear.
- Choose cool water: Use cold or lukewarm water within the label's permitted range.
- Select gentle movement: Avoid heavy agitation, prolonged soaking, and overloaded loads.
- Use mild liquid detergent: Skip optical brighteners, chlorine bleach, fabric softener, and harsh powders.
- Treat stains before drying: Use cold water for suitable stains and inspect the result before applying heat.
- Air-dry when allowed: If using a dryer, select low heat and remove the shirt promptly.
- Protect the design while ironing: Work from the reverse side or use a pressing cloth.
- Document production tests: Record the blank, print method, press conditions, detergent, wash cycles, and drying method.
For makers and print shops, add one more check. Test a representative dark shirt, light shirt, cotton garment, and cotton-polyester blend before you publish care instructions across an entire collection. A graphic can fail through fading, cracking, edge lifting, gloss change, or fine-detail loss while the fabric remains wearable, so your inspection should look beyond the shirt's overall shape.
Consistent low-stress care gives a properly applied design the best chance to stay sharp. It also gives your business a practical process for identifying when better laundry guidance is needed and when replacing the blank and graphic is the more honest solution.
Lion DTF Transfers provides custom DTF transfers, gang sheets, UV DTF stickers, ready-to-press designs, and an Auto-build gang sheet builder for organizing replacement graphics and new merch efficiently. Visit Lion DTF Transfers to prepare your next order with care requirements and production consistency in mind.
Email orders@LionDTF.com or Text or Call: 833-350-5466