


Heat transfer paper printing is one of the most versatile and approachable ways to get into custom apparel. It’s pretty straightforward: you print a design onto specialized paper with a regular inkjet or laser printer, then use a heat press to transfer that design right onto the fabric. This method is a go-to for its low startup costs and its ability to produce vibrant, full-color images on demand.
Demystifying the Heat Transfer Process
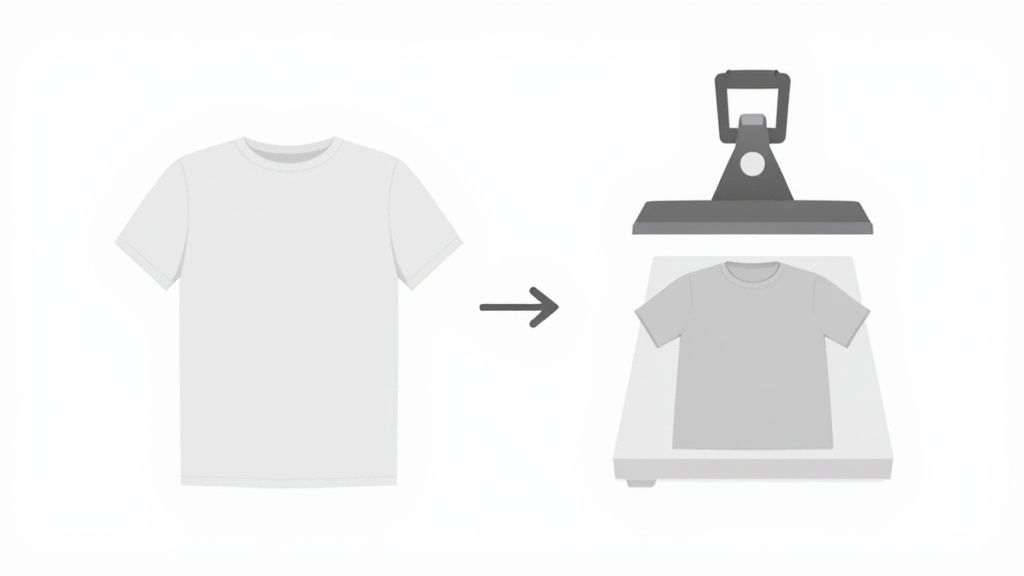
At its core, heat transfer printing is a simple technique that uses heat and pressure to bond a design to a garment. Think of it as a professional-grade, highly advanced iron-on. The process starts with your digital design, which gets printed onto a sheet of heat transfer paper. This isn't your everyday office paper—it has a special coating that releases the ink perfectly when heat is applied.
This accessibility has fueled massive growth in the custom apparel world. In fact, the global heat transfer paper market was valued at around USD 523.2 million in 2023 and is only expected to keep growing, thanks to high demand from crafters and small businesses alike. You can dig deeper into these market trends and their drivers if you're curious.
Key Components for Success
To get started, you’ll need a few essential pieces of gear. The list isn't long, but each item plays a huge role in the final quality of your prints.
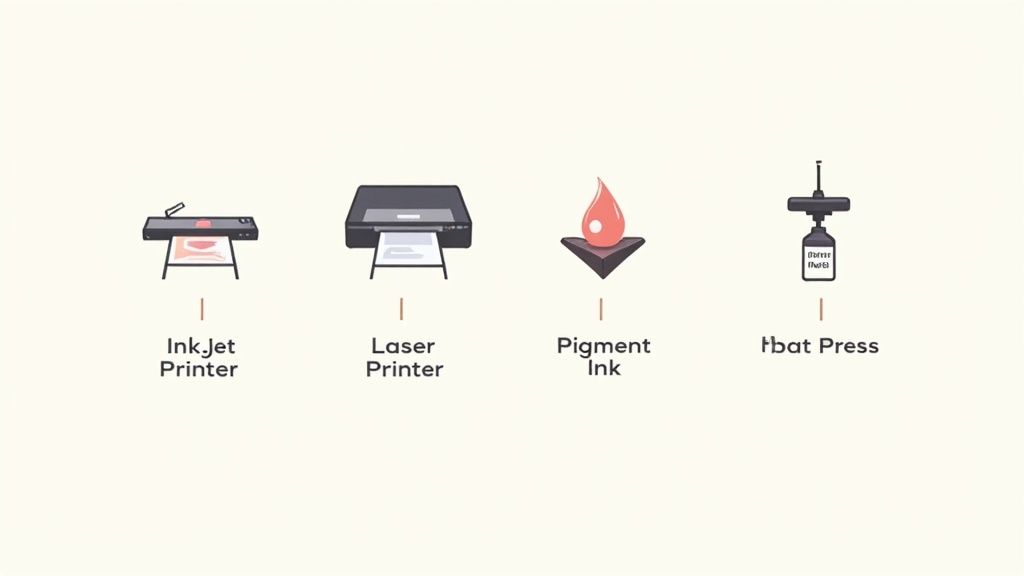
- A Reliable Printer: Both inkjet and laser printers will work, but your choice determines the kind of ink and paper you'll need to buy.
- Specialized Inks: If you're going the inkjet route, pigment-based inks are a must. They’re far more durable and resistant to fading in the wash than standard dye-based inks.
- Heat Transfer Paper: This is your most critical consumable. The right paper depends on your printer and, more importantly, the color of the fabric you're working with.
- A Heat Press: While a home iron can work for a hobby project here and there, a dedicated heat press is non-negotiable for professional, long-lasting results. It provides the consistent temperature and even pressure you just can't get otherwise.
Light vs. Dark Garment Papers
A classic rookie mistake is using the wrong type of paper for the shirt color. Heat transfer papers are specifically made for either light or dark garments, and they function completely differently.
Paper for light-colored fabrics has a transparent polymer background. When you press it, only the ink transfers, letting the white or light-colored shirt show through any unprinted areas. Because of this, you always have to mirror your image before printing.
On the other hand, paper for dark garments comes with an opaque, white background. This layer is crucial for making your design’s colors pop instead of getting lost in the dark fabric. Since the whole backing transfers over, you do not mirror the image for this type of paper.
Choosing the Right Tools for the Job
Let’s be honest—the quality of your final product comes down to the gear you use. Making smart choices on your equipment upfront will save you a ton of frustration and wasted materials down the road. It all starts with the heart of your operation: the printer.
You’re going to hit a fork in the road right away: inkjet or laser? Both can get the job done, but they have very different strengths and weaknesses when it comes to heat transfer paper printing. Figuring out these differences is the first step to matching your gear to your goals.
Inkjet vs Laser Printers
Deciding between an inkjet and a laser printer is a big step, as it dictates the type of paper you can use and the kinds of results you can expect. Here's a quick rundown to help you figure out which path is right for your shop.
| Feature | Inkjet Printers | Laser Printers |
|---|---|---|
| Print Quality | Excellent for photo-realistic images and smooth color gradients. | Produces sharp, crisp lines and solid colors. Can struggle with subtle photographic gradients. |
| Durability | Requires pigment ink for good washability and fade resistance. Dye ink will wash out. | Toner is naturally durable and water-resistant, creating a plastic-like layer on the transfer. |
| Initial Cost | Generally lower upfront cost, making it a popular starting point. | Higher initial investment, but often lower cost-per-print on large runs. |
| Best For | Full-color photographs, detailed artwork, and vibrant designs on light or dark garments. | Bold text, logos, and graphics, especially for self-weeding papers on light-colored fabrics. |
| Paper Types | Compatible with a wide range of inkjet-specific heat transfer papers for lights and darks. | Requires laser-specific transfer paper, including "self-weeding" options that leave no background. |
| Maintenance | Prone to clogged print heads if not used regularly. Ink can be expensive. | Toner cartridges have a long shelf life. Less prone to clogging issues. |
For most people starting out, an inkjet printer offers the best balance of quality, versatility, and affordability, especially when printing complex, colorful designs. However, if your work is mostly logos and text for corporate clients, a laser printer’s speed and durability might be a better fit.
Why Pigment Ink is Non-Negotiable for Inkjet
If you go the inkjet route, this is the part you can’t afford to skip. The standard dye-based inks that come with most off-the-shelf home printers are water-soluble. That means your awesome design is going to fade, bleed, or disappear after a couple of washes. It's a rookie mistake we've all seen before.
The fix? Pigment-based ink.
Pigment ink is made of solid particles suspended in liquid. Instead of soaking into the paper, these particles sit on top and bond directly to the transfer film. This makes them incredibly resistant to water and UV fading. The difference in washability is night and day, making pigment ink a must-have investment for any project you want to last.
For professional, sellable products, always invest in a printer that uses pigment inks or purchase compatible third-party pigment inks. The longevity of your designs depends entirely on this choice.
Selecting the Right Heat Press
A good heat press is just as important as your printer. A household iron won't cut it—you need the consistent heat and even pressure that only a real press can deliver to get professional, lasting results.
There are a few main types you'll run into:
- Clamshell Press: This is the most common design. It opens and closes like a mouth, making it super space-efficient. It's perfect for t-shirts and other flat items, especially if you're working in a smaller shop or garage.
- Swing-Away Press: With this style, the top platen swings out horizontally, giving you a completely open and safe view of the bottom platen. It’s much easier to arrange your garment and transfer without risking a burn.
- Draw Press: This is a hybrid of sorts. The lower platen slides out like a drawer, giving you the easy access of a swing-away but often in a more compact design.
Your choice really comes down to your budget, workspace, and what you'll be pressing. For precision and safety, most pros lean toward a swing-away or draw press if they have the space for it.
Bringing Your Designs From Screen To Paper
A killer print starts long before you ever hit the "print" button. The journey from a digital concept on your screen to a physical, press-ready transfer involves a few critical steps that can make or break your final product. Getting these details right is what separates a professional-looking shirt from an amateur one.
First up, let's talk about artwork resolution. For crisp, clear results with heat transfer paper printing, your design file needs to be set to 300 DPI (dots per inch). If you pull a low-resolution image off a website, you're setting yourself up for a blurry, pixelated transfer that just looks cheap. Before you even think about printing, it's worth learning how to improve image quality to ensure your designs look sharp.
Another thing you absolutely cannot forget is to mirror your image. This is a must-do step when you're using transfer paper for light-colored garments. Because the paper is transparent, you print the design in reverse; when you flip it over and press it onto the shirt, it appears correctly. Forget this, and any text or asymmetrical part of your design will be completely backward.
Dialing In Your Printer Settings
Once your file is prepped and ready to go, you have to tell your printer how to handle this specialty paper. Just hitting "print" with the default settings won't cut it. You need to dive into your printer’s settings to get the right color and ink saturation.
- Media Type: In your printer dialogue box, look for a setting like "Premium Matte Paper," "Photo Paper," or even a dedicated "T-Shirt Transfer" option. This tells the printer to slow down and lay down more ink, which gives you a much richer, more saturated print.
- Print Quality: Always crank this up to the highest setting available. It's often labeled "High," "Best," or "Photo." This maximizes the detail and color depth, preventing that faded look you get from standard or draft modes.
Getting the printer settings perfect is a bit of a game of trial and error at first. I always recommend printing a small test design on a corner of your transfer paper to check the colors and quality before you commit to a full sheet.
Work Smarter with Gang Sheets
Printing one design per sheet is fine if you're making a single shirt, but it's incredibly wasteful for bigger jobs. This is where creating a gang sheet—a single page with multiple designs arranged on it—becomes a massive time and money saver. While you could arrange them by hand, it's tedious and you'll probably leave a lot of wasted space.
This is exactly why tools like our Auto-build gang sheet builder were created. It totally simplifies the process for maximum cost effectiveness. You just upload all your different designs, and the software automatically nests them together to use every last square inch of the paper.
As you can see, you can upload and organize multiple graphics in a snap. This drastically cuts down on paper waste and seriously lowers your cost per print. Using an automated builder just lets you work smarter, not harder, combining ease of use with significant savings.
If you need some inspiration for what to create, check out our guide on leveraging custom heat transfer designs.
Mastering the Heat Press Application
This is where the magic happens. The heat press is the final step in the heat transfer paper printing process, turning your printed design into a permanent part of the garment. Getting it right comes down to a perfect balance of three things: temperature, time, and pressure. Nail these, and you'll get a transfer that's vibrant, durable, and looks like it came straight from a pro shop.
Every type of transfer paper has its own recipe for success, so your first move should always be to check the manufacturer's instructions. A setting that works perfectly for a cotton tee might completely scorch a polyester blend. If you want to go deeper, our own comprehensive temperature guide for heat press breaks down the ideal settings for all kinds of materials.
The Proven Application Workflow
A consistent workflow is your best friend. It cuts out the guesswork and helps you avoid those rookie mistakes that can ruin a perfectly good garment.
Before you even think about placing your transfer, always pre-press the garment for about 5-10 seconds. It’s a simple step, but it’s crucial. This gets rid of any hidden moisture and flattens out wrinkles, giving you a perfectly smooth and dry surface for the transfer to stick to.
Next, carefully position your printed transfer paper on the garment. Remember, it's design-side down for light paper and design-side up for dark paper. If you’re worried about it shifting, use a couple of small pieces of heat-resistant tape to secure the corners. This little bit of extra effort prevents the dreaded "ghosting" that happens when the paper moves during pressing.
The entire path from a digital file to a finished print is a clear, multi-step process.

This visual breaks down the essentials: prepping your artwork with high resolution, mirroring the image when needed, and finally printing it onto the transfer paper. Following this sequence is key to avoiding wasted materials and getting a professional result every time.
Hot Peel vs. Cold Peel
Once the timer on your press beeps, what you do next depends entirely on whether you're using a hot or cold peel paper. This is a critical detail that can make or break your final product.
- Hot Peel: Just like it sounds, you peel the backing paper off immediately after the press opens, while everything is still hot. This method usually gives the design a softer feel because the ink embeds deeper into the fabric fibers.
- Cold Peel: For this type, you have to let the transfer cool down completely before you even think about removing the backing. Peeling it while it's still warm will ruin the design, guaranteed. Cold peel transfers often have a slightly glossier and thicker finish.
No matter which type you're using, always peel the backing paper in one smooth, confident motion. If you hesitate or stop midway, you risk tearing the design or causing parts of it to lift off the shirt.
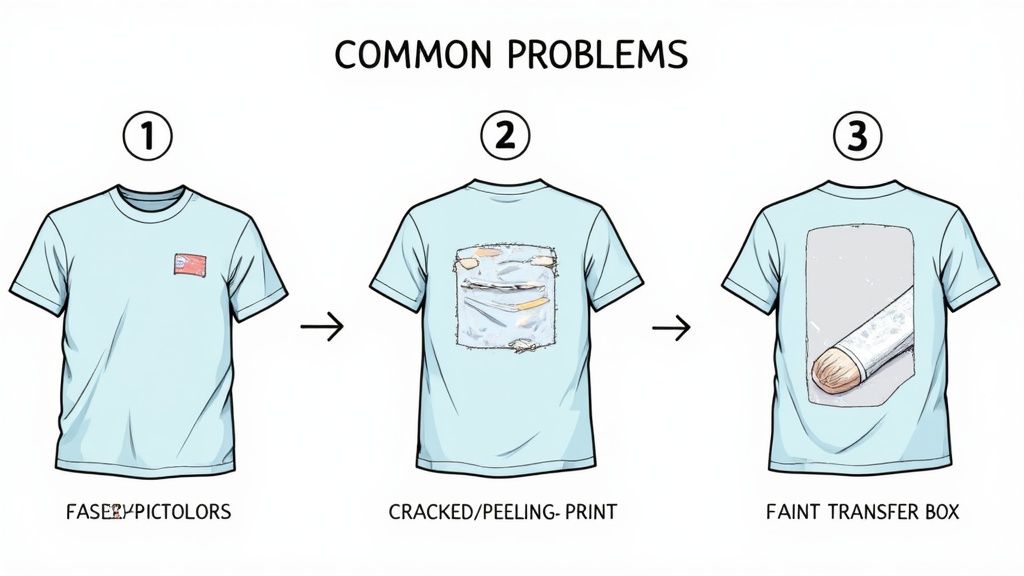
Solving Common Heat Transfer Problems
Even with the best gear, things go sideways sometimes during the heat transfer paper printing process. Knowing how to quickly spot and fix these hiccups is what separates the pros from the hobbyists. The good news? Most problems boil down to just a few key variables, and a small tweak is usually all it takes to get things looking perfect again.
One of the most common complaints I hear is a design that looks faded or washed out right off the press. If your colors just don't pop, the first place you should look is your printer settings.
Printing on "standard" or "draft" quality just isn't going to cut it. Those settings are designed to save ink, but for transfers, you need a heavy, saturated laydown. The same goes for the media type—if you haven't told the printer you're using something like "Premium Matte Paper" or "Photo Quality," it won't apply enough ink for the paper's special coating. Always, always double-check that you’re using the highest quality print setting you have.
Why Is My Design Cracking or Peeling?
A design that starts cracking or peeling after just a couple of washes is a dead giveaway for an adhesion problem. Nine times out of ten, this points straight back to your heat press settings—usually, not enough pressure or time.
Think of it this way: the heat press needs to apply firm, even pressure to literally melt the ink and transfer film into the fabric's fibers. If your pressure is too light, the design just sits on the surface, making it easy to peel away.
Insufficient heat or pressing time is just as bad. Every brand of transfer paper has a sweet spot for temperature and time. Cutting the press time short, even by a few seconds, means the adhesive won't fully activate, and you'll end up with a failed transfer.
Another huge culprit is moisture. If you skip the pre-press step, steam gets trapped under the transfer and messes up the bond. Don't skip it! Always pre-press your shirt for 5-10 seconds to cook out any moisture before you lay down your design.
Getting Rid of That Annoying Transfer Box
Ah, the dreaded transfer box. Seeing that faint, rectangular outline around your design is a super common issue, especially with papers made for light-colored shirts. That box is just the polymer film from the unprinted areas of the paper.
While some paper brands are definitely better at minimizing this than others, you can fight back by trimming your design as close to the edges as possible before you press it.
- Trim Carefully: Get in there with a good pair of scissors or a vinyl cutter. The more unprinted paper you can remove, the better.
- Check Pressure: Sometimes, too much pressure can actually make the box worse by pressing the film's edges deeper into the fabric. It's a balancing act.
- Consider DTF: For really intricate designs where trimming is just not going to happen, this is the perfect time to switch to Direct-to-Film (DTF) transfers. They leave zero background film, which is a total game-changer.
When you're dealing with a bunch of small, complex designs, trimming each one by hand is a massive time sink. This is exactly why a tool like our Auto-build gang sheet builder is so valuable. For maximum ease of use and cost effectiveness, it helps you lay everything out efficiently, making the cutting process faster and wasting less material.
When you run into trouble, it helps to have a quick checklist. I've put together this table to help you diagnose and fix the most frequent heat transfer issues on the fly.
Heat Transfer Troubleshooting Guide
| Problem | Potential Cause | Solution |
|---|---|---|
| Faded or Dull Colors | Incorrect printer settings. | Use the highest quality print setting and select a "Premium Matte" or "Photo" paper type. |
| Low ink levels. | Check your ink cartridges and replace any that are running low. | |
| Design Cracking/Peeling | Insufficient pressure or time. | Increase heat press pressure to firm and ensure you're pressing for the recommended time. |
| Moisture in the garment. | Always pre-press the fabric for 5-10 seconds to remove moisture before applying the transfer. | |
| Fabric incompatibility. | Make sure your transfer paper is designed for the type of fabric you're using (e.g., cotton, poly, blends). | |
| Visible Transfer Box | Excess unprinted film. | Trim as close to the design's edge as possible before pressing. |
| Excessive pressure. | Reduce the pressure slightly to avoid embedding the film edges into the fabric. | |
| Paper type. | Switch to a "trim-free" paper or consider using DTF transfers for a zero-background finish. | |
| Uneven or Patchy Transfer | Uneven heat press temperature. | Test your heat press for cold spots. Ensure it's fully preheated. |
| Uneven pressure. | Check for obstructions on the platen (seams, zippers) and use a pressing pillow if needed. |
Keep this guide handy, and you'll be able to solve most issues without wasting time or materials. A methodical approach is always the best way to get back to printing great-looking shirts.
Knowing When to Use DTF Transfers Instead
Heat transfer paper is a fantastic tool to have in your arsenal, but it's not a one-size-fits-all solution. Part of getting professional-grade results is knowing when to switch gears to another method, like Direct-to-Film (DTF). For certain jobs, DTF isn't just an alternative; it's a clear winner.
The biggest advantages you'll notice right away with DTF are its incredible durability and much softer feel. Some heat transfer papers can leave a thick, plastic-like layer on top of a shirt. DTF, on the other hand, integrates into the fabric for amazing stretch without cracking. This makes it perfect for performance wear or any garment where comfort is key. The demand for these materials is huge; the heat transfer paper and vinyl market is expected to reach USD 2.27 billion by 2034, with apparel leading the charge. You can find more details about this expanding market and its trends here.
Making the Switch to DTF
So, when should you put the paper aside and go with DTF transfers? From my experience, a few situations make it an easy choice.
- Intricate, Complex Designs: If your artwork has tiny text, super fine lines, or distressed effects, trying to trim that out of transfer paper is a recipe for a headache. DTF transfers have no background film, meaning only the ink transfers. You get a clean, perfectly trimmed look every single time, no scissors or weeding required.
- Large or Consistent Orders: For bigger batches or repeat orders for a client, DTF delivers consistency you can count on. You don't have to worry about slight variations in printing or cutting. Every single shirt will look identical to the last.
- Working with Difficult Fabrics: DTF is a workhorse. It sticks beautifully to a much wider range of materials—including tricky ones like polyester, nylon, and even leather—where some transfer papers might fail or peel.
When the goal is a premium, retail-quality finish that looks and feels like it belongs on a store shelf, DTF is the way to go. The soft hand-feel and vibrant colors that last wash after wash really set it apart.
If you want to see how DTF stacks up against other pro-level methods, check out our detailed comparison of DTF vs. DTG printing technologies. It gives you a great overview of where each one shines.
Ultimately, choosing between heat transfer paper and DTF comes down to the job at hand. For a quick one-off prototype or a simple, blocky design, paper can be a great, cost-effective option. But when you need to deliver on complex graphics, large runs, or a superior feel, DTF is the professional's choice. And when you're juggling multiple designs for a big order, our Auto-build gang sheet builder makes life so much easier by organizing your files to maximize every inch of film, ensuring ease of use and maximum cost effectiveness.
Ready to see the DTF difference for yourself? At Lion DTF Transfers, we make it simple to get vibrant, durable, ready-to-press transfers shipped right to your door. Build your custom gang sheet or upload your designs today! https://liondtf.com