










You've probably got a bike sitting in front of you with a good frame, a few scuffs, and a decal that looked perfect online but now seems too large, too thin, or badly positioned. Maybe you're restoring an older steel frame, adding a name to a commuter, or trying to make an e-bike easier to spot after sunset. The sticker is small, but the wrong material or rushed application can make the whole build look unfinished.
Bicycle decals and stickers should do more than decorate. The right decal can reinforce a brand, identify a bike, add a visibility cue, or give a tired frame a deliberate new character. The result depends on three things that matter far more than the artwork alone: surface preparation, material selection, and placement.
Transforming Your Ride with Professional Decals
A plain blue bicycle can become something personal in an afternoon. A narrow name graphic on the top tube gives a commuter a finished look. A clean logo on the down tube can make a shop build feel cohesive. White reflective details on a dark fork can add visual interest while helping the bike stand out from the side in low light.
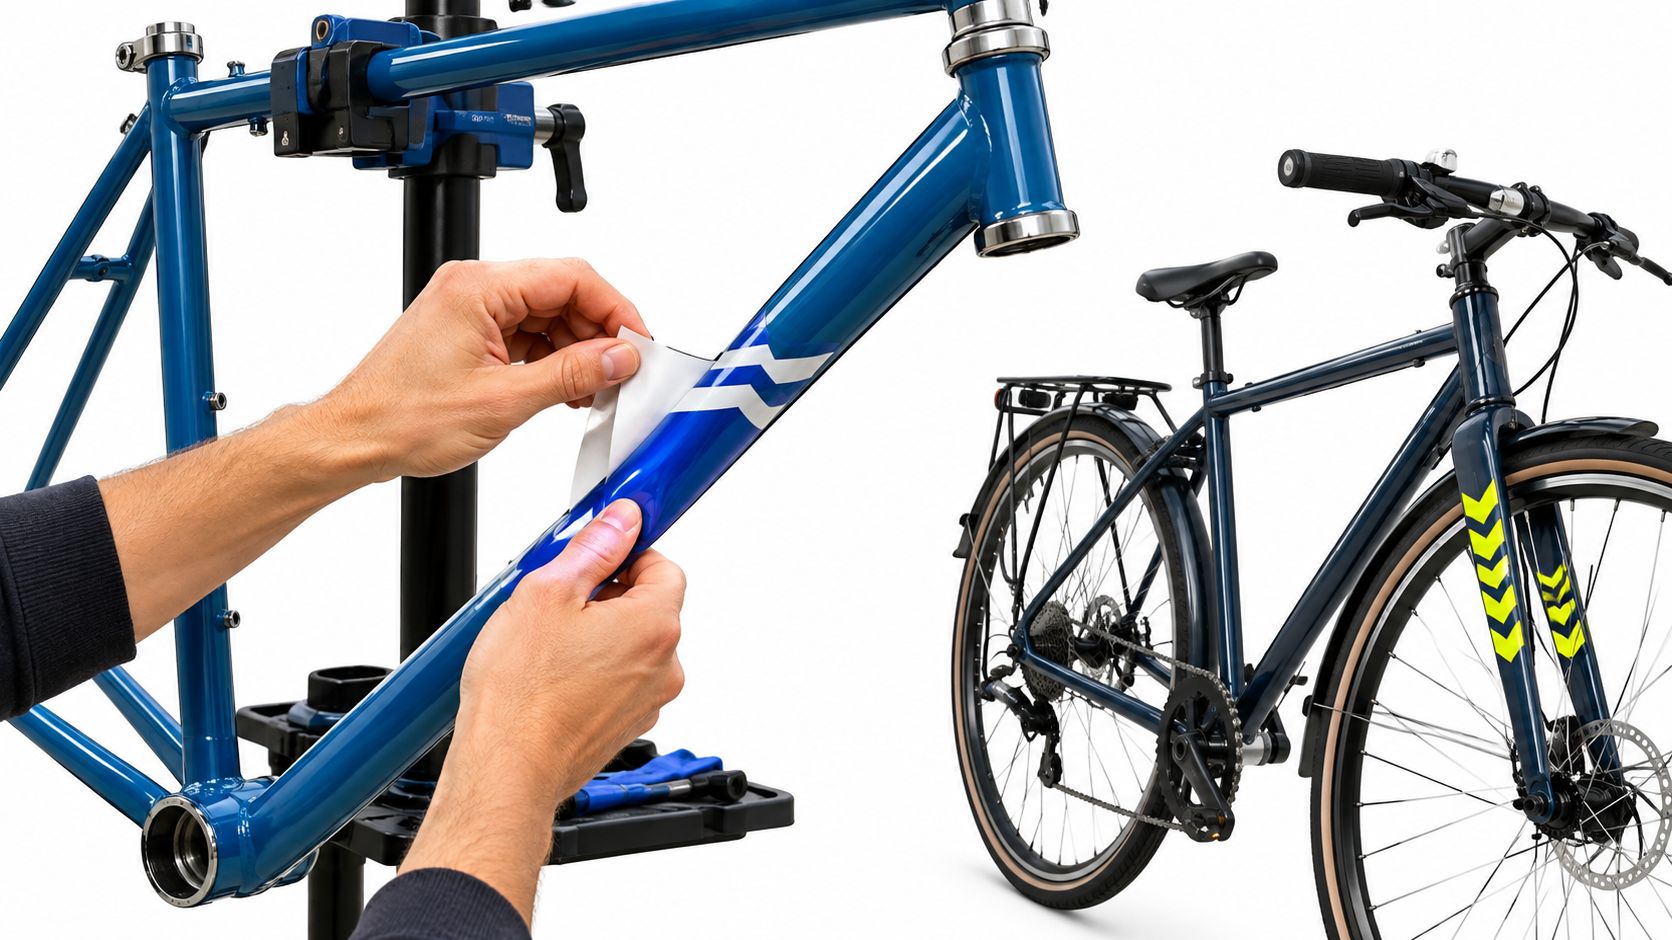
That transformation works best when the graphic is designed around the frame rather than dropped onto it as an afterthought. Tubes taper, welds interrupt clean lines, cables cross available space, and frame bags can hide a carefully designed mark. Measure the intended area first, then decide whether the artwork needs to be narrow, vertical, mirrored, or simplified.
A vintage restoration deserves a different treatment from a mountain bike used through mud and brush. On an older frame, a restrained head-tube badge or period-style lettering may preserve the character of the bicycle. On an aggressively ridden bike, the decal needs stronger abrasion resistance and enough contrast to remain readable after cleaning.
From metal badges to printed graphics
Bicycle graphics have a long practical history. By the late nineteenth and early twentieth centuries, riders were already using hand-painted designs and slogans for self-expression. As bicycle manufacturing and graphic production improved, decals became more standardized and widely available by the middle of the twentieth century. This history of bicycle stickers and head badges also describes how manufacturers gradually replaced traditional metal head badges with decals and Mylar stickers, a shift toward lighter and lower-cost graphic applications.
That history explains why a sticker can function as more than surface decoration. It can act as an identity marker, a replacement badge, a shop signature, or a small protective layer over a frequently touched area. It still needs to match the job. A thin decorative graphic isn't frame-protection film, and a reflective accent isn't a substitute for required lights or reflectors.
Modern Direct-to-Film, or DTF, printing gives small brands and makers a practical way to produce detailed, full-color artwork without committing to a large run of identical graphics. UV DTF stickers are intended for hard, smooth surfaces, while other transfer systems may be intended for fabric. Check the product category before ordering, because the transfer method, adhesive, and surface compatibility all affect the finished result. Learn more about UV DTF stickers and their application.
Shop-floor rule: A professional-looking decal starts with the frame measurement, not the design file.
The best result is usually quieter than people expect. A bold logo with clean spacing often looks more expensive than a crowded set of tiny graphics. Use enough contrast against the frame color, keep important details away from edges and welds, and create mirrored files when both sides of the bike need to match. Quality printing helps, but it can't rescue artwork that was designed without the actual bicycle in mind.
Step-by-Step Application Process
A decal fails most often before it ever touches the frame. Dust, chain lubricant, polish, moisture, and fingerprints can prevent the adhesive from making consistent contact. A careful installation removes those variables before you begin.
Prepare the frame properly
- Wash away loose dirt. Clean the area so grit can't become trapped under the decal. Dry it completely with a lint-free cloth.
- Degrease the surface. Use a frame-safe cleaner or isopropyl alcohol where the finish allows it. Carbon, matte paint, aged clear coat, and unusual finishes can react differently, so follow the frame maker's care instructions and test an inconspicuous area first.
- Check the temperature and condition. Apply to a dry, sound surface rather than chipped paint, loose clear coat, rubber, or a heavily textured area. The adhesive needs a stable surface to bond to.
- Position before exposing the adhesive. Hold the decal in place with low-tack painter's tape. Step back, check the angle from both sides, and confirm that bottle cages, cables, frame bags, knees, and straps won't rub the graphic.
- Create a hinge. Tape one edge firmly, then fold the decal away from the frame. Peel back only the section you're ready to apply. This keeps the graphic from drifting while you work.
- Apply from the center outward. Use a felt-edged squeegee or a clean, flexible card. Work gradually toward the edges rather than pressing the entire decal down at once. That movement pushes air away from the center and makes bubbles easier to prevent.
The correct pressure and heating method depends on the transfer construction and the frame finish. Don't borrow a heat-press setting from a shirt application and assume it belongs on aluminum, steel, or carbon fiber. A bicycle frame can have paint, clear coat, decals, or a matte treatment over the underlying material, and excessive heat can damage that finish. Use the supplier's stated temperature, dwell time, and pressure instructions for the specific product.
Peel and inspect without rushing
Transfer tape should come off slowly and at a low angle. If part of the graphic lifts with the tape, lower it again, burnish that area, and continue more gradually. A hot peel or cold peel is not a matter of preference. It depends on the adhesive and transfer system, so follow the product directions rather than guessing.
Inspect the edges, tube transitions, and small lettering under good light. Press down any edge that hasn't fully seated, then give the adhesive time to settle before washing or exposing the bike to hard use. Use the supplier's application guidance for UV DTF products when that is the material you selected.
Practical test: If you can still see contamination under the graphic before pressing it down, remove the decal and start again. Trapping it won't make the problem disappear.
The cleanest installations usually come from patience, not force. Rushing the backing removal, stretching a graphic around a tight curve, or scraping bubbles with a sharp tool creates defects that become more obvious after the first wash.
Material Choices and Adhesive Science
A sticker that survives a ride needs a material suited to its exposure. A casual road bike stored indoors has different requirements from a mountain bike covered in grit, rain, and repeated cleaning. The right question isn't just, "Is it waterproof?" Ask how the face film, ink, laminate, and adhesive will behave together on the exact frame surface.
Choose the vinyl grade for the job
Standard calendered vinyl is a practical choice for flatter areas and moderate outdoor use. Industry product data rates it for about 3 to 5 years outdoors, although actual service depends on sunlight, abrasion, cleaning, and installation quality. The bike decal material guide from Atomm explains that the laminate shields the printed ink from UV exposure, water, and surface wear.
Premium calendered vinyl offers a more durable option for regular outdoor exposure. The same industry guidance rates it at about 7 years outdoors, making it a sensible middle ground when a decal needs to last but the frame doesn't have severe compound curves.
Cast vinyl is the specialist choice for demanding surfaces. It is made to conform more readily around curves and is rated at about 8 to 10 years outdoors in the cited product guidance. Vinyl material information from StickerApp gives the same broad comparison between standard calendered, premium calendered, and cast constructions.
| Riding situation | Sensible material direction | Main trade-off |
|---|---|---|
| Flat tube, occasional riding | Standard calendered vinyl with laminate | Lower material cost, less suited to aggressive curves |
| Regular commuting | Premium calendered vinyl with laminate | More durability without the highest material cost |
| Curved frame or hard use | Cast vinyl with protective laminate | Higher material cost, better conformability and longevity |
| Temporary branding or event use | Removable adhesive system | Easier replacement, lower long-term security |
The laminate matters because the printed ink is otherwise exposed directly to sunlight and abrasion. A clear overlaminate can reduce fading and surface wear, but it also adds thickness and may change the gloss level. Gloss can make colors appear brighter, while matte can better match a subdued frame finish.
Match the adhesive to the intention
Permanent outdoor acrylic adhesives suit decals that need to remain attached through weather and regular handling. Removable adhesives make more sense for event identification, temporary promotions, or graphics that you expect to refresh often. Neither label guarantees effortless removal from every finish.
Paint condition changes the risk. A sound, cured, clear-coated surface is easier to work with than flaking paint, a fragile matte coating, or a frame with an unknown repaint. On carbon, the sticker sits over the finish rather than the structural fibers, but the paint and clear coat still determine compatibility.
A curved down tube also exposes the limits of a cheap decal. If the film is stiff, it may lift along the edges after installation. Cast vinyl can conform more effectively, while a softer transfer may be easier to install on a modest curve. Don't use a decorative sticker as a substitute for a dedicated impact or frame-protection film. They solve different problems.
Cost Efficiency and the Auto-Build Gang Sheet Builder
Buying one finished decal at a time is straightforward, but it can become inefficient when a shop needs mirrored fork graphics, repeated logos, small frame labels, and several colorways. A mass-produced sticker pack may cost less per item, but it usually limits the artwork, size, finish, and branding. Custom production gives you control, though manual file setup can waste sheet space when every design is placed separately.
The practical answer for small runs is an Auto-build gang sheet builder. Instead of arranging each artwork by hand, upload the required designs, set their sizes and quantities, and let the builder organize them to use the available sheet area efficiently. That reduces the empty space that often appears when a person lays out graphics one at a time.
Compare the real production choices
A ready-made pack is quick, but it may force a compromise in brand consistency. It can also leave you with graphics that don't fit a particular tube or don't provide the contrast needed on a specific frame color.
Manual gang-sheet layout gives an experienced operator control over spacing and orientation. It also takes time, and a small adjustment to one design can require the rest of the sheet to be rebuilt. That labor becomes harder to justify when a customer needs multiple sizes or a fleet order includes many distinct marks.
The Auto-build gang sheet builder is most useful when the order contains varied artwork. A print shop can combine a long down-tube logo, small identification marks, mirrored fork decals, and spare replacements on one organized sheet. A maker testing a new brand can use the same approach for a small custom run without paying for a separate sheet for every graphic.
Production insight: Material waste isn't only a purchasing problem. It often begins with poor layout before printing starts.
Efficiency doesn't mean squeezing graphics together without considering production. Leave enough separation for clean cutting or handling, keep mirrored pieces clearly identified, and check that the smallest lettering remains legible at its finished size. A crowded sheet may use space well but still create confusion during application.
After layout, production speed also depends on file readiness. Vector artwork, transparent backgrounds, clear cutlines, and named versions reduce back-and-forth during proofing. If a shop is producing graphics for several bikes, label files by location, such as down-tube-left, down-tube-right, fork-left, and fork-right.
The Auto-build gang sheet builder also supports repeatability. A bike shop can keep a consistent arrangement for its logo set, a fleet manager can add replacement graphics without rebuilding every file, and a small brand can test several designs while keeping the order organized. See how a DTF gang sheet builder handles multiple designs.
The video below shows the kind of workflow that helps makers move from artwork to arranged production files without treating every order as a one-off puzzle.
The cost advantage comes from using the sheet intelligently, not from choosing the cheapest sticker construction. A poorly made decal that needs replacing after a short period can cost more in labor and customer frustration than a durable graphic planned correctly from the start.
Strategic Placement and Safety Compliance
The most visible position isn't always the best position. A decal placed under a frame bag may be protected from abrasion but invisible. One placed beside a cable port may look good for a week and then wear where the housing moves. Placement needs to balance visibility, friction, access, and legal requirements.
Start with protected frame zones
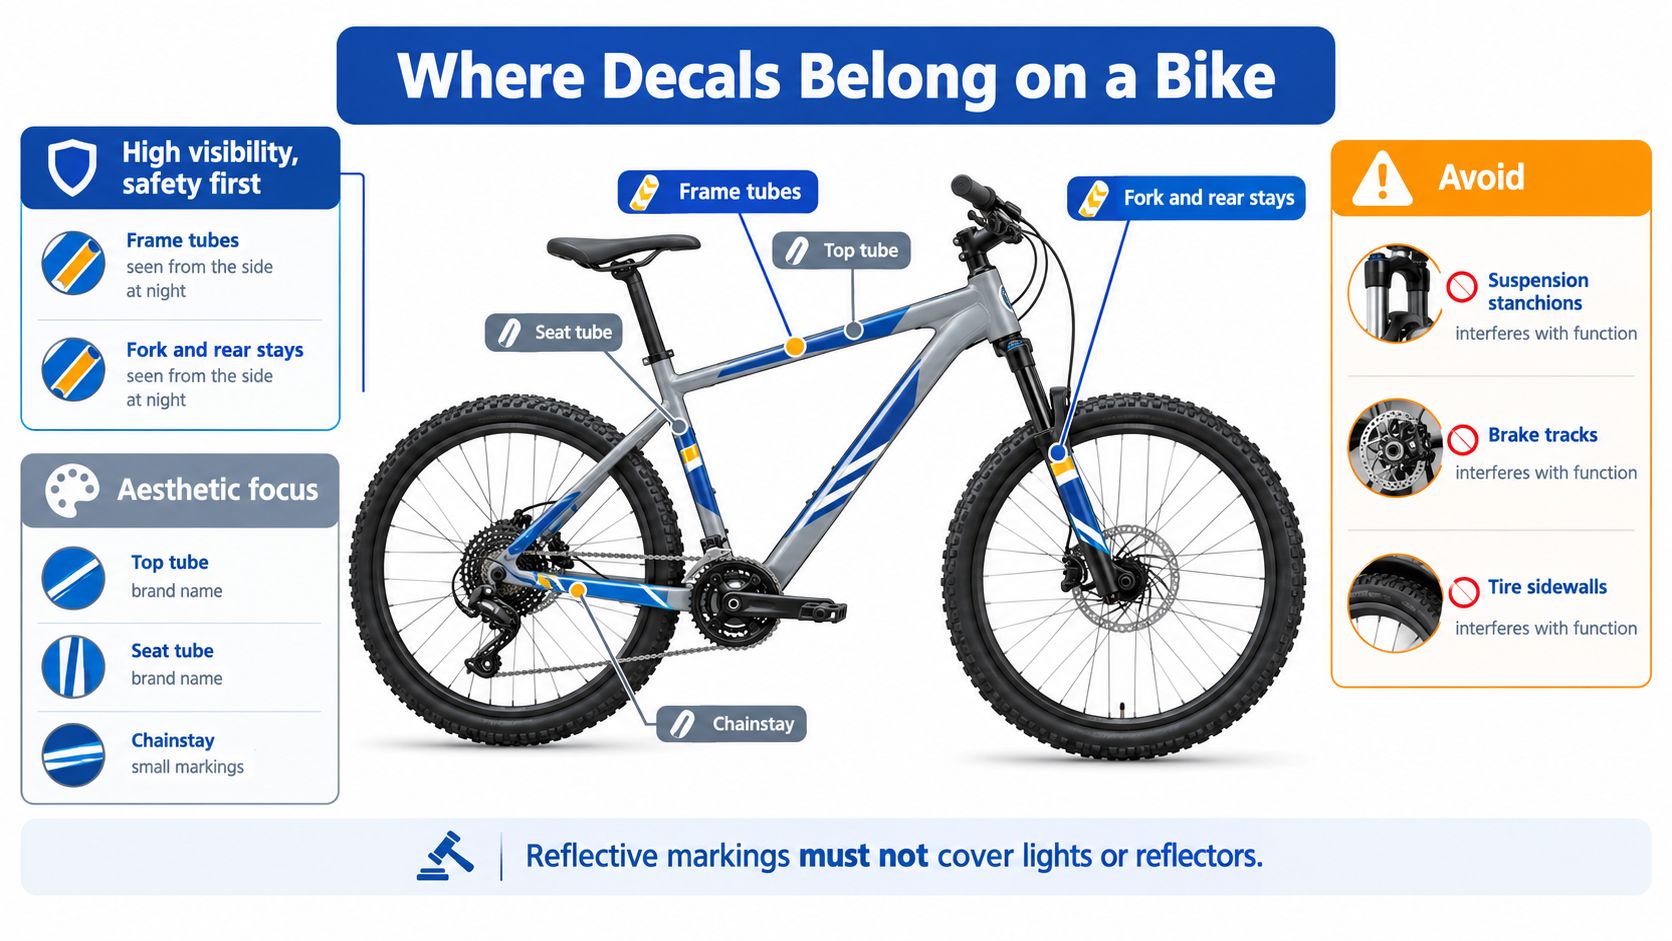
The top tube, down tube, seat tube, and fork are common decal locations because they offer broad, relatively stable surfaces. A guide to bicycle sticker placement specifically recommends these areas and warns against contact points where straps, hands, knees, pedals, or cables can rub the graphic.
The chainstay needs more caution. It may be an attractive location for a small mark, but it sits close to the chain, footwear, grit, and drivetrain cleaning. Suspension stanchions, brake tracks, tire sidewalls, pivots, and moving interfaces should be treated as functional surfaces, not spare advertising space.
Use this decision order:
- Protect function first. Never place a decal where it can interfere with steering, braking, suspension travel, drivetrain movement, cables, or tire clearance.
- Choose the viewing angle. Side-facing reflective details can help a bicycle present a stronger visual signature to traffic, while a top-facing graphic may be mainly decorative.
- Keep required markings readable. A custom graphic must not hide a serial number, classification label, safety label, light, reflector, or other marking that needs to remain visible.
- Check the riding kit. Frame bags, locks, racks, and straps can create friction even when the bare bicycle looks clear.
Treat visibility as a separate design brief
Decorative contrast and nighttime conspicuity aren't the same thing. Research on cyclist visibility reports that fluorescent yellow, red, and orange can improve daytime detection, while earlier conspicuity research supports reflective elements on the rider and bicycle. The independent visibility research available through PMC supports using visibility-focused graphics as part of a wider safety approach.
Reflective or fluorescent bicycle decals can add a useful visual cue, particularly from the side. They don't replace a headlight, taillight, legally required reflector, or safe riding behavior. Reflective material also needs to remain uncovered and correctly positioned to perform its intended function.
Rules vary by location and by bicycle type. Switzerland provides a clear historical example of stickers serving a legal purpose. Bicycle license plates were issued there from 1893 through 1988, and from 1934 each plate was valid for one year. After 1988, metal plates were replaced by a self-adhesive vignette, and that system continued until its abolition at the end of 2011, ending a 120-year bicycle plate era. The Swiss bicycle plate history from Velonummern documents that progression.
E-bikes and commercial fleets require extra care because some jurisdictions require visible classification labels. Guidance on legal and custom e-bike stickers emphasizes UV, rain, and temperature resistance while noting that regulatory markings need to remain legible and permanent. Check local rules before covering or replacing an official label.
A reflective sticker should never cover a headlight, taillight, turn signal, mirror, windshield, license plate, or required safety label. Reflective sheeting guidance for bikes and other vehicles reinforces that visibility accessories must not obstruct those components.
Long-Term Maintenance and Removal
A quality decal doesn't become maintenance-free once it is installed. Mud and road film can act like abrasive paste when a rider wipes the frame dry, and aggressive pressure washing can attack lifted edges. Clean the bike with a soft cloth or sponge, rinse away grit first, and avoid dragging dirt across the printed surface.
The common assumption is that stronger cleaning creates a cleaner decal. It often does the opposite. Solvent-heavy products, rough brushes, and sharp tools can dull the laminate, weaken edges, or mark the frame beneath the graphic. Use a cleaner compatible with the frame finish, and don't scrub an edge that has started to lift.
Watch the failure points
Inspect the decal after rides in wet or gritty conditions. Pay attention to:
- Raised corners: Pressing them down early may prevent more contamination from entering.
- Cloudy or faded print: This can indicate surface wear or exposure rather than a cleaning problem.
- Residue at the edge: Remove it with a finish-compatible cleaner, not an improvised solvent.
- Bubbles that return: Persistent bubbles often signal contamination or poor contact beneath the film.
Outdoor longevity depends on the complete construction, not the vinyl name alone. Ink, laminate, adhesive, frame finish, sunlight, washing, and abrasion all contribute to the result. A decal that survives on a sheltered commuter may age differently on a mountain bike that is regularly brushed against branches and cleaned after muddy rides.
Removal should be slow and controlled. Warm the decal gently with a hair dryer on a low setting, then pull it back at a shallow angle rather than lifting straight away from the frame. Don't use a metal scraper or blade, and don't assume that alcohol or adhesive remover is safe on every paint or clear coat.
Carbon frames deserve the same caution as painted aluminum or steel frames. The structural material isn't the only concern. The finish, clear coat, age of the paint, and adhesive compatibility determine whether removal is clean. If the frame maker gives specific care instructions, follow those before testing a cleaner.
Removal rule: Heat softens adhesive. Patience protects the finish.
If you're refreshing a bike for resale, remove the graphic before the frame develops a sharp contrast between the covered and exposed finish. On sensitive matte surfaces, test first and work in a small area. Replacing a decal is inexpensive compared with correcting damaged paint or clear coat.
Lion DTF Transfers offers UV DTF stickers, DTF transfers, gang sheets, and an online Auto-build gang sheet builder for organizing custom artwork efficiently. For bicycle decals and stickers, visit Lion DTF Transfers to upload your designs, arrange a custom order, and choose a transfer approach suited to your project.