


We’ve all been there. You get a batch of custom tees back from the printer, hold one up, and your stomach sinks. The design is too small, awkwardly high, or worse, a pixelated mess. The real challenge in t-shirt design isn't just the creative part; it's making sure that art looks just as good on a real shirt as it did on your screen.
Getting the size "right" is more of a strategic choice than a single number. It depends on the shirt size, where you're placing the design, and the kind of visual punch you want it to pack.
Why Getting T-Shirt Design Sizes Right Matters
A perfectly sized design does more than just look good—it builds your brand's credibility and flat-out drives sales. A graphic that’s well-proportioned feels professional and intentional, instantly boosting the shirt's perceived value. On the flip side, a blurry or poorly scaled design screams "amateur hour," which can erode customer trust and lead straight to bad reviews.
Using the right dimensions ensures your artwork is clear, readable, and balanced on every single garment, from a Youth Small to an Adult 3XL. That kind of consistency is crucial for building a cohesive product line that people will be proud to wear. It turns a simple tee into a walking billboard for your brand.
The Cost of Sizing Mistakes
Let's be blunt: getting your tshirt design sizes wrong costs you real money. Every misprinted shirt is wasted inventory, a direct hit to your bottom line. Those mistakes add up fast, especially on big orders, turning your would-be profits into sunk costs.
And it's not just about the materials. Think of the time you'll lose redesigning files, re-submitting orders, and dealing with unhappy customers. Those are all hours you could have spent growing your business. For a bigger picture on how smart planning impacts success, check out these expert tips for selling clothes online.
A Smarter Path to Perfect Prints
This guide is here to cut through all the guesswork and give you a clear roadmap from digital file to flawless final print. We’ll cover everything from the basics, like DPI, to more advanced, cost-saving techniques that the pros use. Understanding these principles will help you dodge the common pitfalls and make smarter decisions from the start.
You'll also see how modern tools can make the entire process smoother and more profitable. For instance, our Auto-build gang sheet builder was designed specifically to simplify complex jobs, letting you arrange multiple design sizes on a single sheet for ultimate ease of use and cost-effectiveness. This method doesn't just ensure every print is perfect; it also slashes your per-print cost by making the most out of every inch of material.
By mastering the fundamentals of design sizing and using efficient tools, you can ensure every print you make is a success—saving you time, money, and a whole lot of frustration.
With this guide, you’ll gain the practical know-how to move forward with confidence, making sure your creative vision is brought to life exactly as you imagined, every single time.
Building Your Design on a Solid Foundation
Before you even think about where your design will go on the shirt, you need a technically perfect digital file. This is the bedrock of a great print, and it’s where so many well-intentioned designs fail, ending up fuzzy, pixelated, or just plain wrong.
Think of your design file as the blueprint for your t-shirt. If the blueprint is flawed, the final product will be too, no matter how awesome the original idea was. Let’s get the foundation right.
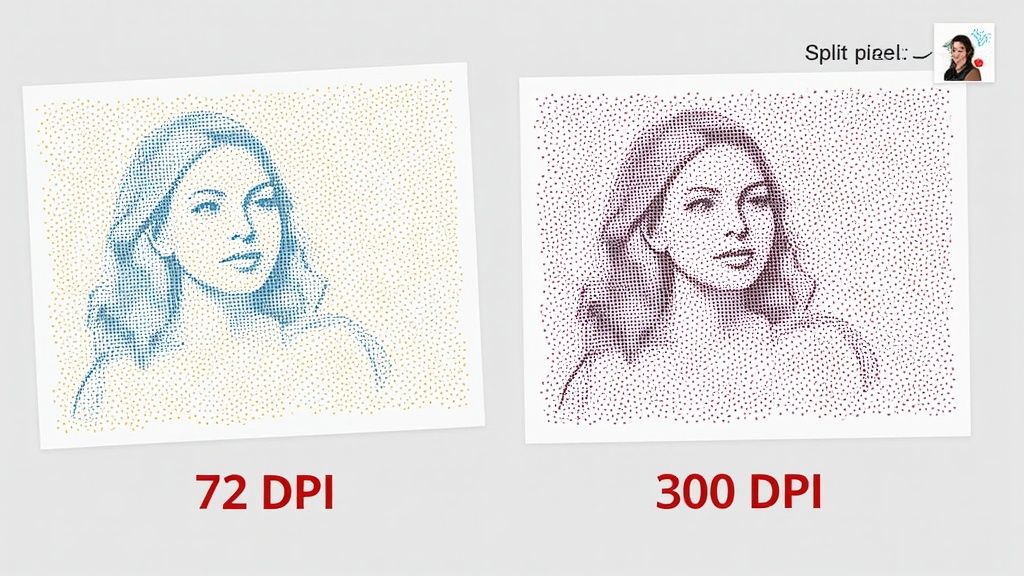
The Non-Negotiable Rule of 300 DPI
The most critical spec for any t-shirt design is DPI, or dots per inch. Imagine it like the thread count in high-end fabric—a higher count creates a smoother, more detailed feel. In printing, a higher DPI packs more "dots" of ink into every inch, resulting in a sharp, crisp, and professional graphic.
For apparel printing, 300 DPI is the industry-standard minimum. This ensures every line, curve, and tiny detail in your art is rendered with total clarity. A file with a lower DPI, like the 72 DPI used for web images, just doesn't have enough data for the printer. The result? A blurry, pixelated mess on the final shirt.
Setting your design canvas to 300 DPI at the final intended print size is the single most important step you can take to avoid poor-quality prints. It’s a simple setting that makes all the difference between a homemade look and a retail-quality product.
This means if you want a 12-inch wide graphic, your digital canvas must be set to 12 inches wide at 300 DPI before you start designing. You can't just scale up a small, low-res image later and expect it to look good.
Choosing the Right File Type: Vector vs. Raster
Your artwork will fall into one of two categories: raster or vector. Understanding the difference is key to creating designs that are both high-quality and easy to resize.
- Raster Files (.PNG, .JPG): These are built from a grid of pixels, like a digital mosaic. They're great for super-detailed photos, but they get pixelated and lose quality when you try to make them bigger. For DTF, a transparent PNG is the format we need.
- Vector Files (.AI, .SVG, .EPS): These are created with mathematical equations that define points, lines, and curves. Because of this, they can be scaled to any size—from a tiny chest logo to a giant billboard—with zero loss of quality.
For logos, text, and most illustrations, vector is always the better way to start. Even though you’ll ultimately export it as a high-resolution (300 DPI) transparent PNG for DTF printing, beginning with a vector file gives you maximum flexibility to resize your design for different shirt sizes later on.
Setting Up Your Canvas and Colors
When you create a new file in your design software, you're setting up your digital canvas. Always punch in the final print dimensions in inches and set the resolution to 300 DPI right from the start.
Just as important is the color mode. Your screen displays colors in RGB (Red, Green, Blue), which is based on light. Printers, on the other hand, use CMYK (Cyan, Magenta, Yellow, Black), which is based on ink. Designing in CMYK mode gives you a much more accurate preview of how the final colors will look on the garment.
This avoids that unwelcome surprise when your vibrant on-screen design comes out looking dull in print. Mastering the setup for custom heat transfer designs is crucial for color accuracy. This technical prep work ensures your vision translates perfectly from screen to shirt, making your life easier and your prints flawless.
A Practical Guide to Standard Design Sizes
Ever get that feeling of just guessing when it comes to artwork dimensions? Let’s clear things up. Getting your t-shirt design sizes right isn't about following a rigid chart—it’s about understanding visual balance. A graphic that looks perfect on an Adult Large can completely swallow a Youth Small, turning a killer design into an awkward blob.
Think of the t-shirt as your frame and the design as the art inside. You wouldn't put a tiny photo in a massive frame, and you wouldn't cram a huge painting into a tiny one. The same idea applies here. We're aiming for artwork that looks intentional and professional, no matter the garment size.
Full Front and Back Designs
This is your biggest canvas, the prime real estate for statement graphics, detailed art, and tour merch. For most standard adult tees (Small through XL), a design width between 10 to 12 inches is the sweet spot. It’s big enough to make an impact without wrapping awkwardly around the wearer's sides.
When you move into larger sizes like 2XL and 3XL, you can push that width up to 12 to 14 inches to keep everything looking proportional. And for youth sizes? You'll need to scale down quite a bit. A youth large might look best with an 8-inch wide design, while a youth small could drop to just 6 inches.
The goal is for the design to own the chest area without overwhelming it. A classic rookie mistake is using one massive graphic for all shirt sizes. It ends up looking comically large on smaller shirts and oddly small on the bigger ones.
Left Chest and Pocket Logos
For a cleaner, more professional vibe, the left chest is a timeless choice. It's the perfect spot for brand logos, small icons, or simple monograms. The key here is restraint. You want a tasteful accent, not the main event.
A standard width for a left chest logo is anywhere from 2.5 to 4.5 inches. This size ensures it sits cleanly over the pectoral muscle without creeping into the armpit or getting lost in the middle of the chest. Best of all, this sizing is pretty consistent across most adult sizes, from XS all the way to 3XL.
- For Business Branding: A 3.5-inch wide logo is a popular, can't-go-wrong choice for corporate apparel and uniforms.
- For a Fashion Feel: Smaller 2.5-inch designs can create a more minimalist, high-end look.
- For Pocket Prints: If you're printing on an actual pocket, measure it and leave a bit of a margin. Most pocket designs land between 3 and 4 inches wide.
When you know the exact size you need for these placements, ordering individual transfers is a great move. For those who want to keep it simple, you can order DTF transfers by size, which really streamlines production for these common jobs.
Recommended T-Shirt Design Widths by Garment Size
Use this quick-reference guide for standard design widths in inches. These dimensions provide a balanced look for common placements across a full range of t-shirt sizes.
| Garment Size | Full Front/Back (Width) | Left Chest (Width) | Pocket Area (Width) | Sleeve (Width) |
|---|---|---|---|---|
| Youth XS | 5" - 6" | 2.5" - 3" | 2.5" - 3" | 1" - 2" |
| Youth S-L | 6" - 8" | 2.5" - 3.5" | 3" - 3.5" | 1.5" - 2.5" |
| Adult XS | 8" - 9" | 3" - 4" | 3" - 4" | 2" - 3" |
| Adult S-XL | 10" - 12" | 3.5" - 4.5" | 3.5" - 4" | 2.5" - 3.5" |
| Adult 2XL-3XL | 12" - 14" | 3.5" - 4.5" | 3.5" - 4" | 3" - 4" |
| Adult 4XL+ | 13" - 15" | 4" - 5" | 4" - 4.5" | 3.5" - 4.5" |
Remember, these are solid starting points, not unbreakable laws. Adjust based on your specific artwork and garment style to get the perfect result every time.
Sleeve and Specialty Placements
Sleeve designs are a great way to add an extra layer of branding or a bit of creative flair. On short sleeves, a small logo or icon usually falls between 1 to 3 inches wide. This size fits nicely on the sleeve without getting warped or distorted.
Long sleeves give you much more room to play. You can run text or a series of graphics right down the arm. For these, a width of 2 to 4 inches is common, while the length can be whatever your design calls for.
At the end of the day, these numbers are just a guide. Always think about the specific shirt you're using and the unique shape of your design—a round logo carries different visual weight than a wide, skinny one. Once you grasp these principles, you’ll stop just following charts and start making smart, informed decisions that lead to a perfect print, every single time.
Scaling Your Artwork for Any Garment Size
Thinking you can create one design file and have it magically fit every t-shirt is a rookie mistake. It’s a fast track to getting inconsistent, unprofessional results. A graphic that looks perfectly balanced on an adult medium will either swallow a youth small whole or look like a postage stamp on a 3XL. This is where learning to properly scale your artwork becomes a non-negotiable skill.
Scaling is just the process of resizing a design proportionally so it looks right across a full run of garment sizes. Think of it like a photographer framing a picture; the image is the same, but an 8x10 print is sized differently than a 4x6 to fit its specific frame. Your designs need that same thoughtful adjustment to fit the "frame" of each individual t-shirt.
When you nail this, every single piece in an order—from the smallest youth tee to the largest adult size—looks intentional. It’s a signature of a professional who cares about the details.
The Right Way to Scale: Proportional Resizing
The secret to scaling that works is locking the design's aspect ratio. This is a fancy way of saying that when you change the width, the height automatically adjusts with it. No more stretched, squashed, or distorted graphics. For instance, if your go-to adult design is 11 inches wide, you’ll want to create other versions—maybe one at 9 inches wide for smaller adult sizes and another at 7 inches wide for youth shirts.
When you're resizing your artwork, a good image resizer tool is your best friend. It helps you maintain that crisp, high-resolution quality across every version of your file.
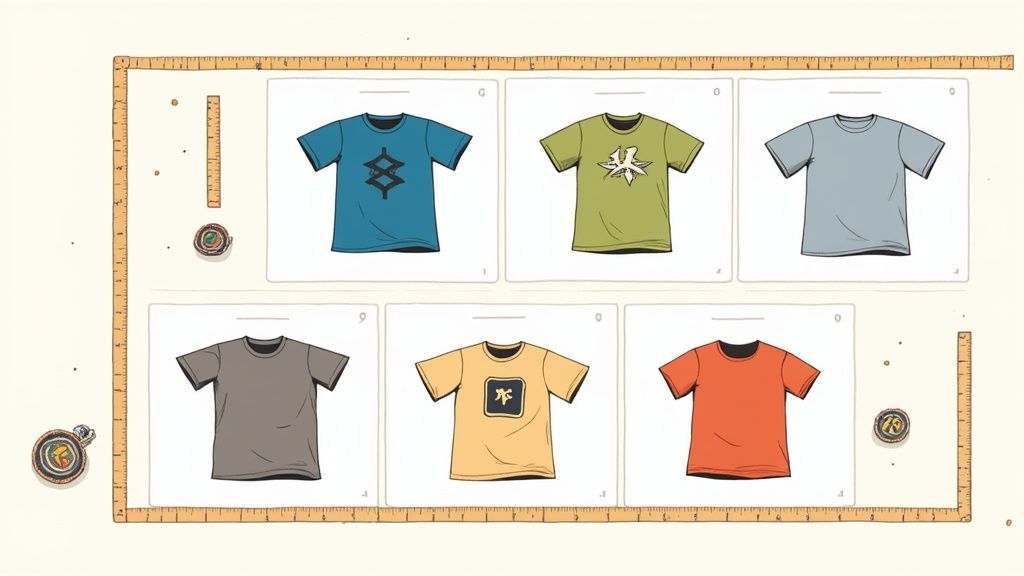
Take a look at this chart. It’s a great visual for why a one-size-fits-all approach just doesn't work.

As you can see, the space you have for a full front print versus a left chest or sleeve print is worlds apart. Each placement demands its own correctly scaled artwork.
Work Smarter: Scaling to Save Time and Money
Scaling isn't just about aesthetics; it's a huge money-saver. Ordering separate DTF transfers for every single size variation gets expensive fast and becomes a nightmare to keep organized. This is where you can get smart and streamline your entire process.
Let's say you have an order for 50 shirts spread across five different sizes. Instead of placing five separate, costly orders for each scaled design, you can combine them all onto a single sheet of film. This is the magic of a DTF gang sheet.
By grouping multiple scaled versions of your artwork onto one sheet, you turn several small print jobs into one efficient run. This move slashes material waste, drives down your cost-per-print, and puts more profit directly back into your pocket on every order.
Manually trying to arrange all those files is tedious and you’re bound to make mistakes. You need a tool that handles the heavy lifting for you. Our Auto-build gang sheet builder makes this incredibly easy and cost-effective.
Effortless Scaling With the Auto-Build Gang Sheet Builder
The headache of arranging different t-shirt design sizes is exactly why our Auto-build gang sheet builder exists. It takes all the guesswork and complexity out of the process, giving everyone access to professional-level efficiency.
You just upload all your different scaled artwork files—your 11-inch, 9-inch, and 7-inch versions—and the builder helps you tile them together perfectly. The goal is simple: pack as many transfers as you can onto the sheet to make sure not a single square inch of film goes to waste, ensuring ease of use and maximum cost-effectiveness.
Here’s how easy it is for a typical order with mixed sizes:
- Upload Your Files: Drag and drop all the scaled PNGs for your design into the builder.
- Arrange Your Designs: Move your graphics around, nesting the smaller ones in the empty spaces around the larger ones.
- Maximize Your Sheet: The builder gives you a visual canvas of your sheet, so you can see exactly how much space you're using and how much money you’re saving.
Using the Auto-build gang sheet builder turns a time-consuming chore into a powerful, money-saving strategy. You can guarantee every shirt looks perfect while getting the absolute best value from your transfers. It’s hands-down the smartest way to manage all your tshirt design sizes.
Mastering Gang Sheets for Ultimate Efficiency
Ready to unlock the most cost-effective way to print multiple designs? Welcome to the world of the DTF gang sheet. This simple concept—printing a bunch of different designs on a single sheet of transfer film—is a complete game-changer for your workflow and your bottom line. It’s the best strategy out there for maximizing value and killing waste.
Let's say you have an order that needs five different t-shirt design sizes for various garments. Instead of ordering five separate transfers (which is slow and expensive), you can group them all onto one sheet. This single move slashes your cost-per-print, making small, varied orders just as profitable as big, uniform ones.
The Power of Smart Consolidation
Think of a gang sheet like packing a suitcase. You wouldn't use a separate bag for your shirts, another for your pants, and a third for your socks. That's just a waste of space and money. You fit everything neatly into one bag to be as efficient as possible. A gang sheet applies that exact same logic to your DTF transfers.
By arranging all your designs to fill a single sheet, you’re only paying for the film area, not for each individual graphic. This method is perfect for:
- Mixed-Size Orders: Print scaled versions for youth, adult, and plus-size shirts all at once.
- Combining Client Jobs: Group designs for multiple customers onto one sheet to seriously improve your margins.
- Building Inventory: Print a variety of your best-selling logos or graphics so they’re always on hand and ready to press.
This approach turns your production from a one-by-one job into a bulk strategy, even when the designs themselves are completely different. The key is to eliminate every bit of empty, unused space on the transfer film. Every square inch you fill is money saved.
How Our Auto-Build Gang Sheet Builder Simplifies Everything
Let's be honest, manually arranging dozens of different files to fit together perfectly can feel like a frustrating game of Tetris. That’s exactly why we created our Auto-build gang sheet builder. It takes all the guesswork out of the process and makes professional-level efficiency easy for everyone, no design software skills required.
The process couldn't be more straightforward. You just upload all your prepared artwork files—your different logos, scaled graphics, and various t-shirt design sizes—and the builder gives you an intuitive canvas to arrange them on. You can drag, drop, rotate, and nest designs to pack them in tightly, making sure you get the most value out of every single sheet. You can dig deeper into optimizing your layouts in our complete guide to DTF gang sheets.
Here’s a quick look at how simple it is to load and arrange your designs in the builder.
The visual interface lets you see exactly how your designs fit, instantly calculates the cost, and helps you get rid of wasted film.
A well-organized gang sheet is the single most effective tool for boosting your profitability with DTF transfers. It's not just about printing; it's about printing smarter.
With our Auto-build gang sheet builder, you don't need to be a graphic design expert to get a perfectly optimized layout. The tool gives you the power to take control of your costs and workflow with total ease and precision. For any business that handles varied apparel orders, mastering the gang sheet isn't just a good idea—it's essential for growth. This one tool transforms a complex task into a simple, money-saving step.
Of course. Here is the rewritten section, crafted to sound completely human-written and natural, following the provided style guide and examples.
Dodging the Most Common T-Shirt Sizing Mistakes
Even the sharpest designers hit a snag now and then. A file that looks absolutely perfect on screen can end up as a pretty big disappointment once it’s pressed onto a real shirt. Think of this as your pre-flight checklist—a quick guide to catching and fixing common sizing mistakes before they turn into a box of expensive misprints.
Let's move past the theory and troubleshoot the real-world problems that can completely derail a print run. Frustrating issues like pixelation, weird visual balance, or outright print failures are almost always preventable. Once you know what causes them, the fix is usually simple, and you'll build better habits for every future project.
The Blurry or Pixelated Print
This one is the most common—and the most heartbreaking. Your design looks crisp and clean on your monitor, but the final DTF transfer comes out fuzzy with jagged, blocky edges.
- What Went Wrong: The culprit is almost always low resolution. The file was probably saved at a low DPI (like 72 DPI, which is standard for web images) or a small image was stretched to fill a much larger print area. There just isn't enough pixel data for the printer to create smooth, sharp lines.
- How to Fix It: The only real fix is to start correctly from the beginning. Always, always set up your design canvas to 300 DPI at the final physical size you intend to print. If you need a 12-inch wide graphic, your artboard needs to be 12 inches wide at 300 DPI. You can't add quality back into a low-resolution image, so getting the setup right is non-negotiable.
The Awkwardly Sized Graphic
You’ve pressed the shirt, you step back to admire your work, and… it just looks off. Maybe the graphic is comically huge on a Small tee, or it looks like a tiny sticker lost on a 3XL. This comes from using a one-size-fits-all approach to your tshirt design sizes.
- What Went Wrong: You used the exact same 12-inch wide graphic for every single size, from XS all the way to 3XL. Visual balance is everything, and what looks perfectly proportioned on a size Large is going to completely overwhelm a smaller shirt.
- How to Fix It: Create at least two or three scaled versions of your artwork. For a typical adult run, you might have an 11-inch version for standard sizes (M-XL), a 9-inch one for smaller adults and teens (XS-S), and maybe a 7-inch graphic for youth sizes. This is exactly where our Auto-build gang sheet builder is a lifesaver. You can easily place all of these scaled versions onto a single sheet to keep your costs down, combining ease of use with cost-effectiveness.
The Dreaded White Box Background
Your design elements are perfect, but the transfer printed with a solid white (or black) box around the whole thing, completely ruining the look. This is a classic file format mistake.
- What Went Wrong: You almost certainly saved your file as a JPG. The JPG format doesn't support transparency, so it automatically fills any empty space in the image with a solid background, usually white.
- How to Fix It: This is an easy one. Always save your final, print-ready file as a transparent PNG. This format preserves transparency, which means only your actual design will be printed on the DTF film. The result is a clean, professional transfer with no unwanted background.
Common Questions About T-Shirt Design Sizing
Getting your t-shirt design sizes just right can feel like a puzzle, but it’s simpler than it looks. A few core rules cover almost every situation you'll run into. This section breaks down the most frequent questions we hear, giving you quick, practical answers to finalize your files and avoid any costly reprints.
Think of this as your cheat sheet for printing. Stick to these guidelines, and you’ll see your creative vision jump from the screen to the shirt exactly as you imagined.
What’s the Best Resolution for My Design File?
Your file needs to be 300 DPI (dots per inch) at the final print size. This is the absolute, non-negotiable industry standard for apparel, and for good reason. It’s what guarantees your design comes out sharp, clear, and professional.
Anything less than 300 DPI will look blurry or pixelated once it’s printed on fabric—a dead giveaway of an amateur job.
Can I Just Use One Design Size for All My Shirts?
While it sounds like a convenient shortcut, it's a bad idea. A graphic that looks perfectly balanced on an Adult Large will completely overwhelm a Youth Small, often wrapping around the sides awkwardly.
For a truly professional look across a full size run, you should create at least two or three scaled versions of your design. A common approach is to have separate sizes for Youth, Adult S-L, and Adult XL+.
The smartest way to print multiple scaled designs without breaking the bank is with a DTF gang sheet. Our Auto-build gang sheet builder makes this exceptionally easy and cost-effective, letting you place all your different sizes onto a single sheet to dramatically cut down on material waste and lower your cost per print.
Which File Format Should I Use for DTF Printing?
A transparent PNG is the gold standard for DTF printing—it's reliable and gets the job done right. This file type is crucial because it preserves transparency, meaning only your design gets printed, not a clunky white or colored box around it.
Also, make sure your file is saved in CMYK color mode. This ensures the colors you see on screen are the colors that come out of the printer.
Our Auto-build gang sheet builder was designed specifically for this workflow. It makes uploading and arranging multiple transparent PNGs of different sizes incredibly easy, saving you both time and money on every single job.
For flawless, vibrant prints every time, trust Lion DTF Transfers to bring your designs to life. Start creating your perfect transfers today at https://liondtf.com.