


So, you've got a brand new t shirt printing heat press machine—this is where the fun begins. It's your ticket to creating awesome, custom apparel right from your own space. But before you start churning out amazing designs, a little bit of prep work will set you up for success and make sure your first print is as good as your hundredth.
Let's walk through the essential first steps to get you from unboxing to pressing like a pro.
From Box to First Press: Getting Started Right
Unboxing a new heat press is always exciting, but hold off on pressing that first shirt just yet. Taking a methodical approach now will save you from some serious headaches and wasted materials down the road.
First things first, you need to do a "burn-off." New machines come with factory residues, oils, and other coatings on the heating element that you definitely don't want on your garments. These can create nasty fumes or, worse, transfer weird stains onto your prints.
To do a burn-off, just crank the heat up to around 350–400°F (177–204°C). Leave it open in a well-ventilated room for about 20–30 minutes. This simple step burns away all that gunk, giving you a perfectly clean platen to work with.
Calibrating for Consistency
Once the burn-off is done, it's time to get your settings dialed in. The success of every single press you do relies on three things: accurate temperature, even pressure, and precise timing. Never trust the factory settings right out of the box—they're rarely perfect.
- Temperature Verification: Your screen might read 320°F, but is the whole platen actually that hot? Grab an infrared temperature gun and check for cold spots across the surface. A big temperature difference from one corner to another is a recipe for uneven, peeling transfers.
- Pressure Setting: Most transfers call for firm, even pressure. An easy way to check this is the "paper test." Just stick a piece of regular printer paper at each of the four corners of the bottom platen and clamp the press down. Try to pull the papers out. If any of them slide out easily, your pressure is uneven and needs to be adjusted.
Key Takeaway: Always, always do a test press. Use an old t-shirt or a scrap piece of fabric to run your first couple of presses after setup. This is non-negotiable. It confirms your settings are correct and the heat is even before you risk a perfectly good garment.
Clamshell vs. Swing-Away: A Quick Comparison
How you set up your workspace might change a bit depending on which type of t shirt printing heat press machine you have. The two most common styles you'll see are clamshells and swing-aways, and each has its own vibe.
A clamshell press opens straight up, kind of like a mouth. They're super fast to operate, which makes them great for high-volume jobs, and they don't take up a lot of space. The only downside is that the heating element is always looming over your workspace, which can make it a little tricky to line up designs perfectly.
On the other hand, a swing-away press lets you move the top platen completely out of the way. This gives you a wide-open, unobstructed view of your shirt, making it way easier to get your transfers placed just right. It's no wonder this style has become a huge favorite for small businesses and crafters.
The heat press market is booming, projected to hit USD 2.3 billion by 2033. And it's the swing-away models that are really driving this growth, capturing a massive 31.09% of the market share. People just love how user-friendly they are for creating vibrant, detailed prints. This growth really underscores how important it is to have both a solid machine and an efficient workflow. If you want a deeper dive, check out our full guide on how to use a heat press machine.
And to make your process even more cost-effective, our Auto-build gang sheet builder is a game-changer. It lets you easily arrange multiple different designs onto a single sheet, saving you a ton of time and material.
How to Choose the Right Heat Press for Your Goals
Picking the right t shirt printing heat press machine is a huge step. This single piece of equipment has a massive impact on your workflow, the quality of your finished shirts, and how efficiently you can get orders out the door. Before you pull the trigger on a purchase, it's worth taking a moment to understand what separates a great press from a good-enough one.
Your final choice will really depend on your goals, how much space you have, and the number of shirts you plan on pressing. Let's break down the most important features so you can find a machine that fits your needs now and can grow with you later.
H3: Clamshell or Swing-Away Models
The first big decision you'll face is the style of the press itself. The two most common types you’ll see are clamshell and swing-away, and each one brings something different to the table.
A clamshell heat press opens and closes on a hinge, just like its name suggests. These are incredibly popular for a reason: they’re fast to operate and don’t take up much space. This makes them a great fit for smaller shops or for high-volume jobs where speed is everything. The only real downside is that the hot upper platen is always hovering right over your workspace.
On the other hand, a swing-away heat press lets you pivot the top heating element completely out of the way. This gives you a wide-open, unobstructed view of your entire work area, which is a game-changer for lining up designs perfectly. They do require more room to operate, but that extra visibility and lower risk of burning your knuckles make them a favorite for anyone doing detailed or oversized work.
Choosing a press style is all about balancing speed with precision. Clamshells are built for speed on straightforward jobs. Swing-aways give you the control you need for complex designs where perfect placement is a must.
To help you visualize the trade-offs, here’s a quick comparison of the two styles.
Clamshell vs Swing-Away Heat Press Comparison
| Feature | Clamshell Heat Press | Swing-Away Heat Press |
|---|---|---|
| Footprint | Smaller, more compact. Great for tight spaces. | Larger, requires more side-to-side clearance to operate. |
| Operation Speed | Faster workflow. Opening and closing is a single, quick motion. | Slower workflow. Requires swinging the platen out and back. |
| Workspace Visibility | Limited. The top platen is always above the lower platen. | Excellent. The work area is completely clear for easy alignment. |
| Best For | High-volume production, standard t-shirt designs, beginners. | Detailed work, oversized prints, thicker items (like hoodies). |
| Safety | Higher risk of accidental burns due to the overhead heat source. | Lower risk of burns, as the heat source moves away completely. |
Ultimately, there's no single "best" choice—it's about what works for your space and the types of products you plan to create.
Platen Size and Why It Matters
The platen is the heated metal plate that presses your transfer onto the garment. The size of your platen determines the biggest design you can press in one shot. Getting this right from the start will save you a ton of headaches down the road.
- Small Platens (e.g., 9" x 12"): Perfect for kids' clothes, sleeve logos, chest pockets, and custom tags. They’re compact and usually a bit more affordable.
- Standard Platens (e.g., 15" x 15" or 16" x 20"): This is the sweet spot for most t-shirt businesses. A 16" x 20" press is a true workhorse that can handle almost any adult-sized shirt you throw at it.
- Large-Format Platens (Over 16" x 20"): You'll need one of these if you're doing oversized graphics, all-over prints, or want to press multiple items at once.
Think about your workflow here. While you can always press a small design on a big platen, you can never press a large design on a small one. To really maximize your time and money, you need a setup that lets you produce more in less time. That’s where tools like our Auto-build gang sheet builder come in handy, letting you easily fill up a large transfer sheet with multiple designs that you can press quickly on a properly sized machine for maximum cost effectiveness.
Essential Features for Quality and Consistency
Beyond the basic style and size, there are a few features you absolutely shouldn’t compromise on if you want professional-looking results. First, make sure any t shirt printing heat press machine you're considering has digital controls for both temperature and time. Digital readouts are way more accurate than analog dials, and that precision is critical when you’re working with DTF transfers that need exact settings.
Even, consistent heat across the entire platen is probably the single most important factor for quality. Cold spots on your platen will cause parts of your design to adhere poorly, which means they'll start peeling or cracking after just a few washes. Nobody wants that.
Finally, an adjustable pressure knob is non-negotiable. It gives you the control to dial in the perfect amount of force for everything from thin tees to thick hoodies. Once you get the hang of your equipment, the next step is marketing your creations. Learning how to write product descriptions that sell is another key skill that will help you turn your passion into a real business.
Mastering Temperature, Time, and Pressure Settings
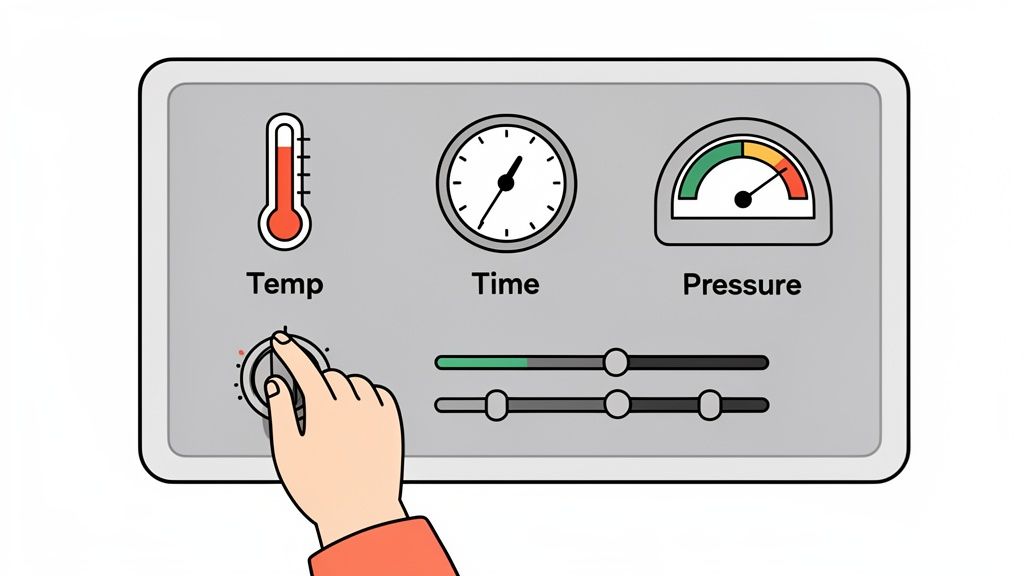
The secret to a print that feels amazing and lasts wash after wash isn't really about the machine—it's all in how you dial in the settings. Nailing the perfect mix of temperature, time, and pressure is probably the most important skill you'll develop. It's the difference between a hobbyist and a professional.
Think of these three things as a recipe. Too much heat can scorch a delicate shirt, not enough time will lead to peeling transfers, and getting the pressure wrong is the number one cause of failed prints. Let's break it down so you can press any garment with confidence.
Decoding the Three Pillars of Pressing
A modern t shirt printing heat press machine uses reliable electric heating elements to hit and hold a precise temperature. This consistency is a huge deal, especially with DTF transfers where a few degrees in either direction can make or break the final result. It's no wonder electric presses make up over 71.30% of the global market.
Once your temperature is locked in, you have to figure out the right time and pressure.
- Temperature: This is simply the heat needed to activate the transfer's adhesive. It changes a lot depending on the fabric.
- Time: This is how long you apply that heat. It’s a balancing act—too short and the design won't stick, too long and you can damage the shirt itself.
- Pressure: This is the force the machine applies to fuse the transfer into the fabric's fibers for a permanent bond.
Getting a feel for pressure is often the trickiest part since most machines don't have a fancy digital gauge. You learn to judge it by the resistance you feel when closing the press. When instructions call for "firm" pressure, it usually means you need to put some real muscle into locking that handle down.
Quick Reference Settings for DTF Transfers
While you should always check the instructions that come with your specific DTF transfers, having a good baseline to start from is a lifesaver. This table covers the most common fabrics you'll likely be working with.
Just remember to always do a quick test press on a scrap piece of fabric or a hidden spot on the garment before committing to the final design.
Heat Press Settings for Common Fabrics (Using DTF Transfers)
| Fabric Type | Temperature (°F/°C) | Time (Seconds) | Pressure |
|---|---|---|---|
| 100% Cotton | 280°F | 10 | Firm |
| 100% Polyester | 240-250°F | 7-10 | Medium-Firm |
| 50/50 Cotton/Poly Blend | 260-270°F | 10 | Firm |
| Tri-Blends | 260-270°F | 10 | Medium |
Pro Tip: Polyester and blends can be sensitive to high heat, sometimes leaving behind a shiny "press box" outline. To avoid this, try a lower temperature and a shorter press time. Using a Teflon cover sheet also adds a great layer of protection for the fabric.
Mastering these settings will instantly improve your consistency. For a deeper dive into different materials, you can check out our complete temperature guide for heat press applications.
The Complete Workflow for Pressing DTF Transfers
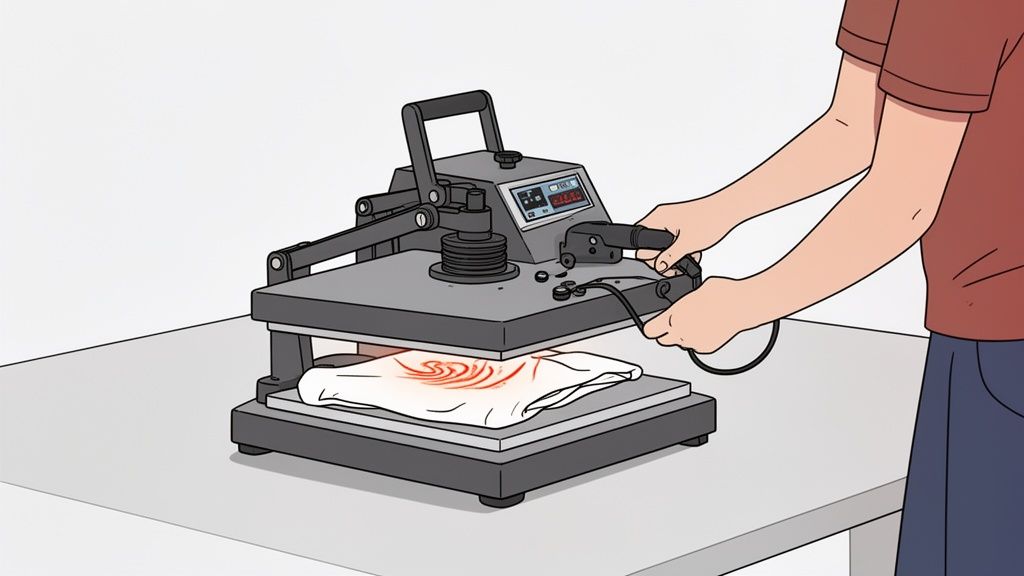
Alright, this is the moment of truth—where all your design prep pays off. The hands-on process of using a t-shirt printing heat press machine with DTF transfers is where digital files become real, wearable art. Nailing down a consistent workflow is the secret to making sure every single print comes out vibrant, tough, and perfectly placed.
We’re going to walk through the entire journey, from getting the shirt ready to that final, satisfying peel. While the process is pretty straightforward, every little step is critical to the quality of your finished shirts.
Preparing the Garment and Workspace
Before you even think about laying down a transfer, you need a clean, prepped garment. Moisture, wrinkles, or any random debris on the shirt can completely sabotage the adhesion, leaving you with a print that peels or looks blotchy.
First thing's first: grab a lint roller and give the shirt a quick pass. You'd be surprised how many tiny, invisible fibers can get trapped under the transfer and cause imperfections. Once it's clean, lay the shirt flat on the lower platen of your press.
Now for the most important prep step: the pre-press. Close the press and hit the shirt with heat for just 5-10 seconds. This does two crucial things at once: it knocks out any wrinkles, and more importantly, it zaps any hidden moisture out of the fabric. A bone-dry, flat surface is the only canvas you want for a DTF transfer.
Aligning Your DTF Transfer for a Professional Look
Perfect placement is what makes a shirt look professionally made instead of just homemade. Taking an extra minute to get your alignment right makes a world of difference. Trust me, "eyeballing it" is a recipe for slightly crooked or off-center prints.
- Find the Centerline: The easiest trick is to fold the shirt in half vertically and give it a quick, light press. This leaves a temporary crease right down the middle, giving you a perfect visual guide.
- Use Placement Tools: If you're doing a batch of shirts, tools like t-shirt rulers or laser alignment systems are worth their weight in gold. They guarantee consistency from one shirt to the next.
- Standard Placement: A solid rule of thumb for a standard chest design on an adult t-shirt is to place the top of your design about 3-4 inches (or a four-finger width) down from the collar.
Of course, a great press starts with a great design. Before you even power on your machine, getting the artwork right is essential. If you need a solid starting point for your projects, resources like T Shirt Templates can give you a professional framework to build from.
The Pressing and Hot-Peel Process
With your shirt prepped and the transfer aligned, you're ready for the main event. Lay a protective cover sheet, like Teflon or parchment paper, over the transfer. This is a non-negotiable step that prevents the transfer film from melting onto your hot upper platen.
Lock down the press using the settings you've dialed in for your fabric. For cotton, that's usually firm pressure for about 10 seconds at around 280°F. As soon as that timer beeps, pop it open.
The Hot Peel: DTF transfers are designed for a "hot peel," meaning you pull the film carrier off almost immediately. While the shirt is still hot on the platen, grab a corner of the film and peel it back in one smooth, confident motion. The design should stay perfectly bonded to the fabric.
After the peel, I always recommend a second press. Cover the exposed design with your protective sheet and press it again for another 5-7 seconds. This final press really helps lock the ink into the fabric fibers, which improves durability and gives the design a softer, more matte finish.
Maximizing Efficiency with Gang Sheets
Pressing shirts one by one is fine when you're starting out, but if you want to scale up, you have to work smarter. This is where gang sheets completely change the game. A gang sheet is just a large DTF transfer sheet that has multiple designs printed on it.
Instead of ordering dozens of individual transfers, you can cram logos, sleeve hits, and multiple t-shirt designs all onto a single sheet. This slashes your cost per print and saves a ton of time. You just snip the designs you need from the sheet as you go.
For peak efficiency, our Auto-build gang sheet builder takes this a step further. You can upload all your artwork, and the tool automatically arranges everything to use every last square inch of the sheet. It ensures you get the most value, minimize waste, and makes producing high-quality custom DTF transfers both incredibly easy and cost-effective.
How to Fix Common Heat Press Printing Problems
Even with the best t shirt printing heat press machine, things can go wrong. We've all been there: a design that looked perfect on screen suddenly isn't sticking right, or worse, you've left a faint scorch mark on a brand-new shirt. Don't panic. These moments are frustrating, but they're also huge learning opportunities.
Think of this section as your go-to troubleshooting guide for turning those printing mishaps into professional-quality results. We'll break down the most common issues, point to the likely culprits, and give you clear, actionable fixes to get your production back on track.
Diagnosing Cracking and Peeling Designs
One of the most disheartening problems is seeing a beautiful design crack or start peeling after the very first wash. When a transfer fails like this, it's almost always a breakdown in one of the three core elements of heat pressing.
Here’s what you should investigate first:
- Insufficient Pressure: This is the number one cause of adhesion failure, hands down. If the pressure is too light, the adhesive on the transfer never properly melts into the fabric's fibers. You want firm pressure—it should take a good amount of effort to lock the handle down.
- Incorrect Temperature: Too low, and the adhesive won't activate. Go too high, and you can actually burn the adhesive, making it brittle and useless. Always, always double-check the recommended settings for your specific DTF transfers and fabric type.
- Inadequate Time: Pressing for too short a time simply won't give the adhesive enough time to form a solid bond. Sometimes, a few extra seconds can make all the difference between a temporary print and a permanent one.
Pro Tip: A quick fix I often use is a second press. After you've done the initial hot peel, cover the design with a Teflon sheet and press it again for just 5-7 seconds. This can dramatically improve the bond and durability of the transfer.
Getting each step right is crucial for avoiding these issues from the start.
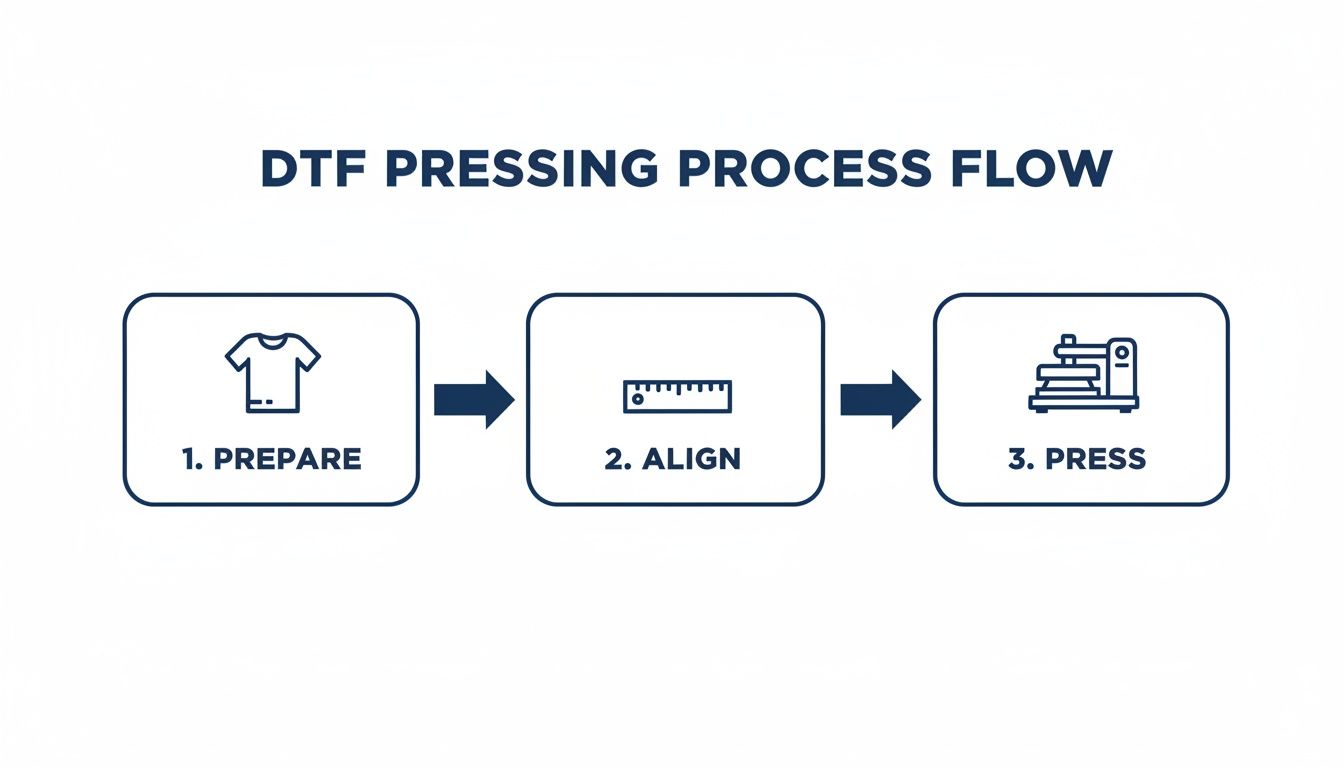
As the graphic shows, preparation, alignment, and pressing are distinct phases. A slip-up in one can easily ruin the final result.
Preventing Scorch Marks and Press Boxes
Seeing that faint, shiny outline of your heat platen—the dreaded "press box"—or a slight yellowing on a white shirt is another common headache. This usually happens with polyester and blended fabrics that are sensitive to high heat, but you can prevent it.
A Teflon cover sheet is your best friend here. Placing one over your transfer before pressing acts as a protective barrier, distributing the heat more evenly and shielding the fabric from direct, harsh contact with the hot metal platen.
Another great tool is a heat press pillow placed inside the garment. It raises the print area, ensuring pressure is only applied right where you need it and not on the surrounding fabric.
Tackling Uneven Color and Partial Adhesion
If you notice parts of your design look faded or haven't stuck to the shirt at all, the problem is almost always uneven heat or pressure. This often points back to the machine itself.
Grab an infrared temperature gun and check for cold spots on your platen. A significant temperature drop in one area will absolutely prevent the transfer from adhering correctly there.
You should also do the "paper test." Just place a piece of paper at all four corners of your platen and close it. If you can pull any of the sheets out easily, your pressure is uneven and needs to be adjusted. This simple diagnostic can save you from wasting countless shirts.
The market for custom apparel is booming. Decorated t-shirt machine sales hit USD 1.2 billion and are projected to reach USD 1.9 billion by 2033. This growth, as highlighted on impressionsmagazine.com, shows just how much demand there is for durable, professional results—the kind you can only get with a well-maintained and properly calibrated t shirt printing heat press machine.
For businesses trying to capture a piece of this market, efficiency is everything. Using a tool like our Auto-build gang sheet builder helps streamline your workflow by letting you easily arrange multiple designs on a single sheet. This not only makes printing more cost-effective but also helps you maintain consistent quality across large batches, cutting down on the common problems that can eat into your profits.
Answering Your Top T-Shirt Heat Press Questions
Let's wrap this up by hitting some of the most common questions that come up when you're getting started with a t-shirt printing heat press machine. Getting these answers straight can save you a ton of time, materials, and headaches down the road.
Can I Just Use a Regular Iron Instead of a Heat Press?
Look, while you can technically stick a simple HTV design on a shirt with a household iron, it's a terrible idea for anything you want to last, especially for professional-grade DTF transfers. An iron just can't provide the two things that matter most: consistent, even heat and firm, uniform pressure.
Home irons are notorious for having hot and cold spots across their surface. That uneven heat is why you see iron-on designs crack, peel, and flake off after just a few trips through the laundry. A proper heat press locks in the temperature and pressure across every square inch of your design, creating a permanent bond that fuses the ink into the fabric.
What Exactly Is a "Pre-Press" and Do I Really Need to Do It?
A "pre-press" is probably the simplest, most important step you can take. It’s just pressing the blank shirt for 5-10 seconds before you even think about laying down your transfer. It might seem small, but this is a non-negotiable step in any professional's workflow for a couple of big reasons.
First off, it instantly smooths out any wrinkles, giving you a perfectly flat surface to work with. But more importantly, it zaps any lingering moisture hiding in the fabric fibers. Trying to apply a transfer to a slightly damp shirt is a recipe for disaster—the steam created during the press will fight the adhesive and ruin the bond.
A quick pre-press is the single best thing you can do to guarantee a strong, even, and long-lasting print. It takes just a few seconds but makes a massive difference in quality.
How Do I Figure Out the Right Pressure Setting?
This is where the art of heat pressing comes in, because most machines don't have a fancy digital pressure gauge. It’s something you learn by feel. For DTF transfers, the magic word is almost always firm pressure. This is what it takes to properly fuse the ink deep into the fabric's weave.
When you lock the handle down, you should feel some real resistance. It shouldn't be a struggle, but it definitely shouldn't feel loose or close too easily. A great little trick is the "paper test": tear a piece of printer paper into four strips, place one at each corner of the lower platen, and clamp the press down. Now, try to pull the strips out. If you can slide any of them out easily, your pressure is too light or uneven.
What Kind of Maintenance Does a Heat Press Need?
The good news is that a t-shirt printing heat press machine is a low-maintenance workhorse. Your main job is just keeping that upper platen clean. Once the machine has fully cooled down after a session, just give the platen a good wipe with a soft, dry cloth. This gets rid of any ink residue or adhesive that might have been left behind.
Other than that, just give it a once-over from time to time. Check that the main bolts and the pressure arm are still tight, especially if you’ve been running it hard. For swing-away models, make sure the pivot point is clean and free of debris so it keeps moving smoothly. A clean press prevents ghosting old designs onto new shirts and will keep your machine running strong for years. And when you pair a well-maintained press with a tool like our Auto-build gang sheet builder, your whole workflow becomes faster, more cost-effective, and way more reliable.
Ready to create stunning, durable custom apparel with ease? At Lion DTF Transfers, we provide vibrant, hot-peel DTF transfers that are tested to last over 100 washes. Use our easy Auto-build gang sheet builder to maximize your value and get your professional-quality prints shipped in just 1-2 business days.