


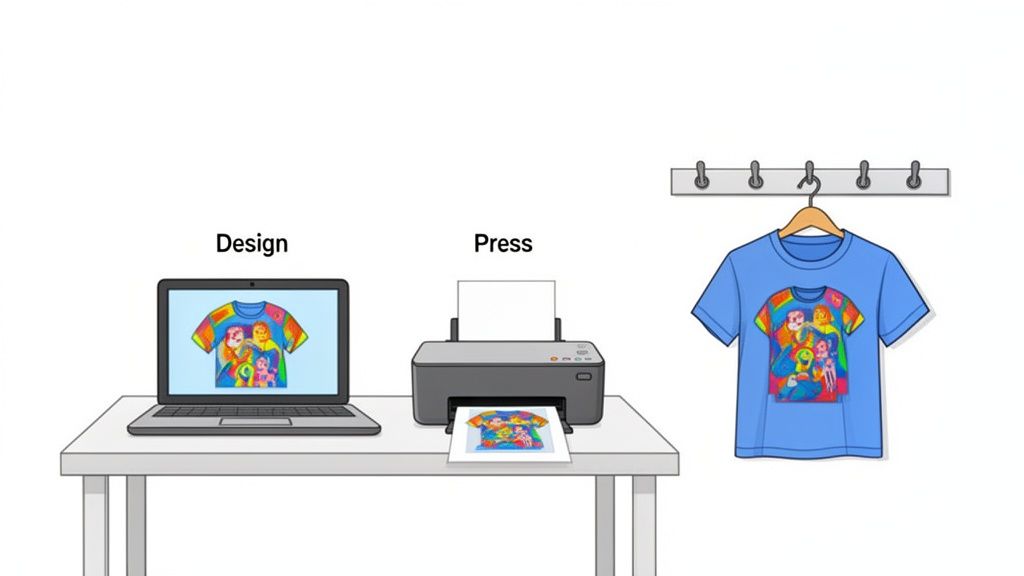
Transfer paper is your ticket to turning cool digital designs into real, tangible products like custom tees or mugs. It’s a pretty straightforward process: you design your art on a computer, print it onto the special paper, and then use heat to press it onto your item. Getting the hang of how to use transfer paper just means nailing those steps for your specific project.
Your Essential Guide to Mastering Transfer Paper
Welcome to the awesome world of custom apparel. Whether you're a hobbyist just firing up your first heat press or a growing print shop trying to work smarter, transfer paper is one of those technologies that puts professional results within everyone's reach.
This guide will walk you through the entire workflow, from picking the right paper to pressing the final product. We'll cut through the confusion about the different types and help you sidestep those frustrating mistakes that burn through time and materials.
Why Transfer Paper is a Game Changer
The real magic of transfer paper is its simplicity and versatility. It’s the bridge between a digital idea on your screen and a wearable piece of art. For small businesses, this has been a massive shift.
The global transfer paper market hit an incredible USD 3.3 billion by 2025, largely thanks to the e-commerce boom and the demand for quick, custom gear. And it’s not slowing down—projections show it rocketing to USD 5.8 billion by 2035, cementing its place in the custom apparel industry.
We’re going to focus on the methods you'll actually use:
- Inkjet and Laser Paper: Perfect for beginners and small runs. These are easy to find and work with standard home or office printers.
- Heat Transfer Vinyl (HTV): A super durable choice for solid-color designs, though you'll typically need a vinyl cutter for anything intricate.
- Direct-to-Film (DTF): The modern powerhouse. DTF delivers incredible, full-color prints that are soft, stretchy, and built to last, making it ideal for scaling up production.
Before we dive into the nitty-gritty of each transfer type, here's a quick rundown to help you get your bearings.
Transfer Paper Types at a Glance
Choosing the right paper can feel overwhelming at first, but it really just comes down to what you're trying to make. This table breaks down the essentials so you can match the material to your project.
| Transfer Type | Best For | Printer Needed | Peel Type |
|---|---|---|---|
| Inkjet Light | White or light-colored cotton/poly-cotton fabrics. | Standard Inkjet | Hot or Cold Peel |
| Inkjet Dark | Dark or colored cotton/poly-cotton fabrics. | Standard Inkjet | Hot or Cold Peel |
| Laser | Both light & dark fabrics; good for fine details. | Laser Printer | Often "self-weeding" |
| Heat Transfer Vinyl | Solid color logos, text, and simple graphics. | None (Cutter Needed) | Hot or Cold Peel |
| Direct-to-Film (DTF) | Full-color, detailed graphics on any fabric type. | DTF Printer | Cold Peel |
Each one has its place. Inkjet is great for starting out, HTV is the go-to for bold, simple designs, and DTF is what you turn to when you need vibrant, pro-level quality on any garment.
Setting Yourself Up for Success
Mastering the basics is one thing, but knowing how to properly print photos on clothing is what separates decent results from professional ones. Each method has its own rules for time, temperature, and pressure, and we'll cover all of that in detail.
For creators looking to scale up, efficiency is everything. Instead of printing designs one by one, the smart move is to arrange multiple graphics onto a single large sheet. This is where tools like our Auto-build gang sheet builder become total game-changers, saving you a ton of time and money by making the most of every single inch of your transfer material.
Preparing Your Artwork and Printer for Perfect Transfers
The secret to a stunning final product starts long before you ever fire up the heat press. A professional-quality transfer is born from carefully prepped artwork and a correctly configured printer. Getting these first steps right is the difference between a crisp, vibrant design and a blurry, disappointing mess.
Think of your digital file as the blueprint for your shirt. If the blueprint is flawed, the final result will be, too. This is why professionals insist on a minimum resolution of 300 DPI (dots per inch). An image snagged from social media just won't cut it; it will look pixelated and fuzzy when printed, no matter how good your paper or press is.
A classic rookie mistake is grabbing a small, 72 DPI web image and just resizing it. This doesn't magically add detail—it just makes the existing pixels bigger, leaving you with a blocky, unprofessional look. Always, always start with a high-resolution canvas in your design software.
Mastering Your Digital Design File
Once your resolution is locked in, the next things to tackle are color and orientation. These settings directly control how the final transfer looks on the garment.
You'll be working with two main color modes: RGB (Red, Green, Blue) and CMYK (Cyan, Magenta, Yellow, Black). RGB is for screens and uses light to create bright, vivid colors. CMYK is the standard for printing and uses ink. While most home inkjet printers will convert RGB files automatically, designing in CMYK from the start gives you a much more accurate preview of the final printed colors and helps you avoid nasty surprises.
Now for the most critical step for most transfer types: mirroring your image. You'll be placing the paper face-down on the fabric, so the design has to be printed as a mirror image to look correct after pressing. Forgetting this is a rite of passage for beginners, resulting in backward text and logos.
- In Canva: Just select your design, click "Flip," and choose "Flip Horizontal."
- In Adobe Illustrator: Select your artwork, right-click, head to "Transform," and hit "Reflect." Make sure to choose the vertical axis to mirror it properly.
This step is absolutely essential for inkjet, laser, and some sublimation transfers. The big exception here is DTF transfers—you do not need to mirror your artwork for DTF, as the printing process handles the orientation automatically.
Setting Up Your Printer for Success
With your artwork ready to go, it's time to talk to your printer. Don't just hit "Print" on the default settings. Taking a minute to tweak your printer's properties is crucial for controlling the ink flow and making sure the paper feeds through without a hitch.
Open your printer's settings or preferences dialogue box and find the "Media Type" or "Paper Type" setting. You won't see an option for your specific brand of transfer paper, so you have to pick the next best thing.
A few settings that work great are:
- T-Shirt Transfer
- Heavy Glossy Paper
- Premium Photo Paper
- Matte Presentation Paper
Choosing a "heavy" or "photo" paper setting tells the printer to slow down and lay the ink down more carefully, which is exactly what you need for a saturated, even print. It also helps prevent the thicker transfer paper from getting jammed in the rollers. For a deeper dive, check out our guide to heat transfer paper printing where we explore these settings in more detail.
Finally, crank up your print quality to the highest setting available, usually called "High," "Best," or "Photo." This forces the printer to use the maximum amount of ink for rich saturation and detail, giving your design the pop it deserves. These small adjustments are non-negotiable if you want pro-level results and want to avoid wasting expensive paper on reprints. A little time spent here saves a lot of headaches later.
The Heat Pressing Process for Flawless Results
With your design printed and cut, it's time for the magic moment. This is where a simple sheet of paper or film becomes durable, wearable art. Nailing that perfect, long-lasting transfer all comes down to a precise combination of time, temperature, and pressure.
Every type of transfer paper has its own recipe for success. Getting these settings right isn't just a suggestion—it's the only way to prevent cracked, peeling, or faded designs down the road. Let’s walk through the specifics for each method, with a special focus on the killer efficiency and quality you get with DTF.
Before you even think about pressing, though, your artwork needs to be prepped. A successful transfer starts with a solid digital foundation.
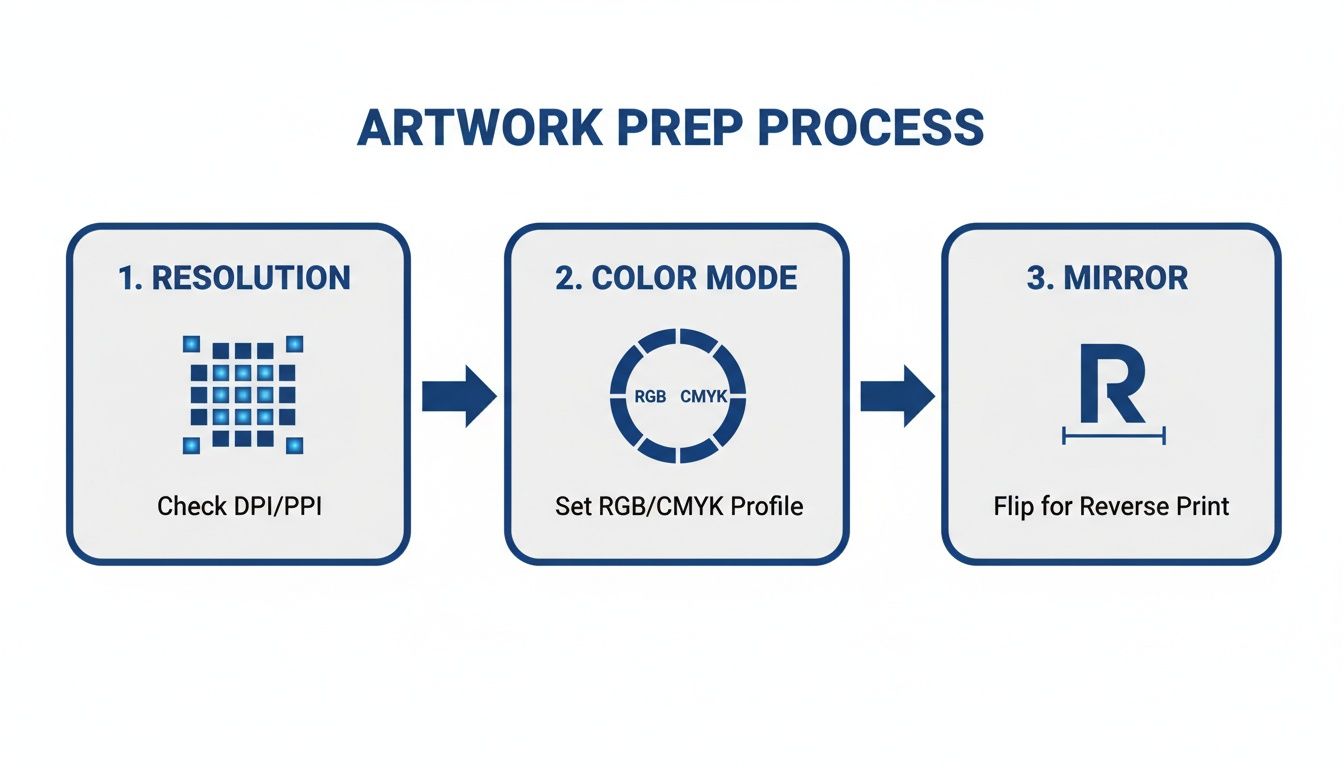
This quick visual guide covers the essentials: checking resolution, setting the right color mode, and mirroring the image. Get these right, and you're halfway to a flawless press.
Pressing Inkjet and Laser Transfers
For those starting out with inkjet or laser transfer paper, the process is pretty straightforward but requires a close eye on the details. The biggest difference comes down to whether you're working with paper for light or dark fabrics.
- Paper for Light Fabrics: This paper has a transparent polymer background, so only the ink transfers to the shirt. The sweet spot is usually around 350-375°F (175-190°C) for 15-25 seconds with medium pressure.
- Paper for Dark Fabrics: This type has an opaque white background, which is crucial for making your colors pop on a dark shirt. It needs lower temperatures, typically in the 325-350°F (160-175°C) range, for just 10-15 seconds.
Don't forget to give your garment a quick "pre-press" for 3-5 seconds before placing the transfer. This simple step zaps any lingering moisture and smooths out wrinkles, giving you a perfect surface for adhesion.
Techniques for Heat Transfer Vinyl (HTV)
Heat Transfer Vinyl, or HTV, works a bit differently. Once your design is cut and the excess vinyl is "weeded" away, you're left with your design on a sticky carrier sheet that holds everything in place.
Most standard HTV presses at 305-320°F (150-160°C) for 10-15 seconds using firm pressure. But specialty vinyls like glitter, flock, or metallic have their own unique needs, so always check the manufacturer's instructions. A classic rookie mistake is pressing for too long, which can shrink the vinyl or even melt the adhesive right through the fabric.
A protective cover sheet is your best friend when pressing. A Teflon sheet or a piece of parchment paper placed over your transfer acts as a barrier, preventing it from sticking to the hot platen and protecting your garment from scorch marks. This is a non-negotiable step for a professional finish.
The DTF Advantage: Precision and Simplicity
This is where consistency and quality really shine. The Direct-to-Film (DTF) process is refreshingly simple and delivers incredible results on just about any fabric you can throw at it, from cotton to tricky polyester blends.
The global demand for reliable transfer methods is exploding. In 2023, the heat transfer paper market hit USD 523.2 million and is projected to reach USD 696.3 million by 2033. For U.S.-based print shops, using efficient methods like DTF is the only way to keep up with demand from schools, e-commerce brands, and local businesses.
Here’s the simple workflow for pressing DTF transfers:
- Pre-press the Garment: Just like the other methods, press your apparel for 5-7 seconds to get a flat, moisture-free surface.
- Position Your Transfer: Lay the DTF transfer onto the garment, printed side down. The clear film makes perfect alignment a breeze.
- Press with Confidence: Set your heat press to 300-320°F (150-160°C) and press for 10-15 seconds with firm, even pressure.
- Perform a Hot Peel: As soon as the press opens, grab a corner of the film and peel it back in one smooth, confident motion while the garment is still hot.
That hot peel process is one of DTF's biggest strengths. It massively speeds up your workflow because there's no waiting for the transfer to cool. You can move right on to the next item. In fact, many shops find that user trials show a 95% first-press success rate when temperatures are dialed in, which drastically cuts down on costly reprints.
For a deep dive into optimizing your equipment, check out our guide on the ideal heat press settings for DTF.
Achieving even pressure across the entire design is absolutely essential for a bond that lasts. If you ever notice one side of a big design seems less stuck than the other, it's a good sign your press's platen isn't perfectly level.
Keeping Your Prints Looking Great: Aftercare and Troubleshooting
A perfect press is a great start, but the real test is how your design holds up wash after wash. The journey from a digital file to a durable, wearable piece of art isn't over until you've got the aftercare down. Proper washing and drying can easily double the life of your creations, keeping them vibrant for a long time.
The golden rule here is pretty simple: be gentle.
Always turn the garment inside out before tossing it in the wash. This protects the transfer from rubbing against other clothes. Stick with cold water on a gentle cycle, and stay far away from harsh detergents or bleach—they will absolutely destroy the adhesives and fade your inks.
When it comes to drying, your best friend is a clothesline. Air-drying is the safest route, hands down. Throwing a custom tee into a hot dryer is the fastest way to invite cracking and peeling. If you have to use a machine, make sure it’s on the lowest possible heat setting.
Figuring Out What Went Wrong
Even with the best care, sometimes things go sideways right off the press. Don't sweat it. Most transfer issues are easy to diagnose and even easier to fix. If your design isn’t looking right, one of these three culprits is almost always to blame: time, temperature, or pressure.
-
Cracking or Peeling: This is the most common headache and nearly always points to not enough pressure or heat. The adhesive simply didn't get a chance to properly melt and bond with the fabric fibers. On your next press, try cranking up the pressure to "firm" and bumping the temperature up by a few degrees.
-
Faded or Dull Colors: If your colors look washed out, the problem might be your press time. The transfer probably didn't get enough time under the heat for the inks to fully cure and pop. Another thing to check: make sure you didn't accidentally use a lower-quality print setting on your printer.
-
The Dreaded "Window" Effect: Seeing a shiny box or outline around your design? This is a classic issue with inkjet paper for light fabrics. It means you didn’t trim close enough to the edge, leaving behind that visible polymer film. You have to trim as precisely as you can to avoid that amateur look.
When every print is for your business, you can't afford mistakes. This is where services like Lion DTF Transfers can be a game-changer. They handle all the technical printing and powdering details for you. You just upload your art using our intuitive Auto-build gang sheet builder for maximum cost-effectiveness, and get pro-level transfers that are ready to press. This takes all the guesswork out of the equation so you can focus on perfecting your press game.
Advanced Troubleshooting Tips
Sometimes the problem is a little more stubborn. If you’ve dialed in your time, temp, and pressure but are still seeing issues, it's time to dig a little deeper into your process.
For anyone running a business, workflow efficiency and cost are everything. When you're running your own DTF setup, getting the process just right is non-negotiable. For instance, ensuring your powder is applied evenly is critical. Industry data shows that a consistent layer of 0.5g per square inch leads to 99% adhesion. Curing that powder properly at 300°F for two minutes sets you up for a flawless press at 320°F for 15 seconds with heavy pressure. Nailing these specs can lead to 40% faster production than screen printing, with a 15% cost saving when you scale up. You can find more data about the heat transfer paper market on zionmarketresearch.com.
Scorching or Shiny Fabric?
If you're noticing a slight discoloration or a shiny box around your design, especially on polyester or dark cotton, your temperature is probably too high. Drop it in five-degree increments until the problem goes away. And always, always use a Teflon sheet or a piece of parchment paper. This acts as a protective shield, distributing heat more evenly and protecting the fabric. It’s a simple accessory, but it's a must-have for any serious printmaker.
Scaling Up: How to Handle Larger Orders with Gang Sheets
There’s a moment in every growing apparel business when you move from making one-off custom shirts to fulfilling your first big order. It’s a huge step. Suddenly, the methods that worked perfectly for a single birthday shirt become bottlenecks. When you’re staring down a deadline for 50 shirts, you realize your entire process has to change.
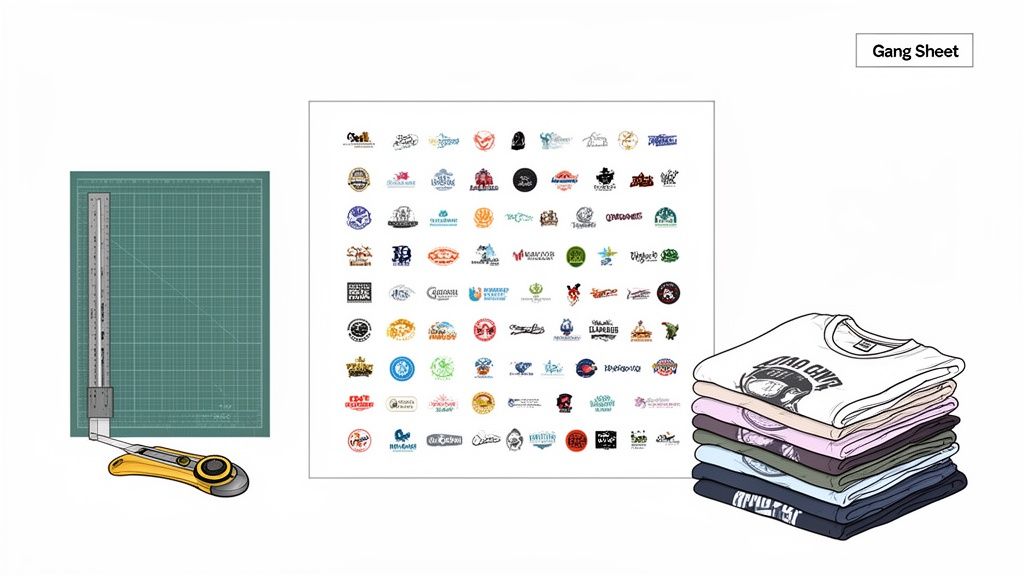
This is where your knowledge of transfer paper stops being a creative hobby and becomes a core business strategy. The single most important tool for scaling up your production efficiently is the gang sheet.
The Power of Ganging Your Designs
A gang sheet is just a large transfer sheet packed with multiple designs, arranged to use every possible square inch of material. Instead of printing one logo at a time, you can group everything you need for a project onto a single sheet—front logos, sleeve hits, back graphics, you name it.
This approach immediately slashes your material waste, which is a direct hit to your bottom line. But even more importantly, it saves you a massive amount of time. You’re no longer printing, cutting, and pressing dozens of tiny individual transfers. You press one large sheet and then simply cut the designs apart, ready to go.
The real beauty of a gang sheet is how it transforms a repetitive, time-sucking task into a streamlined, assembly-line process. It’s the fastest way to increase your output without compromising the quality of your work.
For any business looking to grow, efficiency is the name of the game. Learning to properly use gang sheets isn't just a good idea; it's a critical step toward better profitability and faster turnaround times for your customers. If you want to dive deeper, we have a complete guide to optimizing DTF gang sheets that covers all the details.
Making Gang Sheets Easy and Cost-Effective
Manually cramming dozens of graphics onto a sheet without wasting space can be a real headache. You have to worry about spacing, rotating designs, and making sure you’re not leaving valuable film empty. Honestly, it's a tedious design task that can eat up hours.
That’s exactly why we built our Auto-Build Gang Sheet Builder.
We wanted to make the process dead simple. You just upload all your individual design files, and the tool automatically arranges them for you. It packs them as tightly as possible to guarantee you’re getting the most bang for your buck. This completely removes the design bottleneck and lets you get back to what you actually enjoy—creating and selling awesome custom apparel.
For a small business, this kind of automation is a game-changer. You get all the cost-saving benefits of high-volume printing without needing advanced graphic design skills or spending all afternoon in Photoshop.
A Real-World Scenario: Printing 50 Shirts
Let’s walk through a typical order to see the difference. A local business needs 50 shirts for an event. The job calls for three separate designs on each shirt: a small logo on the left chest, a medium logo for the full back, and a tiny logo on the sleeve.
The Old Way (One-by-One):
If you printed these yourself using standard A4-sized transfer paper, you’d be managing 150 separate transfers. That means 150 print jobs, 150 sheets of paper, and 150 individual presses. And that’s before you factor in the time spent trimming every single one. The potential for errors, misalignments, and wasted material is sky-high.
The Smart Way (Using a Gang Sheet):
With a gang sheet, you’d arrange multiple sets of those three logos onto a single large DTF sheet. For example, a 22"x60" sheet could easily hold all the graphics needed for a dozen shirts or more. Our Auto-Build Gang Sheet Builder makes this incredibly easy and cost-effective, ensuring every inch of film is used. Instead of a mountain of small transfers, you’d get just a handful of large, ready-to-press sheets delivered to your door.
Your workflow is instantly simplified:
- Cut the individual transfers from the sheet as you need them. A rotary cutter and mat make this super fast.
- Press each transfer onto its correct location on the shirt.
The time you save is enormous. You’re no longer babysitting the printer for hours on end. You're just cutting and pressing, which means you can knock out that 50-shirt order in a fraction of the time. This newfound efficiency is what allows your business to take on bigger clients and more profitable projects.
Deciding to outsource your prints to a service like Lion DTF isn't just about convenience; it's a strategic move that frees you up to focus on growing your brand.
DIY Printing vs. Outsourcing to Lion DTF
To put it in perspective, let's compare the true cost and effort of producing a 50-shirt order in-house versus ordering pre-made gang sheets from a professional service like Lion DTF.
| Factor | In-House DIY (50 Shirts) | Outsourcing to Lion DTF | Winner |
|---|---|---|---|
| Material Costs | High per-shirt cost due to small-batch supplies (ink, film, powder). Significant waste potential. | Lower per-shirt cost from bulk material pricing. Zero waste on your end. | Outsourcing |
| Time Investment | Hours spent on file prep, printing, powdering, curing, and troubleshooting printer issues. | Minutes to upload files. Zero production time. Transfers arrive ready-to-press. | Outsourcing |
| Equipment & Maintenance | Requires upfront investment in a DTF printer, curing oven, and supplies. Ongoing maintenance costs. | No equipment needed besides a heat press. No maintenance, no clogged print heads. | Outsourcing |
| Consistency & Quality | Quality can vary with humidity, printer settings, and user error. Risk of misprints. | Professional-grade consistency. Every transfer is perfectly printed and cured. | Outsourcing |
| Scalability | Production is limited by your equipment's speed and your available time. Difficult to scale quickly. | Infinitely scalable. Order 50 or 5,000 prints with the same simple process. | Outsourcing |
For small businesses, the winner is clear. While DIY printing offers control for one-off projects, outsourcing your gang sheets is the smartest financial and strategic decision for handling larger orders. It lets you focus on sales and growth, not printer maintenance.
Got Questions About Transfer Paper? We've Got Answers.
Even after you've pressed a dozen shirts, certain questions always seem to pop up. Nailing down the answers to these common sticking points can save you a mountain of frustration and a ton of wasted materials. Let's walk through some of the most frequently asked questions to help you troubleshoot issues before they even start.
Hot Peel vs. Cold Peel: What’s the Real Difference?
The biggest difference between hot peel and cold peel transfers is all about timing—when you pull that backing paper off after pressing. It’s not just a matter of personal preference; it directly impacts the final look, feel, and even the durability of your design.
-
Hot Peel: Just like it sounds, you peel the backing away immediately after the heat press opens, while the shirt is still piping hot. This is the fast lane of transfer application. It typically leaves the design with a softer, more matte finish that feels like it’s part of the fabric. Most modern DTF transfers are hot peel, which is a huge reason they're so popular for rapid production.
-
Cold Peel: With these, you have to play the waiting game. You let the transfer and the garment cool down completely before you even think about touching that backing sheet. This method often results in a glossier, sometimes slightly thicker-feeling design. You’ll see this with certain types of HTV and a lot of older inkjet papers.
The choice isn't up to you—it's baked into the transfer's chemistry. Trying to cold peel a hot-peel transfer can cause the whole design to lift right off the shirt. On the flip side, peeling a cold-peel transfer while it's still hot can leave you with a blotchy, incomplete mess. Always, always follow the manufacturer's instructions.
Can I Get Away With Using a Home Iron Instead of a Heat Press?
Technically, you can use a home iron for some of the most basic inkjet transfer papers, but honestly, it's a huge gamble. The results are almost always inconsistent and lack the professional durability you’d get from a real heat press.
The problem comes down to two things: uneven heat and inconsistent pressure. An iron has hot spots and cool spots all over its surface, and it’s nearly impossible to apply the firm, even pressure needed for the adhesive to truly bond with the fabric fibers. This is why iron-on designs so often peel at the edges or crack after the first wash.
Look, an iron might be fine for a one-off craft project you don't expect to last. But if you're serious about creating professional, sellable products, a heat press isn't just a recommendation—it's a non-negotiable investment. That consistent temperature and even pressure make all the difference.
Why Is My Design Cracking After I Wash It?
Cracking is one of the most maddening problems to deal with, but it's almost always preventable. The culprit is usually an issue with the initial press or improper care after the fact.
If a design cracks after the very first wash, the problem was almost certainly with your application. The three most common reasons are:
- Not Enough Pressure: The adhesive wasn't pushed deep enough into the fabric's weave to form a strong bond.
- Wrong Temperature: The heat was too low to fully activate the adhesive layer.
- Too Little Time: The transfer simply didn't get enough time under the heat to cure properly.
If the design looked perfect at first but started cracking over time, the issue is probably your laundry routine. Tossing the garment in a hot wash or a high-heat dryer is the fastest way to destroy a transfer. For maximum longevity, always wash inside-out in cold water and hang it to dry.
How Do I Pick the Perfect Transfer Paper?
Choosing the right paper really boils down to three things: your printer, your fabric color, and your design.
First, match the paper to your printer—inkjet paper is for inkjet printers, laser for laser. Simple enough. Next, look at your shirt. If you're printing on white or very light-colored fabrics, you can use paper designed for "lights." For literally any other color, you absolutely need paper for "darks," which has an opaque white background to make your colors pop instead of getting lost.
Finally, think about your artwork. For simple, one-color text or bold logos, HTV is a fantastic and durable choice. But for complex, full-color graphics with gradients, photos, or fine details, nothing beats the quality and versatility of Direct-to-Film (DTF) transfers.
For bigger jobs or when you have a bunch of different designs, building a gang sheet is the smartest, most cost-effective way to get pro-level prints without the headache. Using a tool like an Auto-build gang sheet builder streamlines this entire process, saving you a massive amount of time and money.
Ready to skip the guesswork and get perfect, vibrant prints every single time? At Lion DTF Transfers, we make professional-quality custom apparel easy. Use our Auto-Build Gang Sheet builder to maximize value or upload your designs for fast, reliable hot-peel transfers that are tested to last over 100 washes. Start your order today at Lion DTF Transfers!