


Figuring out how to price your custom shirts can feel like a shot in the dark, but it's a skill you can dial in with the right approach. It all boils down to a simple formula: Total Cost Per Shirt + Your Profit = The Price Your Customer Pays.
This core equation is what separates sustainable businesses from the ones that fizzle out. It stops you from making the classic mistake of just guessing or matching what a competitor is doing, without having any clue what their numbers actually look like.
The Blueprint for Profitable Shirt Pricing
Many newcomers to the apparel game make the same critical error: they only account for the obvious stuff. They look at the cost of the blank shirt and the DTF transfer, add a little extra, and call it a day.
That approach is a direct path to losing money. It completely ignores all the less visible expenses that quietly chip away at your profits until there’s nothing left. To build a pricing model that actually works, you have to think bigger. It requires a complete, honest breakdown of every single cost that goes into producing one shirt.
Looking Beyond the Obvious Costs
A solid pricing strategy has to account for way more than just the garment. Successful apparel brands factor in every single touchpoint of the production process. We’re talking about:
- Direct Costs: This is the easy part—the blank shirt and the DTF transfers you're pressing.
- Labor Costs: Your time is valuable. The minutes you spend pressing the shirt, folding it, and packing it up for shipment need to be in the final price.
- Supply Costs: Think about the little things that add up, like poly mailers, thank-you cards, and packing slips.
- Overhead Costs: A tiny slice of your software subscriptions, your workshop rent, and your utilities should be baked into each item's price.
Understanding these components is the first step toward setting a price that’s both competitive and profitable. It gets you away from risky shortcuts, like just doubling your material costs, and moves you toward a flexible model that you can adjust for any order size.
A common mistake is undervaluing your own time. If it takes you three minutes to press and pack a shirt, and you value your time at $20 per hour, that's $1 in labor cost that must be included in your pricing.
Before you even think about marking up your prices, it's crucial to get a handle on all the components that make up your total cost per shirt.
Here's a quick table to break it down.
Quick Guide to Custom Shirt Pricing Components
This table summarizes the core elements you need to track to calculate your final shirt price accurately. Don't skip any of them.
| Cost Component | Description | Example |
|---|---|---|
| Blank Garment | The cost of the unprinted t-shirt or apparel item. | $4.50 per Bella+Canvas 3001 |
| DTF Transfer | The price of the printed design you'll be pressing. | $1.25 for a 4" chest logo |
| Labor | Your time spent on pressing, folding, and packing. | $1.00 (3 mins @ $20/hr) |
| Supplies | Packaging materials like mailers, tape, and inserts. | $0.45 per order |
| Overhead | A small portion of fixed costs (rent, software, utilities). | $0.25 per shirt |
| Shipping | The cost to mail the finished product to the customer. | $4.75 via USPS |
Nailing down these numbers gives you a true "cost of goods sold" (COGS) and provides the foundation for setting a price that guarantees you make money on every single sale.
Maximizing Profit from the Start
Your profit potential starts by getting your costs under control, especially your print expenses. Using tools designed for efficiency isn't just a nice-to-have; it's a must.
For instance, our Auto-build gang sheet builder is engineered specifically to slash waste and drive down your per-print cost. By automatically squeezing as many of your designs as possible onto a single sheet, it ensures you get the absolute most value from every DTF transfer you order.
This directly boosts your margin on each shirt before you even turn on the heat press. That blend of cost-effectiveness and dead-simple usability is what a strong pricing foundation is all about. Now, let’s get into the nitty-gritty of calculating these costs.
Calculating Your True Cost Per Shirt
If you want to price your custom shirts for profit, you have to think like a detective. Your first mission? Uncover every single penny that goes into making one finished shirt. That total is your Cost of Goods Sold (COGS), and getting it right is the bedrock of a healthy business.
Plenty of new sellers make the mistake of stopping at the obvious costs—the blank shirt and the DTF transfer. This is a classic rookie move that leaves serious money on the table. We need to dig a lot deeper to account for direct costs, variable costs, and even those sneaky overhead expenses that can quietly eat away at your profits.
This simple formula is everything when it comes to profitable pricing.

As you can see, your final price is just your true cost per shirt plus your desired profit. It's a fundamental concept, but one that hinges entirely on knowing your true cost.
Itemizing Your Direct Costs
Let's start with the easy stuff—the tangible expenses directly tied to producing a single shirt. Think of these as the core ingredients in your recipe.
- Blank Apparel Cost: This is what you pay for the blank t--shirt, hoodie, or whatever you're printing on. Don't forget to factor in the shipping you paid to get those blanks to your door. That's part of their true cost.
- DTF Transfer Cost: This is the price of the design itself. This is where a lot of people get tripped up, but nailing this calculation is essential for pricing your shirts correctly.
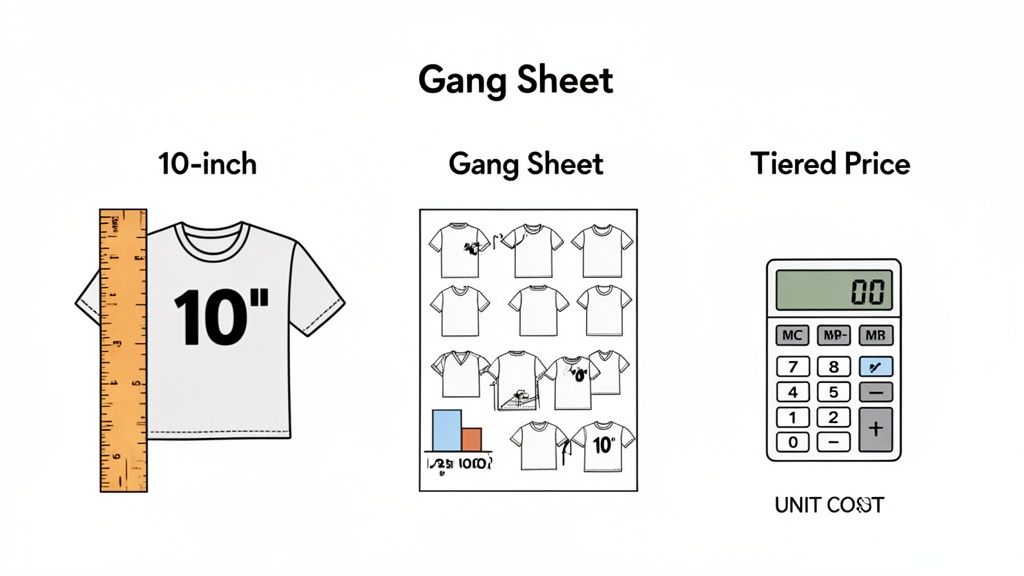
Calculating Your Transfer Cost Per Square Inch
The most accurate way to figure out your print cost is by the square inch. Let's say you buy a 22"x60" gang sheet from us for $54. That sheet gives you a total of 1,320 square inches of printable real estate (22 x 60).
To get your cost per square inch, just divide the total cost by the total area:
$54 / 1,320 sq. in. = ~$0.04 per square inch.
So, a standard 10"x10" chest design (which is 100 square inches) would cost you about $4.00 in transfer material. Simple as that.
Pro Tip: Our Auto-build gang sheet builder is a game-changer here. It’s built to automatically pack your designs as tightly as possible, minimizing wasted space on the film. This directly lowers your cost per square inch and boosts the profit margin on every single shirt you sell.
Getting the most out of your film is one of the easiest ways to control your costs. For more on this, check out our guide to optimizing DTF gang sheets.
Adding Up Variable and Hidden Costs
Okay, with the big material costs handled, let's look at the expenses that can change from order to order or are just easy to forget.
Variable Costs are the expenses that go up and down with your production volume. These include:
- Labor: Your time is not free. Figure out how long it takes you to press one shirt, then fold and pack it. If you value your time at, say, $25 per hour and the whole process takes 3 minutes, your labor cost is $1.25 per shirt.
- Packaging: Don't forget the poly mailer, the shipping label, a thank-you card, or any other branding materials you include. These little things add up fast, often costing between $0.50 and $1.00 per order.
Overhead Costs are the fixed expenses of just being in business. You can't charge a single customer for your entire internet bill, but a tiny piece of it should be assigned to every shirt you sell. Just add up your monthly overhead (rent, software, utilities, marketing) and divide it by the number of shirts you typically sell in a month. This might only be $0.20 to $0.50 per shirt, but ignoring it is a common pitfall that hurts businesses over time.
Putting It All Together for a Final Number
A reliable pricing model brings every single one of these costs together. For example, many sellers find blank tees cost them anywhere from $2.50 to over $12 for premium brands, while the printing itself can add another $0.50 to $14 per location.
Using Lion DTF's gang sheet pricing as an example, a 12"x12" chest print (144 sq. in) can cost just $2.45 in transfer material, showing just how cost-effective DTF can be.
Once you sum all these costs—the garment, the transfer, your labor, the packaging, and that little slice of overhead—you have your final, true COGS. By breaking it all down like this, you stop guessing and start knowing. You'll have a real number that lets you set prices with confidence, ensuring every sale puts money in your pocket.
Alright, you’ve nailed down your true cost per shirt. That number is the foundation of your entire business. Now for the fun part: deciding how much profit to bake in. This is the moment you shift from simply covering costs to actually building a profitable apparel brand.
Your markup strategy is way more than just pulling a percentage out of thin air. It’s about matching your prices to your brand's quality, who you're selling to, and your own financial goals. It's also critical to get the difference between markup and margin straight—they’re often used interchangeably, but they mean two very different things.
- Markup is the percentage you add on top of your cost to arrive at your selling price.
- Margin is the percentage of the final selling price that is pure profit.
Getting a firm grip on this is non-negotiable for running a profitable shop. If you need a deeper dive, learning how to calculate markup and margin for profit is a smart move for any serious business owner.
To help you figure out what works best, here’s a quick comparison of the most common pricing models you'll encounter.
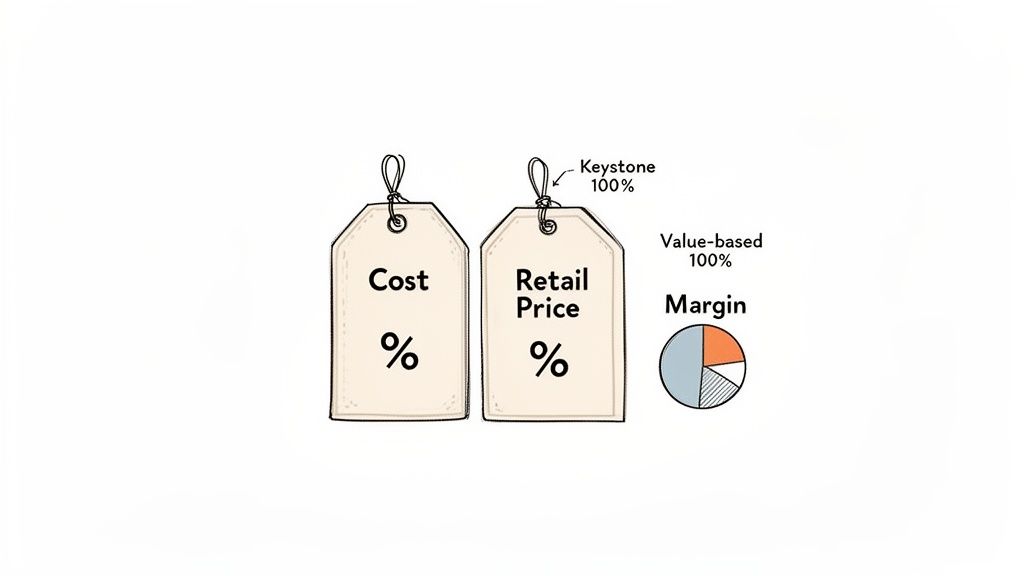
Comparing Markup vs Margin Pricing Models
A side-by-side look at different pricing models to help you find the right fit for your business goals.
| Pricing Model | How It Works | Best For | Potential Pitfall |
|---|---|---|---|
| Keystone | Double your Cost of Goods Sold (COGS). A 100% markup that results in a 50% margin. | New businesses, retail shops, and anyone needing a simple, consistent formula. | Can leave money on the table if your product's perceived value is high. |
| Value-Based | Price is based on the customer's perceived value of the product, not just its cost. | Premium brands, high-quality products, and unique, in-demand designs. | Requires strong branding and confidence in your product's superior quality. |
| Tiered/Volume | The price per unit decreases as the order quantity increases. | Wholesale orders, corporate clients, teams, and anyone buying in bulk. | You must know your costs precisely to ensure higher-tier discounts are still profitable. |
Each model has its place, and many successful shops use a mix of all three depending on the customer and the job.
Simple and Effective Markup Models
When you're just starting out, a straightforward markup model is your best friend. It’s easy to calculate and gives you a reliable framework for pricing every job.
The most common method is Keystone pricing. This one’s dead simple: you double your cost of goods sold (COGS) to set your retail price. That’s a 100% markup. So, if your true cost to make a shirt is $12, you price it at $24. Easy.
Keystone is a great starting point because it almost always guarantees a healthy 50% profit margin. That buffer gives you enough room to cover all your costs, handle unexpected issues, and still have profit left over to reinvest in growing your business.
Moving Beyond Basic Markup with Value-Based Pricing
While Keystone is a solid foundation, the really successful brands eventually shift toward value-based pricing. This strategy sets your prices based on what your customer believes the shirt is worth, not just what it cost you to produce.
This is where using high-quality materials gives you a massive advantage. When you’re pressing premium DTF transfers tested to last 100+ washes, you aren't just selling a t-shirt; you're selling a durable, professional-grade garment. That perceived value justifies a premium price, letting you push your margins well beyond the standard 50%.
Don't compete on price alone. Compete on quality, design, and customer experience. Customers will happily pay more for a shirt they know will look great and last for years.
This approach turns your pricing into a powerful marketing tool. You’re signaling to your customers that they’re buying something better, and your price tag proves it.
Implementing Tiered Pricing for Volume Orders
Not every order is for a single shirt. To land those bigger clients—like sports teams, companies, or wholesale accounts—you need a smart approach to volume discounts. This is where tiered pricing comes in.
It's a simple concept: the more shirts a customer buys, the less they pay per piece. This structure is a huge magnet for bulk buyers and can lock in much larger, more profitable orders than one-off sales.
Here’s what a tiered structure might look like for that same shirt with a $12 COGS and a $24 base price:
| Quantity Range | Price Per Shirt | Discount |
|---|---|---|
| 1-11 Shirts | $24.00 | 0% |
| 12-24 Shirts | $21.60 | 10% |
| 25-49 Shirts | $19.20 | 20% |
| 50+ Shirts | $18.00 | 25% |
How can you afford to offer these discounts? Simple: your own costs drop as the order size grows. Your transfer cost per design, in particular, plummets when you can pack a whole gang sheet with the same artwork.
This is exactly where our Auto-build gang sheet builder becomes a game-changer. It automatically fits the maximum number of logos onto a single sheet, slashing your per-print cost and making these volume deals incredibly profitable. You pass some of those savings on to the customer, they place a bigger order, and your total profit on the job skyrockets. It's a true win-win.
Pricing for Different Sales Channels
Where you sell your shirts completely changes how you should price them. Slapping a single price tag on everything is a surefire way to lose money. Why? Because every sales channel—your own website, a wholesale client, a local school—comes with its own costs, customer expectations, and competition.
A smart pricing strategy isn't one-size-fits-all. It adapts. The price on your Shopify store will, and should, look very different from the price list you send to a boutique wanting to stock your brand. Let's break down how to price your work for each of these channels so you're profitable everywhere you sell.
Pricing for Your Online Store
When you're selling directly to customers on your own site (like Shopify) or a marketplace (like Etsy), this is your retail price. It's your highest-margin channel, but it also comes with the most hidden costs.
You absolutely have to build these expenses into your retail price, or you'll end up losing money on every sale.
- Platform Fees: Marketplaces take a cut. Etsy, for example, charges listing fees ($0.20 per item) and transaction fees (6.5% of the total sale).
- Payment Processing Fees: Services like Shopify Payments and PayPal will take their share, usually around 3% + $0.30 per transaction.
- Marketing Spend: That Facebook ad or email campaign that brought in the customer? The cost to acquire them has to be covered by the price.
- Shipping & Handling: Are you offering "free" shipping? That cost has to be baked into the shirt price. If you charge for shipping, you still need to account for your packaging and handling time.
Forgetting these fees can quickly turn a profitable-looking sale into a net loss. Most successful direct-to-consumer brands aim for a profit margin between 40% and 50% on their retail products to comfortably cover all these variables.
Crafting a Wholesale Price List
Wholesale is a totally different ballgame. Here, you’re selling in bulk to other businesses—like local boutiques or other apparel brands—who need to mark the price up again to sell to their own customers. Your job is to give them a price that's attractive enough for them to make a profit while still protecting your own.
The industry standard here is keystone pricing, which is just a fancy term for a 50% discount off your retail price. So, if you sell a shirt for $28 on your website, your wholesale price would be $14.
For wholesale to be viable, your initial retail price must be high enough to absorb that 50% discount and still leave you with a profit. This is why accurately calculating your COGS in the beginning is so crucial.
To make wholesale work, you have to lean into volume. This is where getting hyper-efficient with your production pays off big time. Using our Auto-build gang sheet builder, for instance, lets you cram dozens of the same design onto one sheet. This crushes your per-print cost, making it possible to offer those deep wholesale discounts and still have the order be very profitable.
Handling Custom Orders and Contract Work
Not every sale happens through a clean online checkout. A huge part of the custom apparel world is quoting one-off projects and landing recurring contract work with local groups.
One-Off Custom Orders: For that person who needs 15 shirts for a family reunion, your pricing should be higher than your standard retail rates. These jobs demand more of your time—more back-and-forth emails, more design tweaks, and unique setup. You can either add a specific "customization fee" or just use a higher markup (think 120-150%) to account for the extra labor.
Recurring Contract Work: This is the bread and butter for many shops. For those ongoing orders from schools, local businesses, or sports leagues, you can offer more competitive, tiered pricing. The orders are predictable and the volume is high, so you can afford a slightly lower margin per shirt in exchange for that consistent cash flow. It's smart to create a separate price sheet just for these clients, rewarding them for their loyalty and order size.
Adapting your pricing like this is key to building a sustainable business, much like how a successful print on demand business model has to be flexible to meet different market needs.
A Real-World Custom Shirt Pricing Walkthrough
Theory is great, but seeing the numbers in action is where it all clicks. Let's walk through a complete, real-world example of how to price a custom shirt, moving from raw costs to a final, customer-ready price list.
This is the exact process you can use for any job that comes your way.
We'll start with a popular, mid-range blank shirt and a standard front chest print. From there, we'll build up our costs, apply different markup strategies, and create a volume-based price chart that makes sense for both you and your customer.
Itemizing Your Direct Costs
First up, we need to get a handle on the tangible costs—the actual money spent to produce one single shirt. Let's set the scene for a typical order.
- The Blank Shirt: We're going with a Bella+Canvas 3001, a soft and popular choice for many brands. After shipping, our cost per shirt lands at $4.50.
- The DTF Transfer: The customer wants a 10" x 10" logo on the chest. This design is 100 square inches (10" x 10").
To figure out the transfer cost, let's use a 22"x60" gang sheet. This sheet costs $54 and gives us 1,320 square inches of print area. A little math shows our cost per square inch is about $0.04. So, our 100 sq. in. logo costs $4.00 to print ($0.04 x 100).
But this is where efficiency becomes your best friend. Using our Auto-build gang sheet builder is a game-changer for lowering this cost. The tool automatically packs your designs to fit the maximum number onto the film, squeezing out every last bit of value and slashing your per-logo expense.
For a bulk order, you could easily fit 13 of these 10"x10" logos on one sheet. Suddenly, your per-transfer cost plummets to just $4.15. Big difference.
Adding Labor and Overhead
Next, we have to account for the "hidden" costs. They're just as real and just as important. These are realistic estimates, but you should absolutely adjust them to reflect your own business operations.
- Labor: Let's say it takes 3 minutes to press, fold, and pack one shirt. If you value your time at $20/hour, your labor cost is $1.00 per shirt.
- Packaging: A poly mailer, thank you card, and shipping label will run you about $0.45 per order.
- Overhead: You need to factor in a small slice of your monthly fixed costs (rent, software, utilities). A fair estimate here is $0.25 per shirt.
Now, let's pull it all together to find our total Cost of Goods Sold (COGS).
| Cost Component | Price |
|---|---|
| Blank Shirt | $4.50 |
| DTF Transfer | $4.00 |
| Labor | $1.00 |
| Packaging | $0.45 |
| Overhead | $0.25 |
| Total COGS | $10.20 |
This $10.20 is your real, hard cost. It’s the number you absolutely must beat to make a profit.
Applying Your Markup Strategy
With our total cost nailed down, it's time to set the retail price. Let's look at how two common methods play out.
Keystone Markup (100%)
This is the simplest model out there. You just double your COGS.
$10.20 (COGS) x 2 = $20.40 Retail Price
This lands you at a clean 50% profit margin, which is a healthy, sustainable target for most apparel businesses. It gives you room to breathe and reinvest.
Targeted Profit Margin (40%)
Maybe you want to be a bit more competitive in your market and are aiming for a 40% margin. The formula for that looks like this:
COGS / (1 - Desired Margin) = Price
$10.20 / (1 - 0.40) = $10.20 / 0.60 = $17.00 Retail Price
This price is definitely lower, which might attract more customers. The trade-off, of course, is that you're left with less profit on each sale.
Your pricing strategy directly reflects your brand. A higher price can signal premium quality and service, while a lower price might attract budget-conscious buyers. There's no single "right" answer—choose the model that aligns with your business goals.
Building a Tiered Pricing Chart
Finally, let's put together a pricing structure that actually encourages people to order more. We'll offer discounts at key quantity breaks, passing on some of the savings we get from printing in bulk.
Using our Keystone price of $20.40 as the starting point for a single shirt, a tiered chart could look something like this:
| Quantity | Price Per Shirt |
|---|---|
| 1-24 Shirts | $20.40 |
| 25-49 Shirts | $18.50 |
| 50-99 Shirts | $16.75 |
| 100+ Shirts | $15.00 |
This template is repeatable for any custom shirt job. By following these steps—calculating all your costs, applying a consistent markup, and offering volume incentives—you can price your custom shirts with confidence, knowing every single order is a profitable one.
Advanced Strategies to Maximize Your Profit
Once you've nailed down a solid pricing formula, it's time to start thinking beyond just covering your costs. Let's move into the strategies that seasoned apparel decorators use to turn a good profit margin into a great one. This is how you evolve from just selling shirts to truly building a thriving business.
It’s all about adding value that customers are more than happy to pay a premium for.
One of the easiest ways to instantly boost your profit is by offering rush services. In the world of custom apparel, deadlines are everything. When a client absolutely needs an order for an event this weekend, that urgency has serious value. Don't be shy about implementing a clear rush fee—an extra 20-30% on the total order cost for a 24-hour turnaround is a smart, fair move. It compensates you for shuffling your schedule and builds a healthy profit buffer right into the sale.
Upselling and Cross-Selling Your Way to Bigger Orders
Another game-changer is mastering the art of the upsell and cross-sell. Never assume a customer knows everything you can do for them. It's your job to present compelling add-ons that make their order better and, in turn, increase its total value.
Simple suggestions can make a huge difference to your bottom line:
- Garment Upgrades: Offer a "good, better, best" lineup of blank shirts. Let them feel the difference between a standard tee and a premium, ringspun cotton option. A lot of customers will gladly pay a few extra dollars for a noticeably better shirt.
- Additional Print Locations: A chest print is a great start, but what about adding a small logo to the sleeve? Or a custom tag print on the inside neck? Every additional press is a new opportunity for profit.
- Product Bundles: Don't stop at shirts. Offer to create matching UV DTF stickers for their laptops or water bottles. Bundling items together not only drives up the order value but also shows off just how much you can do.
Think about it: a customer ordering 50 shirts for their business probably hasn't even considered adding branded stickers. A simple question—"Hey, for just $1.50 each, would you like to add 50 matching UV DTF stickers to the order?"—can tack on an extra $75 in high-margin revenue to a single job.
These small additions stack up fast and are central to learning how to grow your T-shirt business with DTF transfers. If you really want to dive deep, exploring comprehensive revenue optimization strategies can give you a significant leg up.
Capitalizing on Trends and Seasonal Demand
Finally, smart pricing is never static. It needs to adapt to what's happening in the market. Don't be afraid to adjust your prices for timely designs that are suddenly in high demand. A clever t-shirt design based on a viral meme or a big sporting event has a short but incredibly valuable lifespan. During that window, its perceived value is much higher, and your pricing should absolutely reflect that.
The same logic applies to seasonal rushes. Custom shirts for holidays like Halloween, Christmas, or the Fourth of July are always in high demand. During these peak times, you can command higher prices because of the increased urgency and consumer spending. It’s not just a hunch; the global custom T-shirt printing market is on track to hit $13.55 billion by 2029, fueled by this very demand for quick-turn, high-value products that customers are willing to pay more for.
To make the most of these moments, you need to be efficient. Using tools like our Auto-build gang sheet builder keeps your transfer costs low, making these premium-priced, timely orders exceptionally profitable. When you combine rush fees, smart upselling, and dynamic pricing, you create a powerful strategy that maximizes your revenue on every single order you press.
Common Questions About Pricing Your Shirts
Figuring out how to price your shirts can feel like a moving target. To help you nail it down, I've answered some of the most common questions I hear from other apparel creators. My goal is to give you clear, no-nonsense advice so you can build a pricing strategy that actually works.
How Much Should I Charge for a Custom T-Shirt?
There’s no magic number, but the best place to start is with the keystone pricing model. It's a classic for a reason.
First, you need to know your true cost to make one shirt. That means adding up the cost of the blank tee, the DTF transfer, your labor time, and a little slice for overhead. Once you have that all-in number, just double it. That's a 100% markup.
So, if your total cost comes out to $11, a solid retail price would be $22. From there, you can always tweak it based on how complex the design is, the quality of the shirt, or the order size.
What Is a Good Profit Margin for T-Shirts?
You should be aiming for a profit margin between 30% and 50%. Staying in this range is what keeps a business healthy.
A margin like this ensures you’re not just covering your costs, but you actually have profit left over to reinvest. Think marketing, new equipment, or just growing your brand.
For those big wholesale or bulk jobs, you'll probably have to lower your per-shirt margin to stay competitive. That’s okay. The much higher volume should still lead to a bigger total profit on the order, making it a smart trade-off.
Should I Offer Discounts for Bulk Orders?
Absolutely. Offering tiered pricing for bigger orders is a standard industry practice because it flat-out works. It gives customers a real incentive to order more, which is a win for both of you.
Set up some clear price breaks at different quantities. Good starting points are usually around 25, 50, and 100+ units.
The real secret to making bulk pricing profitable is locking in your efficiency. When you use a tool like our Auto-build gang sheet builder, you crush your per-print cost by fitting as many designs as possible onto the film. This is how you pass savings on to your customer while your own profit on the total job gets even bigger.
How Do I Factor in Shipping Costs?
You’ve got a few solid ways to handle shipping, and the right one just depends on how you sell.
- Roll it into the price. Offer "free" shipping by simply building the average shipping cost right into your shirt's retail price. Customers love it.
- Charge a flat rate. Pick a single shipping fee for all orders. This keeps the checkout process super simple and predictable.
- Use real-time rates. Let your e-commerce platform (like Shopify or BigCommerce) calculate the live shipping rates from carriers like USPS or UPS.
If you’re sending a custom quote, always calculate the estimated shipping and list it as its own line item. That transparency goes a long way in building trust and making sure there are no surprises for your customer.
Ready to start pricing with real confidence? At Lion DTF Transfers, we give you the high-quality DTF prints and tools you need to build a profitable apparel business. Squeeze every bit of value out of your costs and deliver amazing quality with our easy-to-use Auto-build gang sheet builder today.