


Knowing how to get a perfect iron-on transfer comes down to a simple formula: consistent heat + even pressure + the right tools. This combo is the real secret to creating custom apparel that looks professional and actually lasts through dozens of washes. Forget frustrating, peeling designs; getting your setup right from the start makes all the difference.
Gathering Your Tools for a Perfect Application
Before you even think about pressing your first design, getting your toolkit in order is the most important step. The final quality of your application depends directly on the tools you use, as they’re what prevent the most common—and frustrating—mistakes. Think of it as laying a solid foundation for a durable, vibrant result every single time.
Your most valuable player here is a quality heat press. I know a home iron seems convenient, but it’s missing the two things a DTF transfer absolutely needs: consistent temperature across the heating plate and evenly distributed pressure. An iron’s surface is full of hot and cool spots, which is why you see parts of a design stick perfectly while other parts peel right off.
A heat press just eliminates all that guesswork. It delivers the steady, reliable heat and firm pressure needed to properly cure the transfer’s adhesive and bond the ink deep into the fabric fibers. This is what separates a homemade-looking shirt from a professional-grade product that can easily withstand over 100 washes.
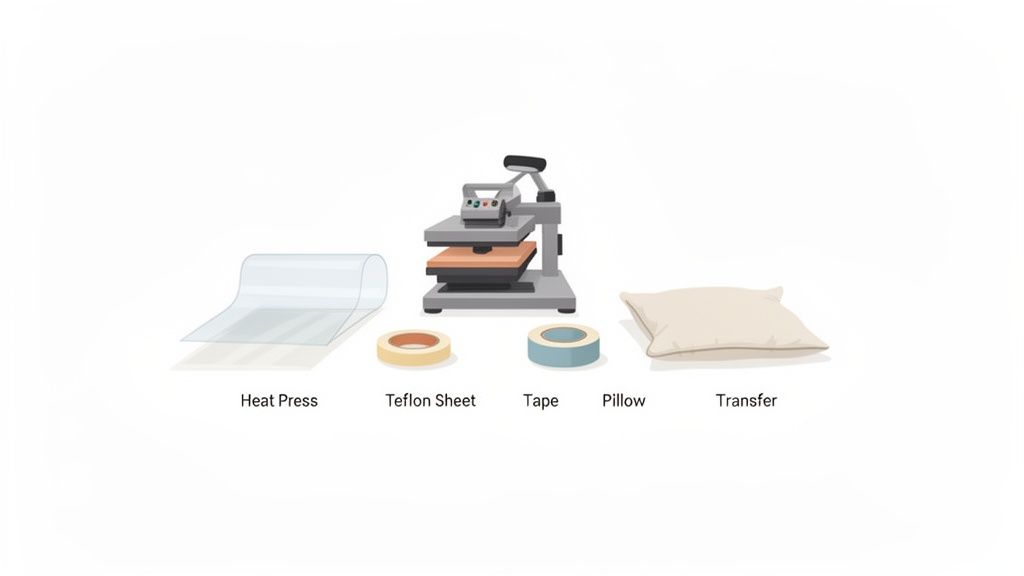
Essential Application Accessories
Beyond the press itself, a few key accessories will seriously level up your results and protect your gear. Before you start your project, make sure you have all the essential sewing notions and tools on hand for a smooth process.
-
Heat-Resistant Tape: This stuff is non-negotiable for locking your transfer in place. Even a tiny shift during pressing can cause ghosting or a misaligned design, but a few small pieces of this tape will keep everything exactly where you want it.
-
Teflon Sheet: A protective Teflon sheet (or even parchment paper in a pinch) acts as a barrier between the hot platen and your garment. It’s cheap insurance against accidental ink transfer onto your press and shields delicate fabrics from direct, scorching heat.
-
Heat Press Pillow: These Teflon-coated foam pillows are absolute problem-solvers. When you’re pressing a shirt with thick seams, zippers, or collars, a pillow raises the application area so you can get that even pressure needed for a perfect bond.
A classic rookie mistake is thinking more pressure is always better. The real goal is firm, even pressure. Too much force can actually cause the adhesive to ooze out from the edges of the design, creating a thin, shiny outline you definitely don't want.
Getting these items ready beforehand just sets you up for a win. For a deeper dive into different transfer methods, our guide on heat transfer paper printing can give you some more great context.
Prepping Your Garment and Transfer for a Lasting Bond
Look, a professional-quality transfer starts long before you even think about bringing the heat. One of the quickest ways to absolutely ruin a project is by skipping the prep work on your garment and transfer. This first stage is everything—it's the foundation for a bond that actually lasts. If the foundation is weak, the whole thing will fail.
Let's start with the garment itself. A lot of fabrics, especially cotton and its blends, hold a surprising amount of hidden moisture, even when they feel bone dry to the touch. When you press it, that moisture flashes into steam and gets in the way of the transfer's adhesive, stopping it from properly grabbing onto the fabric fibers.
The fix is dead simple: a quick 5-10 second pre-press. This blast of heat gets rid of that invisible moisture and knocks out any stubborn wrinkles, leaving you with a perfectly smooth, dry surface to work with.
Getting Your DTF Transfer Ready
Once the shirt is prepped, it's time to get the transfer sorted. If you're working with individual designs, you’re already good to go. But to really get the most bang for your buck, a lot of creators use gang sheets, which pack multiple designs onto one big sheet of film.
This is where you can see some serious cost savings. Instead of paying for each design one by one, you're just paying for the sheet, which means more prints for your money. Our Auto-build gang sheet builder makes this insanely easy and cost-effective. You just upload your art, and the tool automatically nests everything to fit the maximum number of designs possible, slashing waste and dropping your cost per print.
Before you can press anything, though, you’ll need to cut your chosen design out of the gang sheet.
- Leave a Small Border: When you're trimming, it's a good idea to leave a tiny clear border around the design. It just gives you a little buffer to prevent accidentally nicking the ink.
- Use Sharp Scissors: A clean cut is a must. Dull scissors can snag and mess up the film, so grab a sharp pair to get those smooth, precise lines.
- Store Them Right: Keep your unused transfers on the gang sheet and store them flat in a cool, dry place. Keep them out of direct sunlight to make sure they stay perfect for your next job.
Prepping your garment isn't just a friendly suggestion; it's non-negotiable. Industry tests show that failing to pre-press can slash the wash durability of a transfer by up to 50%. Taking those extra 10 seconds means your work will look great not just today, but dozens of washes from now.
This simple two-part routine—pre-pressing the garment and neatly trimming the transfer—is what separates the amateur-hour results from professional, long-lasting custom apparel. It gives every single design the best possible chance to adhere perfectly, giving you that vibrant, durable finish you're after.
Mastering Your Heat Press Settings for Any Fabric
This is where all your prep work really shines. Nailing the perfect trifecta of temperature, time, and pressure is the final, most crucial step for a flawless, long-lasting transfer. Think of it like a recipe—get one ingredient wrong, and it can throw off the entire result, affecting everything from how vibrant the colors look to how well the design holds up in the wash.
When you're working with Lion DTF’s premium hot-peel transfers, the magic happens between 240-280°F. This temperature range is non-negotiable. It's just hot enough to properly melt the adhesive and cure the ink, letting them fuse permanently into the fabric fibers. Veer off course by just a few degrees, and you can run into trouble. Too cool, and the bond will be weak, leading to peeling. Too hot, and you risk scorching delicate fabrics or even altering the ink’s color.
The Trio of Transfer Success
That professional-grade press you're after comes down to balancing three key variables. Each one plays a critical role in creating a product that feels soft to the touch and can handle dozens of washes.
- Temperature: This is what activates the adhesive. You need consistent heat across the entire platen to make sure every single part of your design bonds equally.
- Time: This is all about how long the heat is applied. The right press time allows the heat to fully penetrate both the transfer and the fabric without overcooking it.
- Pressure: Firm, even pressure is what physically embeds the melted adhesive and ink into the fabric’s weave. In my experience, uneven pressure is the number one cause of peeling edges and failed applications.
Before you even get to the press, a few prep steps set the stage for success. It starts with trimming your transfer and getting the garment ready.
This just goes to show that a great press begins with careful prep work, making sure both the garment and the transfer are perfectly ready for the heat.
Getting these details right is what separates an amateur job from a professional one. And with the DIY world booming, people expect quality. The global iron-on transfer sheet market was valued at a whopping $1.21 billion in 2024 and is on track to hit $2.19 billion by 2033. This growth is all thanks to creators like you who demand pro-level results.
The real secret to a perfect hot-peel transfer? Confidence and speed. As soon as the press is done, you need to peel that film away immediately in one smooth, fluid motion while it's still hot. If you hesitate, parts of the film can start to cool, leading to a choppy peel and a ruined finish.
Recommended Heat Press Settings for Lion DTF Transfers
To make things easy, here’s a quick-reference guide with our tested-and-true settings for the most common fabrics you'll be working with. These are the precise temperature, time, and pressure settings we recommend for getting the best results with Lion DTF hot-peel transfers.
| Fabric Type | Temperature (°F) | Press Time (Seconds) | Pressure Level | Peel Method |
|---|---|---|---|---|
| 100% Cotton | 280°F | 10 | Medium-Firm | Hot Peel |
| Polyester | 240-250°F | 8-10 | Medium | Hot Peel |
| Cotton/Poly Blends | 270-280°F | 10 | Medium-Firm | Hot Peel |
| Tri-Blends | 260-270°F | 8-10 | Medium | Hot Peel |
Remember, these settings are your starting point. Every heat press is a little different, so you might need to make small adjustments. My advice? Always do a quick test on a scrap piece of fabric first to dial in your settings perfectly.
For an even deeper dive, our comprehensive temperature guide for heat press applications covers a wider range of materials and scenarios.
Lock In Durability With A Post-Press And Proper Care
Your design is on the shirt, and it looks incredible. But the job isn't quite finished. What you do in the next few minutes separates a good-looking transfer from one that lasts for years. This is how you lock in that professional quality and make sure all your hard work pays off.
One of the best tricks in the book is a quick second press. It's an optional step, but I can't recommend it enough. Just place a Teflon sheet or a piece of parchment paper over the finished design and press it again for just 3-5 seconds.
This brief blast of heat does wonders. It helps embed the ink even deeper into the fabric's fibers, giving it a much softer, more integrated feel—less like a sticker and more like a high-end screen print.
Proper Washing For Long-Term Wear
Once your design is fully applied and post-pressed, aftercare is what guarantees it reaches the 100+ wash durability our transfers are famous for. Giving clear, simple instructions to your customers is just as important as the application itself.
The most critical rule? Wait at least 24-48 hours before that first wash. This isn't just a suggestion; it’s essential. That waiting period gives the transfer's adhesive the time it needs to fully cure and form a permanent bond with the garment.
For ongoing care, these simple guidelines will keep the design looking vibrant and sharp:
- Turn It Inside Out: Always wash the garment inside out. This simple habit protects the design from rubbing against other clothes and the washing machine drum.
- Stick to Cold Water: Cold water is much gentler on both the transfer's ink and its adhesive bond.
- Skip the Harsh Stuff: Steer clear of bleach, fabric softeners, and aggressive detergents. They can break down the materials over time.
To really nail down the aftercare process, especially for items that get a lot of wear, checking out comprehensive washing and maintenance tips for children's clothes can be a huge help, as the same principles for durability apply.
Why Aftercare Is So Important
The demand for high-quality custom apparel is only getting bigger, and with it, customer expectations are rising. The heat transfer paper segment alone was valued at $656.62 million in 2024 and is projected to nearly double. This isn't a niche market anymore; it's a serious business.
The biggest mistake you can make is assuming the process ends after the first press. That final 5-second post-press and clear washing instructions are what protect your reputation and keep customers coming back for more.
Providing these simple care tips shows you're a professional who stands by their work. It ensures your creations continue to look amazing for the long haul. For an easy reference, you can always direct your customers to our detailed pressing and shirt care instructions page.
How to Troubleshoot Common Transfer Issues

Even with perfect prep, you’ll eventually run into a transfer that just doesn't want to cooperate. Don't sweat it—most of these problems are incredibly common and easy to fix once you know the signs. Think of these hiccups as part of the learning curve; every failed press teaches you something that makes the next one better.
The number one complaint we hear is about the edges of a design peeling or lifting right after pressing. This is almost always a dead giveaway for one specific problem: uneven pressure. Your heat press might feel like it's clamping down tight, but if you're working over thick seams, collars, or zippers, those raised areas create gaps. The platen simply can't make solid, even contact with the transfer, leaving the edges vulnerable. A simple heat press pillow is your best friend here.
Diagnosing Faded or Cracked Designs
If your finished design looks dull or, worse, starts cracking after its first trip through the wash, the issue is almost certainly rooted in your heat press settings. This is a classic symptom of the ink and adhesive not curing correctly, which means you have a weak bond with the fabric.
- Faded Colors: This almost always points to your temperature being too low. If the heat isn't intense enough to fully activate the ink, you'll be left with a muted, disappointing finish.
- Cracking Graphics: This one can be a two-part problem. It's often caused by not enough heat, but it can also happen if your press time is too short. The adhesive needs both the right temperature and enough time to properly melt and weave itself into the fabric fibers.
You can avoid both of these headaches by doing a quick test press on a scrap piece of the same fabric. It’s a small step that helps you dial in your settings perfectly before committing to the final garment.
One of the most overlooked causes of transfer failure is skipping the pre-press. Trapped moisture is the invisible enemy of a good bond. That quick 5-10 second press to remove humidity and wrinkles is a non-negotiable step for professional, lasting results.
Fixing Fabric Discoloration
Seeing a slight discoloration or a shiny "press box" outline on your garment can be alarming, especially on sensitive materials like polyester. This is usually just a sign of too much heat. The fix is straightforward: drop your temperature a bit. You can also add a protective Teflon sheet between the platen and the garment to shield the fabric from direct, intense heat.
Nailing these techniques is more important than ever. The entire transfer sheets market, which includes all types of iron-on products, was valued at a massive $2.5 billion in 2024 and is on track to hit $4.8 billion by 2034. You can discover more insights about this expanding market and its trends. Perfecting your process is how you deliver the pro-level quality that customers are looking for.
And remember, starting with a better product makes troubleshooting a whole lot easier. When you lay out your designs with our Auto-build gang sheet builder, you're not just saving money on materials—you're starting with a premium transfer designed for consistency and durability, which minimizes these issues from the get-go.
Common Questions We Get About Iron-On Transfers
Even with the best guide, a few questions always come up when you're dialing in your process. We've been there. Here are the answers to the most common questions we hear from creators, designed to get you past those little hurdles and on your way to a perfect press.
Can I Just Use a Regular Home Iron for DTF Transfers?
Look, I get the temptation, but for the kind of durable, professional-quality results you're aiming for, a home iron just won't cut it. We strongly recommend against it.
A standard iron is designed with hot spots and cool spots—it's impossible to get the two things a DTF transfer absolutely needs to bond permanently: consistent, even heat and firm, uniform pressure. Using one is a recipe for designs that peel in some spots while sticking in others. A quality heat press is the only tool that guarantees the whole transfer gets the exact heat and pressure it needs for that permanent, soft-hand feel our transfers are known for.
Help! My Transfer Is Peeling After I Wash It.
This is probably the most frustrating issue, but the good news is that it's almost always caused by something that went wrong during the application. Peeling after a wash is a dead giveaway that the transfer didn't fully bond with the fabric fibers.
The usual suspects are:
- Not Enough Pressure: If you press too lightly, the transfer's adhesive doesn't get pushed deep into the fabric. You need that firm press to create a bond that lasts.
- Temperature Was Too Low: If your press isn't hot enough, the ink and adhesive just won't cure properly. It might look fine at first, but it won't survive the wash.
- You Skipped the Pre-Press: This is a huge one. Forgetting to pre-press the garment traps moisture in the fabric. When you press the transfer, that moisture turns into steam and completely blocks a solid bond from forming.
So, always double-check your press settings for firm pressure, make sure you're at the right temp for your fabric, and never, ever skip that quick pre-press. It makes all the difference.
What’s a Gang Sheet and How Does It Save Me Money?
Think of a gang sheet as buying in bulk. It's a large sheet of transfer film where you can arrange multiple different designs. Instead of ordering and paying for each design one by one, you just pay for the whole sheet. It's a total game-changer for your costs.
Our Auto-build gang sheet builder makes this super easy and maximizes every inch of film. You just upload your logos and graphics, and the tool automatically nests them together to fit as many as possible, cutting down on wasted space. This is how you get a bunch of different designs for one low price, which seriously drops your cost-per-print and boosts your profit margins.
A quick but important note: DTF transfers are single-use only. Once you press a design, the ink and adhesive permanently bond to the fabric. You can't reuse it.
What's the Difference Between Hot Peel and Cold Peel?
The "peel" just refers to when you remove the clear carrier film after pressing your design. Timing here is critical, and it all depends on the type of transfer you're working with.
With a hot peel transfer—which is what we specialize in here at Lion DTF—you peel the film off immediately while everything is still hot. It’s a much faster process, which is great for production, and it leaves behind a much softer, more flexible finish that really feels like it’s part of the shirt.
On the other hand, cold peel transfers make you wait until the garment has cooled down completely before you can remove the film. We're all about the hot peel method. It gives you that premium, soft-hand feel your customers will love and seriously speeds up your workflow.
Ready to create some stunning, durable custom apparel? The team at Lion DTF is here to get you going with our premium hot-peel transfers that deliver professional quality every time. Build your first gang sheet today!