


To get an image embedded in Adobe Illustrator, you just place it into your document using File > Place, then look for the ‘Embed’ button up in the top control panel and click it. That's it. This one move locks the image into your .ai file for good, so it can’t go missing when you send the file off to print. It’s a simple but critical step for creating design files that are completely self-contained and portable.
Why You Need to Embed Images in Illustrator
Ever opened an Illustrator file and been hit with that dreaded "missing link" error? It's a designer's worst nightmare, especially when a deadline is breathing down your neck.
This happens because, by default, Illustrator links images instead of including them directly. A linked image is basically just a shortcut—a pointer to an external file saved somewhere else on your computer. If you move, rename, or delete that original file—or worse, send the .ai file to someone else without the image file—that link breaks. And your image vanishes.
Embedding is the permanent fix. When you embed an image, you're pasting a full-resolution copy of it right into your project. The .ai file becomes a self-contained package, and that image becomes a true part of the design itself.
The Core Difference: Linking vs. Embedding
Figuring out when to link versus when to embed is a huge part of a smooth and efficient design workflow. Here's how I think about it:
- Linking is perfect for works-in-progress. It keeps your Illustrator file size small and snappy, which is a lifesaver when you're in the creative zone and making constant tweaks to your images in programs like Photoshop.
- Embedding is for the final handoff. This is the non-negotiable standard for sending files to a print shop, sharing with a client, or archiving a project. For DTF printing, embedding is an absolute must to ensure we have every single asset needed for production.
To make it even clearer, here’s a quick rundown to help you decide which method fits your current task.
Linking vs. Embedding: A Quick Comparison
Use this table to quickly decide which method is right for your project.
| Consideration | Linked Images | Embedded Images |
|---|---|---|
| File Size | Keeps .ai files small. |
Increases .ai file size significantly. |
| Performance | Faster, more responsive workflow. | Can slow down performance on complex files. |
| Image Updates | Updates automatically when the source file is edited. | Requires you to un-embed and relink to update. |
| Portability | Requires sending all linked files separately. | Self-contained; no extra files needed. |
| Best For | Early design stages, collaborative projects. | Final delivery, printing, and archiving. |
At the end of the day, you can't go wrong embedding your final files. It guarantees that what you see is what you get.
When Embedding is Non-Negotiable
This isn't just a preference; it's a fundamental best practice in the design world. Embedding is the number one way to solve collaboration problems when teams need to share files without passing around complicated folder structures.
Ultimately, embedding gives you reliability. It ensures that what you see on your screen is exactly what the print shop or your client will see when they open the file. This is especially true for complex projects with tons of different raster assets, where trying to manage dozens of individual linked files is just asking for trouble.
Yes, embedding makes the file size bigger, but the peace of mind it delivers is priceless.
This is also why it's so important to get your color modes right before you embed. If you want to learn more, check out our guide on how to properly convert from RGB to CMYK for print accuracy. For anyone creating DTF transfers, this step is just one part of a seamless process that ends with our Auto-build gang sheet builder, ensuring your perfectly embedded, print-ready designs are ganged up for maximum cost-effectiveness.
The Easiest Ways to Embed Your Images
Getting your images locked into an Illustrator file is a non-negotiable step for clean, predictable printing. It’s a simple process once you know the ropes, and there are a few different ways to get it done, depending on your workflow.
Let's break down the most common methods I use every day.
The most direct route is to embed an image the moment you bring it into your project. When you go to File > Place, you'll see a dialog box pop up. Before you click "Place," look for a little checkbox labeled Link. If you uncheck this box, Illustrator embeds the image into your document right from the start.
This is the "one and done" approach, perfect for when you know an image is final and you don't want to think about it again. The image becomes a permanent part of your .ai file, completely eliminating the risk of it going missing later.
Embedding an Image After Placing It
But what if you've already placed an image and it's linked by default? This happens all the time, especially when you're still playing around with a layout. Thankfully, embedding it after the fact is just a single click.
First, grab the Selection Tool (V) and click on the linked image on your artboard. With the image selected, look at your Control Panel—that's the toolbar that usually runs across the top of your workspace. You should see an "Embed" button. Just click it.
That’s it. Illustrator instantly converts the linked file into a fully embedded one. It's a super fast way to finalize an asset without having to delete it and place it all over again.
Pro Tip: If your Control Panel isn't visible, you can turn it on by going to Window > Control. I highly recommend keeping this panel active; it's a huge time-saver for common tasks just like this.
Managing Multiple Images With The Links Panel
For bigger projects loaded with tons of images, embedding them one by one would be a nightmare. This is where the Links Panel becomes your command center. You can pop it open by going to Window > Links.
This panel gives you a clean list of every single image in your document. To embed a bunch of files at once:
- Hold down Shift or Ctrl (Cmd on a Mac) to select all the linked images you want to embed.
- Click the little hamburger menu icon in the top-right corner of the Links Panel.
- From the dropdown menu that appears, choose Embed Image(s).
This one action embeds all your selected images in a single go, which is an absolute lifesaver for complex layouts or gang sheets. This infographic breaks down the core difference between these two states.
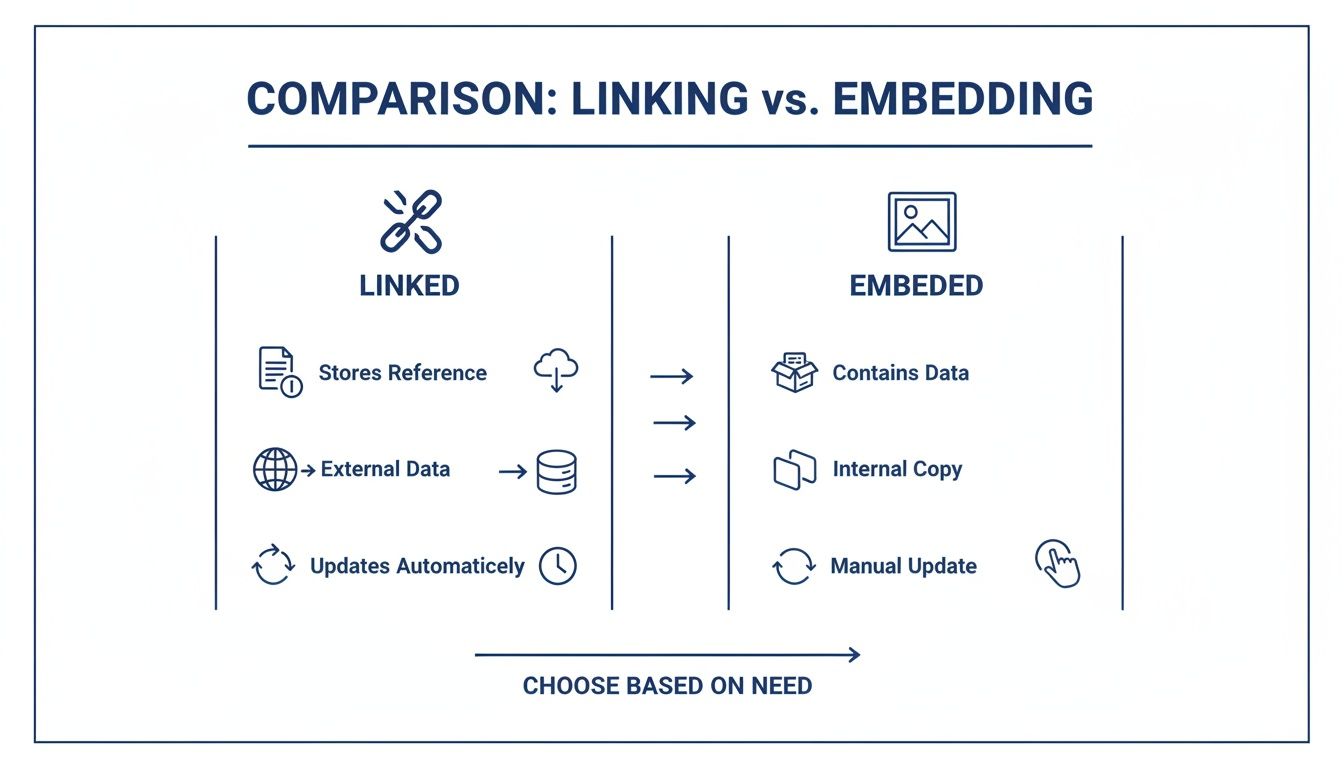
As you can see, linking keeps an external connection alive, while embedding makes the file completely self-contained and portable.
No matter which method you pick, the end goal is always the same: creating a stable, print-ready file. For our DTF transfer customers, making sure all images are embedded is a critical step before sending designs to our Auto-build gang sheet builder. This guarantees your file has everything needed for a perfect print, making the whole process hassle-free and cost-effective.
Mastering the Links Panel for Full Asset Control
The Links Panel is your command center for every single image you place in an Illustrator document. Think of it less like a list and more like an interactive dashboard that gives you total control over your assets.
You can pull it up anytime by going to the top menu and navigating to Window > Links.
Once it’s open, the panel instantly shows you the status of every image. A quick glance tells you everything you need to know: a simple file icon means the image is linked, while a small, boxy icon that looks like a tiny painting means it’s fully embedded. This visual feedback is a lifesaver for auditing a complex file before sending it off to print.
Fixing Broken Links and Replacing Images
One of the most common—and stressful—issues you’ll run into is the broken link, flagged by a jarring red question mark icon. This just means Illustrator has lost the trail to the original image file, maybe because you moved or renamed it. The Links Panel makes this an incredibly simple fix.
All you have to do is:
- Select the missing file in the Links Panel.
- Click the Relink icon (it looks like a chain link) at the bottom.
- Navigate to the file's new location on your computer and hit "Place."
This same exact process is perfect for updating an image with a newer version. If you just finished making edits in Photoshop, you can use the "Relink" button to swap the old version for the new one without messing up its position or scale in your layout.
Un-embedding an Image for External Edits
What if you need to make changes to an image you've already embedded? No need to start from scratch. The Links Panel lets you reverse the process and pull the image data back out into an external file.
Just select the embedded image in the panel, click the little hamburger menu in the top-right corner, and choose Un-embed. Illustrator will ask you to save the image as a new file (like a PSD or TIFF). Once saved, the image in your document automatically becomes a linked file, ready for you to open and edit in another program.
This workflow is a game-changer. It gives you the security of embedding with the flexibility of linking, letting you move between both states as your project evolves.
Sometimes, a low-resolution image just won't cut it for a high-quality DTF print. If you need to upgrade a blurry logo or graphic before you embed it, our design vectorizing services can convert it into a crisp, scalable vector file perfect for any size.
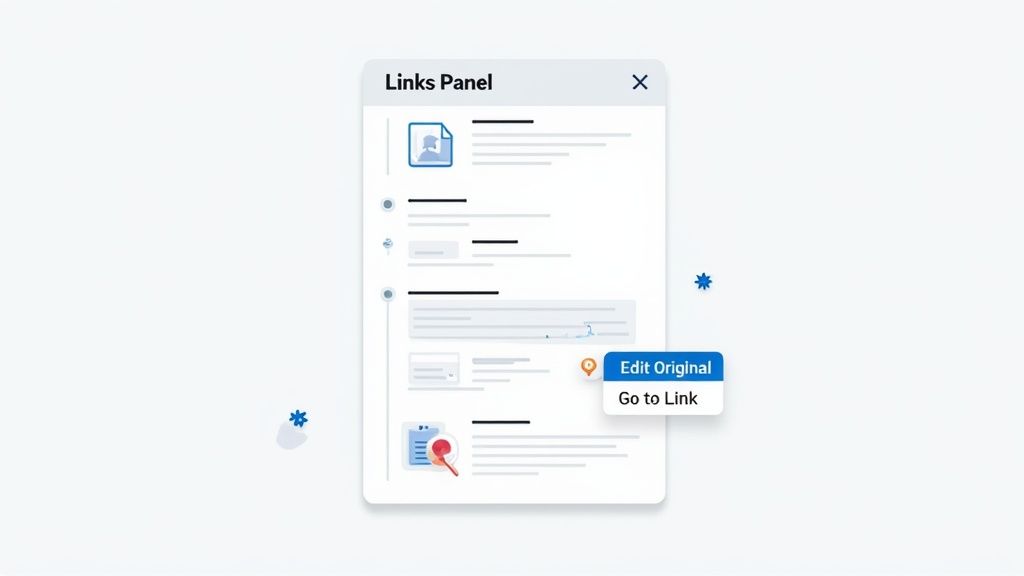
Streamlining Your Workflow with Panel Options
Beyond the basics, the Links Panel has a few killer features that can dramatically speed up your workflow. You'll find them in the panel's dropdown menu or as small icons at the bottom.
- Go To Link: This button instantly selects and centers the chosen image on your artboard. No more hunting for that tiny logo in a crowded design.
- Edit Original: When you select a linked file and click this, Illustrator automatically opens the image in its default program (like Photoshop), ready for you to make changes.
By mastering these functions, you'll manage all your visual assets like a pro. You’ll be able to quickly embed an image in Illustrator for final delivery, fix problems on the fly, and keep your project files clean and organized.
Solving Common Problems with Embedded Images
Embedding is a game-changer, but let's be real—it's not always a smooth ride. When you embed an image in Illustrator, you solve the problem of broken links but can accidentally create a few new headaches. The good news is these common issues are easy to fix once you know what's going on under the hood.
The biggest offender is almost always a massive, unexpected jump in file size. You might drop a tiny 500KB JPG into your artboard, hit embed, and suddenly your .ai file balloons to 10MB. This isn't a glitch; it's just how Illustrator works. It uncompresses raster images like JPGs and PNGs, storing every single raw pixel right inside the file.
This file bloat has been a pain point for designers forever. In a classic example from an Adobe community discussion, one designer embedded a tiny 0.35MB JPG, and their Illustrator file swelled to an insane 7.7MB. That’s a 2,100% increase. This happens because Illustrator stores the uncompressed image data, and if you have the "Create PDF Compatible File" option checked when you save, it saves another copy for the PDF preview, basically doubling down on the bloat.
Managing Huge File Sizes
If your file size is spinning out of control, you have one primary weapon in your arsenal. When you save your file (File > Save As), just uncheck the box that says Create PDF Compatible File.
This one simple click can slash your file size by up to 50%. By turning it off, you’re telling Illustrator to skip saving that second, PDF-friendly version of your embedded images. The only real trade-off is that you might lose thumbnail previews in your file browser or have issues opening the .ai file in apps that aren't made by Adobe. For a final, print-ready file, this is almost always a safe and necessary move.
Important Takeaway: For any project loaded with high-res embedded images, saving without PDF compatibility is the most effective way to keep your file from becoming a monster. Just make sure to give a heads-up to anyone you're sharing the file with.
Avoiding Pixelation and Blurry Images
Another frustrating moment is when a perfectly sharp image suddenly looks pixelated the second you embed it. This almost always boils down to one simple thing: source resolution.
Illustrator is a vector powerhouse, but it can't magically invent pixels that aren't there. If you grab a 72 PPI image from a website and embed it, it’s going to look blurry and unprofessional when it comes time to print. No way around it.
- Always start with high-quality assets. For printing, the non-negotiable standard is 300 PPI (Pixels Per Inch) at the final size you intend to print it.
- Check before you even place it. Before dragging an image into Illustrator, open it in Photoshop or a similar program to confirm its resolution. A few seconds of prevention saves a ton of headaches later.
Preventing Unexpected Color Shifts
Ever embedded a vibrant, punchy image only to see it look dull and washed out in your Illustrator file? That’s a classic color mode mismatch. Your Illustrator document is probably set to CMYK (for printing), but the image you placed was in RGB (for screens).
To fix this, get everything on the same page before you embed:
- First, make sure your Illustrator document's color mode is set to CMYK. You can check this under
File > Document Color Mode > CMYK Color. - Next, open your source images in Photoshop and convert them to the same CMYK profile before you place them into Illustrator.
By nailing these three common issues—file size, pixelation, and color shifts—you can embed images with total confidence. For DTF printing, getting these details right is absolutely critical before you upload your art to our Auto-build gang sheet builder, which makes creating efficient, press-ready layouts a breeze and is incredibly easy to use.
Alright, let's get that Illustrator file prepped and ready for a flawless DTF print run. Knowing how to handle your images and settings is what separates a professional, press-ready design from a costly mistake. Think of this as your final pre-flight checklist before sending your art to print.
Running through these steps ensures that what you see on your screen is exactly what comes off the printer. It’s all about eliminating those common production headaches before they even have a chance to start.
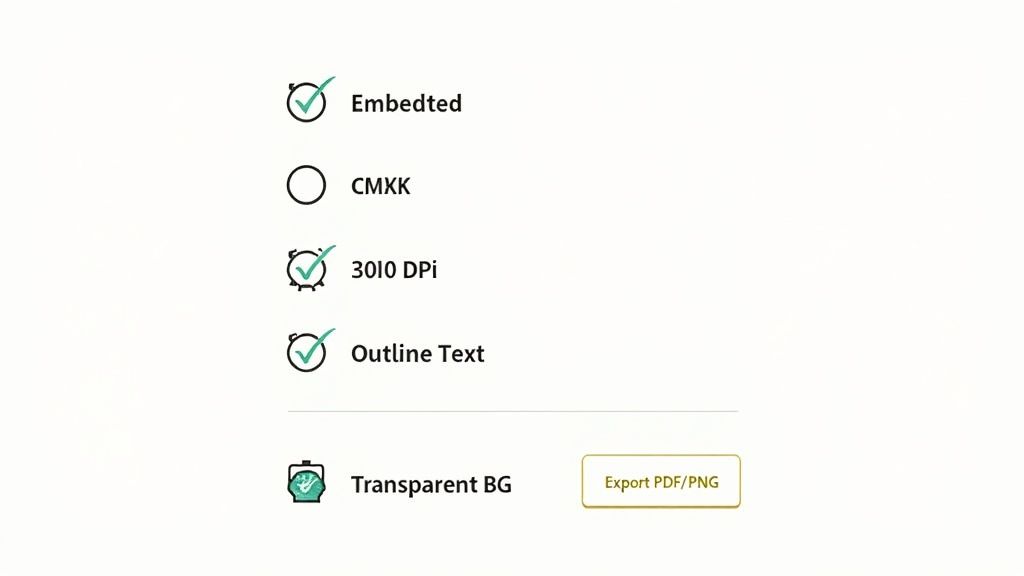
Your DTF Pre-Press Checklist
Before you even think about hitting that export button, take a minute to go through these five crucial checks inside your Illustrator document. Getting these right from the jump will save you a ton of time, money, and frustration down the line.
-
Make Sure Every Image Is Embedded: Pop open your Links Panel (
Window > Links) and give that list a quick scan. See any icons missing that little "embedded" symbol? Click on them, then head to the panel menu and hit Embed Image(s). This is hands-down the most important step for creating a self-contained, bulletproof file. -
Double-Check Your Color Mode: DTF printers work in CMYK. It's how they mix inks to create all those vibrant colors. Head over to
File > Document Color Modeand confirm that CMYK Color is checked. If you send an RGB file, you’re gambling with your colors, and they’ll likely come out looking dull or muddy. -
Verify 300 DPI Resolution: Click on any raster image (like a photo or a complex texture) in your design. Now, look at your Control Panel at the top of the screen—it should show the resolution. For a crisp, professional transfer, every single image needs to be at least 300 DPI at its final print size. Anything less will look blurry.
-
Outline All Your Text: This is a classic pre-press move to avoid font nightmares. If the print shop doesn't have the exact font you used, their system will swap it for something else. To prevent that, just convert your text to shapes. Select your text box and hit
Type > Create Outlines(or the shortcutShift+Ctrl+O/Shift+Cmd+O). -
Confirm a Transparent Background: Unless a colored background is part of your actual design, you need to make sure it's transparent. Check for any leftover background shapes or fills that could sneak their way into the final print.
Once your file passes this five-point inspection, it's officially ready for the pros.
Of course, a perfect file is just the first step. The next piece of the puzzle involves choosing the right DTF printing software, which acts as the brain that tells the printer exactly how to interpret your design. And if you're new to this whole process, our complete guide to creating https://liondtf.com/blogs/news/custom-heat-transfer-designs has a ton of info to get you started.
Getting these fundamentals right gives you complete control over the final product. This kind of attention to detail is what makes the difference between an amateur-looking graphic and professional, retail-quality apparel.
Now that you have a perfect, print-ready file, you can make it work even harder for you. Export your design as a high-resolution PNG or PDF and upload it to our Auto-build gang sheet builder. This easy-to-use tool lets you arrange multiple designs on a single sheet, which is an incredibly smart way to cut down on material waste and save serious money on your DTF projects.
Common Questions Designers Ask About Embedding Images
Jumping into the world of linked versus embedded assets always brings up a few questions, especially when you’re laser-focused on creating a perfect, press-ready file. Let's clear up some of the usual points of confusion designers run into when they embed an image in Illustrator.
Getting these details sorted out keeps your workflow moving and makes sure your final prints come out flawless.
What’s the Real Difference: Embedding vs. Linking?
Think of linking an image as creating a shortcut. Illustrator just references an external file saved somewhere on your computer. This keeps your Illustrator file size small and snappy, but it's also a bit fragile. If that original file gets moved, renamed, or deleted, the link breaks, and you're left with a missing image warning.
Embedding, on the other hand, copies the entire image and pastes it directly into your Illustrator document. This makes the file larger, for sure, but it also makes it completely self-contained. For sending designs to print, this is the industry standard—it guarantees no missing assets.
I Embedded an Image, but Now I Need to Edit It. How Do I Unembed?
It happens. You've embedded an image and then realize you need to make a quick tweak. The process is actually pretty simple.
Just head over to your Links Panel (you can find it under Window > Links) and click on the embedded image you need to work on. From there, click the little hamburger menu icon in the top-right corner of the panel and select Unembed.
Illustrator will then ask you to save the image as a new external file (a PSD or TIFF is usually best). Once you save it, the image automatically becomes a linked file right back in your document, ready for you to open and edit in a program like Photoshop.
This flexibility is a lifesaver. You can bounce between linked and embedded states whenever you need to, giving you the best of both worlds: easy editing when you need it and secure, final files when you're done.
Why Did My Illustrator File Size Explode After Embedding?
This is easily the most common side effect of embedding, and it can be jarring to see your file size jump by 10-20 times. When you embed a raster image, Illustrator stores it in an uncompressed format, which eats up a ton of space compared to a compressed JPG or PNG.
The issue is often made worse by a default setting called "Create PDF Compatible File." This option essentially saves an extra copy of the image within your AI file. A quick way to cut down on that bloat is to simply uncheck this box when you save your Illustrator file.
For DTF Printing, Should I Always Embed My Images?
Yes. 100% of the time. For any professional print job—and especially for DTF transfers—embedding isn't just a suggestion; it's a non-negotiable requirement.
When you embed everything, you guarantee that your print provider receives a single, complete file with all the necessary assets baked right in. This simple step prevents production delays, maintains color accuracy, and ensures the final print is a perfect match for your design. Consider it the final quality check before you send your art off to be printed.
Once you've made sure all your images are perfectly embedded and your file is ready for press, the next step is to maximize your efficiency. At Lion DTF, our Auto-build gang sheet builder makes this incredibly easy. Just upload your final design to arrange multiple images on a single sheet, which helps reduce material waste and makes your projects more cost-effective.