


For anyone just getting into custom apparel, the best heat press for beginners is a 15"x15" swing-away model. That size is the sweet spot—versatile enough for everyday projects like t-shirts and totes, but not so big it takes over your workspace. More importantly, the swing-away design gives you a clear, safe area to arrange your transfers, which is a huge confidence booster when you're starting out.
Choosing Your First Heat Press for Custom Apparel
Stepping into the world of custom apparel is exciting, and your heat press is the heart of the whole operation. It’s the tool that bridges the gap between a cool idea on your screen and a real, wearable product. A quality press doesn't just make your designs look good—it makes them last, capable of surviving over 100 washes without fading, cracking, or peeling. That durability is what separates a hobby from a business.
And it’s a great time to jump in. The demand for unique, personalized clothing is exploding. The global heat press market was valued at USD 829.13 million in 2024 and is expected to hit USD 1,315.39 million by 2032. This growth, driven by small businesses and at-home creators just like you, means there are more affordable and reliable machines on the market than ever before. You can dig into more of the market data on Verified Market Research.
Finding the Right Starting Point
For beginners, the goal is to find a machine that’s easy to learn but still delivers professional results. You don't need the fanciest, most expensive model right away. What you do need is a press that gives you consistent heat across the entire platen, even pressure, and straightforward controls you can trust.
A reliable entry-level press is the foundation for getting flawless applications, especially when you pair it with top-notch Direct-to-Film (DTF) transfers. This combo is a game-changer, letting you create vibrant, soft graphics that feel and look like they came from a high-end screen printing shop—all from your own home or studio.
Key Takeaway: Your first heat press doesn’t need to be your last, but it absolutely needs to be a reliable partner. It should help you master the fundamentals of time, temperature, and pressure without making you want to pull your hair out.
To help you narrow down the options, here’s a quick look at the most common heat press types perfect for beginners and what they do best.
Quick Guide to Beginner-Friendly Heat Presses
This table breaks down the top heat press types to help you find the right fit for your space, safety needs, and creative goals.
| Heat Press Type | Best For | Key Benefit |
|---|---|---|
| Swing-Away Press | Beginners prioritizing safety and working with thicker items like hoodies. | The top platen moves completely away, providing a clear, burn-free workspace for perfect design alignment. |
| Clamshell Press | Crafters with limited space who need a compact, efficient machine. | Its space-saving design is ideal for small craft rooms, and it offers a fast, straightforward pressing motion. |
| Draw Press | Users seeking ergonomic comfort and ease of layout for detailed designs. | The bottom platen slides out like a drawer, making it simple to arrange transfers without reaching under a hot element. |
Ultimately, the best press is the one that fits your workflow. When you pair a solid machine with smart, cost-effective supplies—like using an Auto-build gang sheet builder to print multiple designs at once—you’ve got a powerful and affordable setup ready to launch your custom apparel business.
Clamshell vs. Swing-Away: A Head-to-Head Comparison
Choosing between a clamshell and a swing-away heat press is the first big decision you'll make, and it completely shapes your workflow. Both can give you fantastic results, but they're built for very different needs when it comes to space, safety, and the kinds of items you want to create. This isn't just a simple pros and cons list; it's about matching the machine to your actual creative space.
A clamshell press opens and closes on a hinge, just like the name suggests. Its biggest win is the compact, space-saving design, making it the best heat press for beginners with a small craft room or a corner of a spare bedroom. It's also generally faster to operate since the motion is a simple up-and-down movement.
On the flip side, a swing-away press has a top platen that swings completely away from the bottom one. This design definitely needs more room to operate, but it offers a huge benefit: a totally clear, burn-free workspace. This is a massive confidence booster when you're carefully lining up detailed DTF transfers or working with thicker garments.
To help you figure out the best starting point for your budget, this simple decision guide can get you moving in the right direction.
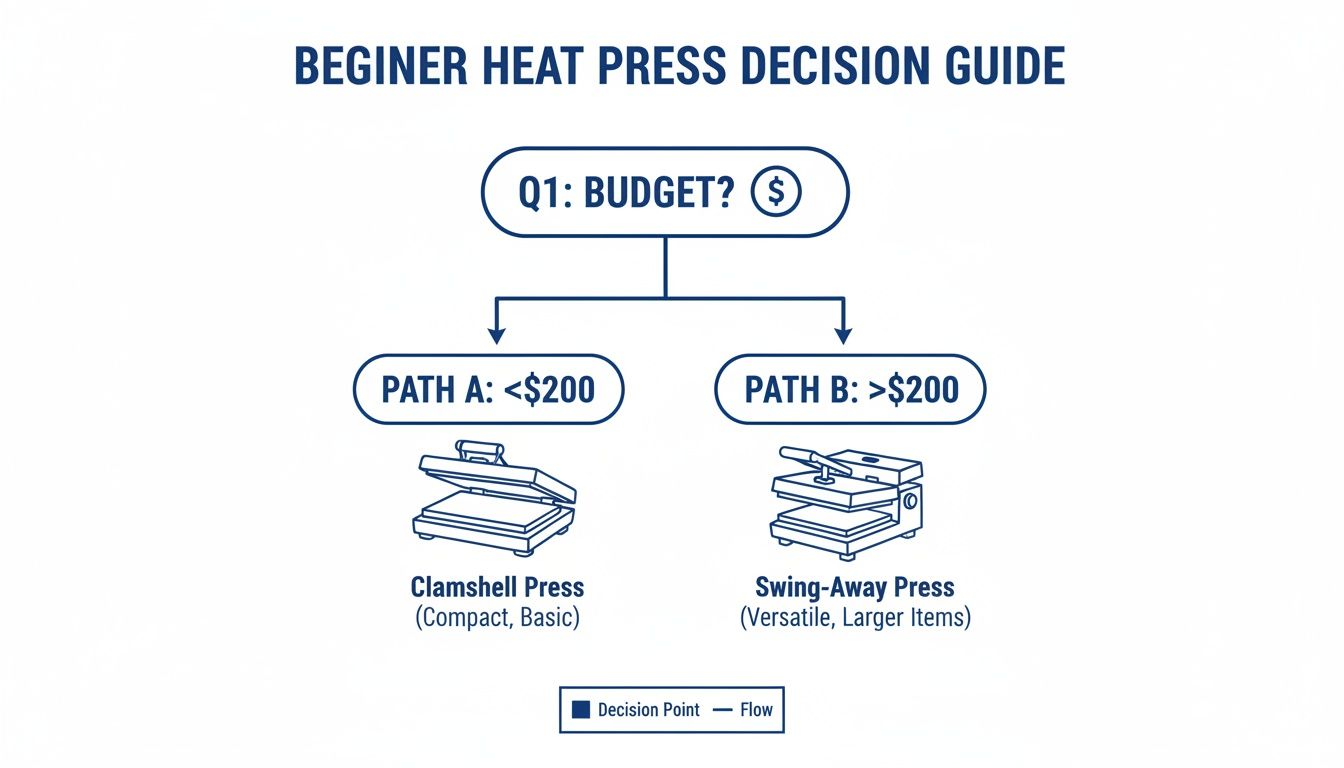
As the chart shows, your initial budget is a major factor. Clamshell models are often more affordable under $200, while the extra safety and versatility of a swing-away usually mean a slightly higher price tag.
Workspace and Safety Considerations
The most critical difference really comes down to your workspace. If you're working on a small desk or in a cramped area, a clamshell’s vertical operation is the clear winner. You can push it right up against a wall and still use it without any issues.
But that compact design comes with a safety trade-off. With a clamshell, your hands are always working directly under a blazing-hot platen. The risk of accidentally bumping it and getting a burn is higher, especially when you're super focused on getting a design perfectly straight.
A swing-away model completely removes this risk by moving the heat source out of your work area. This gives you plenty of room and peace of mind to lay out your shirt, position your transfers, and double-check alignment without worrying about touching a 400°F surface. For anyone just starting out, that extra safety margin can make the learning curve a lot less stressful.
Key Differentiator: The choice often boils down to space versus safety. A clamshell saves precious square footage, while a swing-away offers an open, burn-free environment that is ideal for careful and precise work.
Pressure and Garment Versatility
How these presses apply pressure is another area where they differ quite a bit. A clamshell press pivots from the back, which means the pressure can be slightly uneven—more force gets applied at the rear of the platen. Modern designs have gotten better at this, but it can still be a factor with thicker items.
Swing-away presses, in contrast, come straight down, delivering direct pressure that’s evenly distributed across the entire platen. This makes them far better for pressing thicker items like hoodies, sweatshirts, or anything with bulky seams and zippers. If your plan is to print on a wide variety of apparel, a swing-away gives you more consistent and reliable results across different fabric thicknesses. For a deeper dive, you can learn more about picking the right heat press machine for t-shirt printing in our other guide.
Here’s a practical look at how this plays out:
- Scenario 1: You have a small craft corner. A clamshell is your best bet. Its small footprint won't take over your limited space, letting you set up a functional printing station almost anywhere.
- Scenario 2: You plan to press bulky hoodies. A swing-away is the way to go. Its even, top-down pressure ensures every part of your DTF transfer sticks perfectly, even over thicker fabric and near seams.
- Scenario 3: You value an ergonomic workflow for long sessions. A swing-away or a draw-style press (a hybrid where the bottom platen slides out) is more comfortable. Both reduce the need to reach under a hot element, which minimizes physical strain over time.
Ultimately, the best choice depends on what you want to achieve. If you're starting a small business from home and need to maximize every inch of space, a clamshell is a practical pick. But if you prioritize safety and plan to work with all sorts of different garments, a swing-away is an investment that pays off in both quality and peace of mind.
Key Features That Define the Best Beginner Heat Press

When you're shopping for your first heat press, it’s easy to get buried in technical specs. But getting pro-level results really just comes down to nailing three things: temperature, time, and pressure. The best beginner machines are the ones that make controlling these variables dead simple and repeatable. That’s the secret to getting perfect prints, every single time.
These features aren't just for convenience; they're the difference between a durable, professional-looking product and a dud. A press with spotty heat will leave you with peeling transfers. One with bad pressure control can easily ruin a perfectly good shirt. Understanding what actually matters helps you pick a machine that will be a reliable workhorse for your projects.
Platen Size and Heat Distribution
The platen is the heated metal plate that does all the work, and its size and quality are critical. For anyone starting out, a 15" x 15" platen is the undisputed sweet spot. It's big enough to handle almost anything you can throw at it—from full-front adult t-shirt designs to tote bags and pillows—without being a massive space hog.
But size is useless without consistent heat. The single most common cause of failed prints is poor, uneven heat across the platen. Cheaper presses are notorious for having "cold spots," where the edges and corners are significantly cooler than the center. This is what causes transfers to lift at the corners or not stick properly, wasting your time and materials.
Key Insight: A quality heat press should hold its temperature across the entire platen with almost no variation. Look for models that mention thick platens and multiple heating elements—this is the engineering that eliminates cold spots and ensures every inch of your DTF transfer gets the exact heat it needs.
Digital Controls for Time and Temperature
Guesswork has no place in heat pressing. DTF transfers require precise time and temperature settings to bond correctly. That’s why accurate digital controls are a non-negotiable feature on any press worth buying.
Forget about analog dials. They are notoriously inaccurate and tend to drift over time, which can lead to scorched fabrics or under-cured transfers that wash out. A digital LCD screen gives you everything you need:
- Precision: You can set the temperature to the exact degree and the timer to the exact second.
- Consistency: The machine holds those settings press after press, so your results are always the same.
- Ease of Use: An audible alarm tells you when the press is done, preventing you from over-cooking your transfer.
This level of control is what lets you confidently create vibrant designs that feel great and last through dozens of washes.
Adjustable Pressure for Versatility
You wouldn't press a thin t-shirt and a thick, fleece-lined hoodie the same way. Different materials require different amounts of force, which is where an adjustable pressure knob becomes essential.
Usually a big, easy-to-turn wheel on top of the press, this knob lets you increase or decrease the clamping force of the platen. This versatility is crucial for getting a perfect application on a wide range of garments. Without it, you risk either crushing delicate fabrics with too much pressure or not applying enough force for the transfer adhesive to properly bond to thicker ones. It’s a simple feature that unlocks the ability to customize almost any type of apparel.
When you pair these features with smart, cost-effective supplies, you set yourself up for success. For example, using our Auto-build gang sheet builder lets you print multiple designs at once, making it incredibly affordable to experiment and perfect your technique on a reliable machine. This tool is especially handy for beginners because it simplifies the process and maximizes value from your very first order.
A Step-by-Step Guide to Your First Perfect Press
Getting that new heat press out of the box is an exciting moment. The journey from unboxing to your first perfect project is all about following a simple, clear process. We've put together this guide to take the guesswork out of it and get you pressing with confidence from day one.
We'll walk you through everything, from the initial setup to that final satisfying peel. Follow these steps, and you'll sidestep the common mistakes beginners make, paving the way for consistent, professional-quality results every single time.
Prepping Your Press and Workspace
Before you even think about plugging it in, let's get your space set up for success. Your heat press needs a sturdy, heat-resistant surface to live on. Make sure you give it plenty of room to breathe, especially if you're working with a swing-away model that needs clearance.
Next up is "seasoning" the platen. It sounds technical, but it’s really just about cleaning and preparing it for action. Power on your press and set it to a low temp, maybe around 250°F. Once it's warm, just wipe the top platen down with a clean, dry cloth to get rid of any dust or residue from the factory. This little step is crucial for a clean transfer.
Pro Tip: Before you press your first real garment, do a "ghost press." Just press a piece of parchment paper or an old t-shirt for a few seconds. This burns off any leftover factory coatings and ensures the platen is totally clean and ready to go.
The First Press Workflow
Alright, your machine is prepped and ready to make something awesome. A perfect press comes down to three things: preparation, precision, and a little bit of patience. Having a structured workflow makes sure your transfers come out vibrant, perfectly centered, and built to last.
Here’s a simple, repeatable process for your first project using Lion DTF transfers:
- Prepare the Garment: Always, always pre-press your shirt for 5-7 seconds. This little step is a game-changer—it zaps moisture and smooths out wrinkles, giving you a perfectly flat, dry canvas for your transfer.
- Align Your Transfer: Here's a trick for perfect placement. Fold the shirt in half vertically and give it a light press to create a faint center line. Do the same thing with your DTF transfer film. Now, just line up those two creases. Dead center, every time.
- Press the Design: Lay the garment on the press, position your transfer, and cover it all with a Teflon or parchment sheet. Press it using the settings we recommend for Lion DTF transfers, which is usually around 240-280°F for 10 seconds with medium pressure.
- The Hot Peel: As soon as that timer beeps, open the press and peel the film off immediately. Don't hesitate. Start at a corner and peel it back in one smooth, confident motion. A hot peel is what gives our transfers that signature soft feel.
- Final Curing Press: This is the secret to making your design last for 100+ washes. Cover the design with your Teflon or parchment sheet and give it one more press for 5-7 seconds. This locks the ink into the fabric fibers for maximum durability.
This workflow is designed to be straightforward and seriously effective. While we've laid out the steps for using a heat press, understanding how to structure clear instructions is a skill that helps with any project. If you're interested, you can find resources on how to build effective step-by-step guides for just about anything.
Maximizing Value with Gang Sheets
Want to practice and produce projects without burning through cash? Gang sheets are your answer. Instead of printing designs one by one, a gang sheet lets you pack multiple logos, graphics, and text onto one big transfer sheet.
This is where our Auto-build gang sheet builder really shines for beginners. It’s a super simple tool that takes your uploaded designs and automatically arranges them to use every inch of space, which cuts down on waste and saves you money. Its ease of use makes it a cost-effective way to experiment with different designs, print samples for clients, or run a whole team's order without breaking the bank. For a deeper dive, you can learn more about how to use a heat press machine in our dedicated guide.
Pairing Your Press with High-Quality DTF Transfers
Picking out the right heat press is a huge first step, but it’s only half the equation. Think of it this way: a high-performance press is like a race car engine. To get the results it was built for, it needs premium fuel. For us, that fuel is our transfers. Pairing your new machine with high-quality Direct-to-Film (DTF) transfers is what truly unlocks professional, sellable products from day one.
The quality of your transfer film directly impacts everything—how vibrant your colors look, the feel of the design on the fabric, and most importantly, how well it holds up over time. This is where Lion DTF Transfers really make a difference, especially when you're just starting out. Our premium hot-peel transfers are engineered to produce stunning results with incredible ease, making them a perfect match for someone learning the craft.
Why Lion DTF Transfers Are Ideal for Beginners
We designed our transfers to eliminate the common frustrations that trip up new creators. The goal is a simple, repeatable process that builds your confidence and delivers consistent quality every single time.
- Vibrant, Accurate Colors: We use advanced color-matching tech to ensure the design you see on your screen is the exact design that ends up on the shirt. Expect sharp details and rich, true-to-life colors.
- Incredible Soft-Hand Feel: Nobody likes stiff, plastic-feeling prints. Our DTF transfers have a remarkably soft feel that blends right into the fabric, giving the final product a comfortable, premium touch.
- Tested for Durability: A great design is one that actually lasts. Our transfers are rigorously tested and proven to withstand over 100 washes without cracking, fading, or peeling. Your creations will stay looking brand new.
This combination means you can focus on mastering your heat press, knowing the transfers you're using are built for success. You can dive deeper into the ideal heat press settings for DTF to get perfect results with our transfers.
Making Professional Quality Affordable and Efficient
One of the biggest hurdles for anyone starting out is the cost of materials, especially when you're just experimenting. Wasting transfers on practice runs can get expensive, fast. We built our services to tackle this problem head-on, making it incredibly cost-effective to get started and scale up when you're ready.
The key is our Auto-build gang sheet builder. This intuitive online tool lets you upload multiple designs—logos, graphics, text, anything—and automatically arranges them onto a single transfer sheet to maximize every last square inch of space. Its ease of use is perfect for beginners, offering a highly cost-effective way to get multiple designs in one order.
By optimizing your layout, the gang sheet builder dramatically cuts your cost per design. This can bring the price down to as low as $0.017 per square inch, letting you print dozens of different designs for just a few dollars.
This approach is a total game-changer for beginners. It gives you the freedom to:
- Experiment Freely: Create sample designs, test out color combos, or press on different fabrics without worrying about the cost.
- Build an Inventory: Print a diverse collection of designs so you’re ready for craft markets, an online store launch, or custom client orders.
- Maximize Profit: For those starting a business, slashing material costs is the quickest way to boost your profit margins on every single item you sell.
For creators who want to simplify their workflow even more, we also offer a "We Build a Gang Sheet for You" service. If you'd rather focus purely on pressing and growing your brand, our team will handle the entire layout process for you, guaranteeing a professionally optimized sheet every time. This service lets you offload the design prep and concentrate on what you do best—creating amazing products with your heat press.
Troubleshooting Common Beginner Heat Press Issues
Even the best heat press comes with a learning curve. When you're just starting, it’s completely normal to hit a few frustrating roadblocks. Knowing what to look for ahead of time means you can diagnose problems fast, save your materials, and get to the good stuff—creating flawless products.
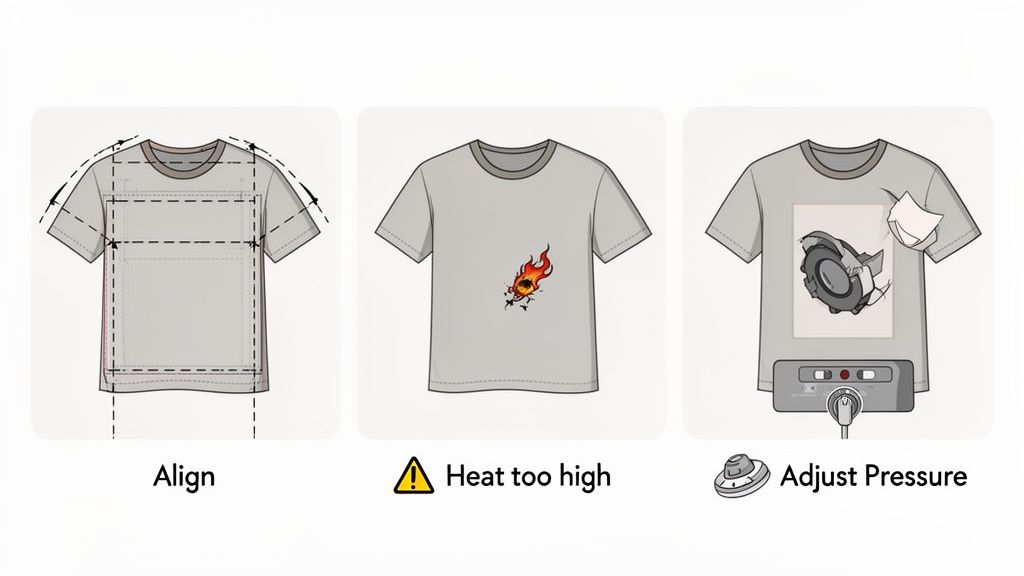
The number one issue for newcomers? A transfer that peels or lifts at the edges right after the first wash. This is almost always a pressure problem. If your pressure is too light, the transfer’s adhesive never gets a real chance to bond with the fabric fibers, leaving you with a weak application.
On the other hand, if you see scorched or shiny patches on a garment, that’s a dead giveaway of too much heat. Every fabric has its limit, and pushing past it can melt synthetic fibers or discolor your cottons. Always double-check the recommended settings for both your transfer and your blank to avoid this expensive mistake.
Diagnosing and Fixing Common Problems
Let's break down how to spot and solve the usual suspects. Taking a methodical approach will help you pinpoint the real cause instead of just guessing your way through it.
-
Peeling or Lifting Edges: This screams "not enough pressure." Give the pressure knob on your press a clockwise turn to increase the force. You're aiming for firm pressure, where the platen leaves a faint outline on the fabric after you press.
-
Scorched or Yellowed Fabric: That's a temperature issue. Immediately drop your heat press temp by 10°F. Also, make sure you're not pressing longer than the recommended time, since too much dwell time can also cause scorching.
-
Uneven or Inconsistent Application: If some parts of your design look perfect while others are peeling, you’ve probably got cold spots on your platen or uneven pressure. For thicker items like hoodies, a swing-away press often does a better job of delivering that even, top-down force.
Key Insight: Before you start a big project, always run a test press on a scrap piece of the same fabric. This five-minute step can save you from ruining an expensive hoodie by letting you dial in your settings first.
Essential Habits for Flawless Results
Building good habits from day one is the secret to consistency. It’s about more than just time and temp; a few simple practices will prevent most issues before they ever happen.
One of the most critical habits is to always use a protective sheet, like Teflon or parchment paper. Placing it between your transfer film and the hot platen stops any ink from sticking to the platen and ghosting onto your next project. It also shields your garments from harsh, direct heat.
Perfect alignment is another area where beginners can get tripped up. Here’s a simple trick: fold your shirt in half vertically and give it a quick two-second press to create a faint centerline. Do the same thing to your transfer film to make a matching crease. Lining up those two marks guarantees your design is perfectly centered every time. No more guesswork or crooked prints.
By understanding these common pitfalls, you can approach your new heat press with confidence. That means you can focus less on fixing mistakes and more on creating, especially when you’re using cost-effective tools like our Auto-build gang sheet builder to pack as many designs as possible onto one sheet. Its ease of use is perfect for beginners who want to maximize their materials without a steep learning curve.
Frequently Asked Questions About Beginner Heat Presses
Jumping into the world of heat presses always brings up a bunch of questions. Getting good, straight answers is the first step to feeling confident about your new apparel venture. Let's tackle the most common things beginners ask so you can choose the right press and get started without any guesswork.
What Is the Best Size Heat Press for a Beginner?
For anyone just starting out, a 15" x 15" heat press is the sweet spot. It’s big enough to handle almost anything you'll throw at it—adult t-shirts, tote bags, you name it—without taking over your entire workspace. This size gives you the most bang for your buck and tons of versatility.
You might be tempted by smaller, cheaper presses, but you'll outgrow them fast. A 15" x 15" platen is the perfect size to grow with, letting you take on bigger and more complex projects as your skills improve.
Can I Use a Regular Iron Instead of a Heat Press?
Honestly, no. A household iron just can't do what a heat press does, especially for DTF transfers. Irons have two major flaws for this job: they don't provide consistent, even heat, and they can't deliver uniform pressure. An iron has hot and cold spots and you simply can't push down hard enough or evenly enough to get the transfer's adhesive to bond properly with the fabric.
A dedicated heat press is non-negotiable if you want a professional, durable finish. It's the only tool that guarantees the precise temperature and pressure needed to create a product that looks incredible and survives dozens of washes—something an iron will never be able to replicate.
How Much Should I Spend on My First Press?
You can get a really solid entry-level heat press for somewhere between $200 and $400. Machines in this price range will give you all the essentials: digital temperature and time controls, adjustable pressure, and a reliable 15" x 15" platen.
It's tempting to grab one of those sub-$200 presses, but they often cut corners on build quality and heat consistency, which leads to nothing but frustration and ruined shirts. Investing just a bit more in a reputable model will pay off with better results and a machine that lasts. It lets you focus on creating, especially when you're using tools like an Auto-build gang sheet builder to pack your designs onto a single sheet and get the most value from the start. Its ease of use makes it a cost-effective choice for any beginner's budget.
Ready to pair your new heat press with vibrant, durable, and easy-to-use transfers? At Lion DTF Transfers, we provide premium hot-peel DTF transfers that are perfect for beginners. Get started today and bring your creative ideas to life at https://liondtf.com.