


A DTF gang sheet is essentially a large transfer film packed with multiple designs, all printed in a single run to boost efficiency and slash costs. Think of it like baking cookies—you wouldn't bake them one at a time, right? You fill the entire sheet to save time and energy. It's the same principle here, and it’s a total game-changer for anyone making custom apparel.
What Is a DTF Gang Sheet and Why You Need One
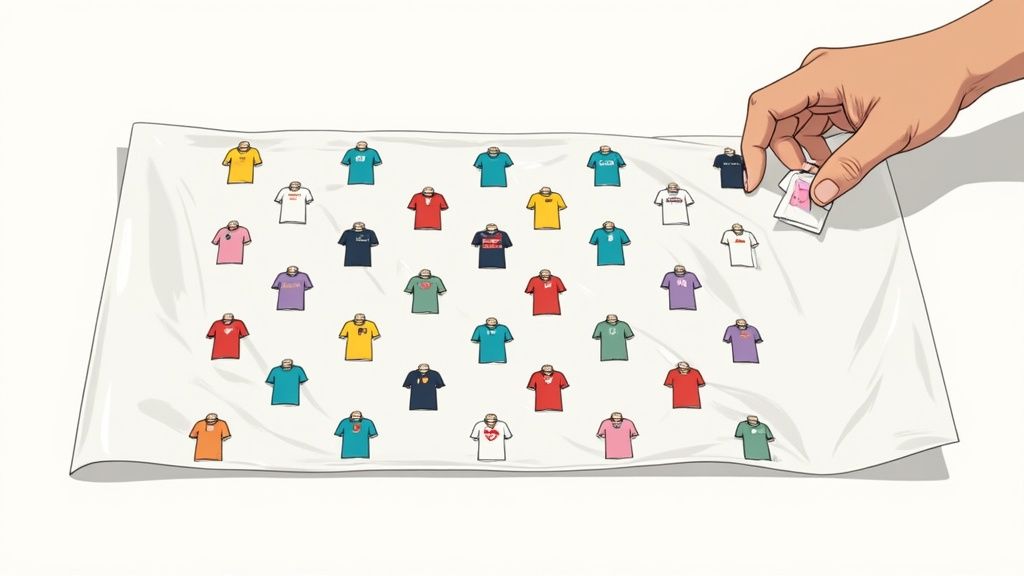
If you’ve ever paid for a big transfer sheet just to print one small logo, you already know the frustration. The DTF gang sheet is the perfect fix. The idea is brilliantly simple: instead of printing each design one by one, you "gang" them all together onto a single, large sheet of PET film. This turns multiple print jobs into one streamlined process.
This approach immediately cuts down on wasted material. Every square inch of the film can be put to work by filling the gaps with smaller graphics—think pocket logos, neck tags, or sleeve designs—right alongside your main artwork. For creators and business owners, that translates directly into real cost savings.
The Power of Efficiency and Cost Savings
The real magic of the gang sheet is how it makes production affordable at any scale. Whether you're an Etsy seller testing out new ideas, a local sports team needing jerseys, or a big print shop handling bulk orders, grouping your artwork is simply the smartest way to print.
Just think about the alternative: printing every single design on its own little piece of film. It's not just slow; it's incredibly wasteful. A DTF gang sheet solves this by turning all that unused film space into valuable real estate for more prints. The more designs you can intelligently fit, the lower your cost-per-print plummets.
This economic advantage is a huge reason the technology has taken off so quickly. In fact, the global Direct to Film printing market—which relies heavily on gang sheets for efficient production—was valued at USD 2,720.0 million in 2024 and is projected to hit USD 3,920.0 million by 2030. That kind of growth shows just how essential this method has become for modern apparel customization. You can explore more data on the industry's expansion and see how businesses are cashing in.
Making Gang Sheets Easy for Everyone
Not too long ago, arranging designs perfectly required some serious graphic design chops and expensive software, which was a major roadblock for a lot of people. Thankfully, that's not the case anymore.
Key Takeaway: The primary benefit of a DTF gang sheet is maximizing material usage to drastically lower the cost per transfer, making custom apparel production more accessible and profitable for everyone.
Tools like our Auto-build gang sheet builder have completely simplified the process. It lets anyone upload a bunch of images, and the software intelligently arranges them for the best possible spacing and cost-effectiveness. This automation takes out all the technical guesswork, ensuring your setup is perfect from the jump and making this powerful, money-saving technique accessible to all creators.
How DTF Gang Sheet Technology Actually Works
To really get why a DTF gang sheet is such a game-changer, you have to look at the smart tech working behind the scenes. Don't think of it like old-school printing. It's more like building a high-performance graphic, layer by layer. The whole process is a finely tuned dance between specialized materials, and each one has a crucial job to do.
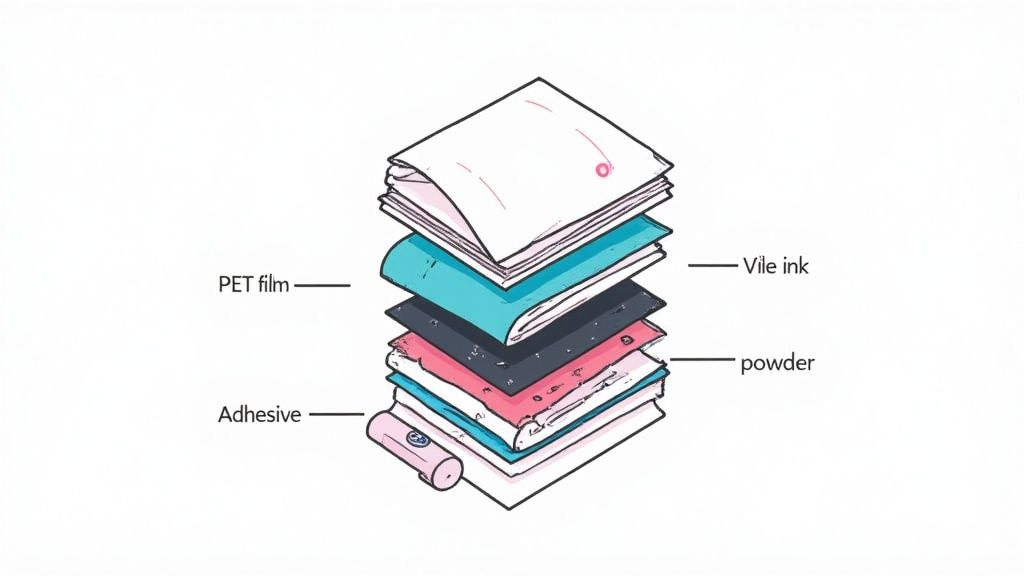
It all starts with a special PET (polyethylene terephthalate) film. This isn't just a random sheet of plastic; it's engineered with a unique coating designed to grab onto the ink but let go perfectly under heat. This film acts as the temporary home for your designs, holding them securely until they're ready to meet the fabric.
The Journey from Digital File to Tangible Transfer
The process kicks off when your digital artwork gets sent to a specialized DTF printer. This machine is loaded up with five specific water-based pigment inks: cyan, magenta, yellow, black, and a critical, brilliant white.
Here’s a step-by-step look at how the magic happens:
- Color Layer Printing: First, the printer lays down the full-color (CMYK) part of your design directly onto the PET film. It’s printed as a mirror image of the final artwork.
- White Ink Underbase: Right after the color goes down, a layer of white ink is printed directly on top. This white underbase is the secret sauce—it acts like a primer, making sure your colors pop with incredible vibrancy on any fabric, from bright white to jet black.
- Adhesive Powder Application: While the ink is still wet, the film rolls through a station where it’s coated in a fine, thermoplastic polyurethane (TPU) adhesive powder. The powder is clever; it only sticks to the wet ink, leaving the blank areas of the film clean.
- Curing and Melting: Next, the film passes through a curing oven. This carefully controlled heat melts the powder, fusing it with the ink and turning it into a smooth, flexible adhesive backing.
Once cured, the sheet is a finished, press-ready transfer. You're left with a collection of graphics perfectly arranged on a DTF gang sheet, each one a self-contained, durable design ready for action.
Why This Method Beats Older Techniques
The real genius of DTF technology is in what it gets rid of. Unlike screen printing, there are no messy screens to prep, no complicated color separations, and zero limits on the number of colors you can use. You can print photorealistic images with tiny details and smooth gradients without breaking a sweat.
DTF printing bypasses the limitations of older methods. By printing directly to film and using an adhesive powder, it removes the need for vinyl weeding or screen setup, allowing for full-color, complex designs with minimal prep work.
It also completely sidesteps the tedious, time-consuming process of weeding that comes with heat transfer vinyl (HTV). Intricate designs with fine lines or delicate text are no problem at all, since there's no excess material to cut and peel away. This saves a massive amount of time and frustration, especially when you're dealing with big orders.
The modern DTF process makes putting dozens of unique, press-ready graphics on a single sheet not just possible, but incredibly efficient. This is exactly where tools like our Auto-build gang sheet builder become so valuable. It helps you maximize every single inch of your film, turning what used to be a complicated manual layout task into a simple, cost-effective automated process.
Preparing Your Artwork for a Flawless Print
The journey to a stunning, professional-quality transfer doesn't start at the printer; it begins on your computer. Your digital artwork is the blueprint for the final product, and if that blueprint has flaws, the finished shirt will, too. This is hands-down the most critical step in the entire DTF process.
A lot of first-timers get tripped up here, but the rules are actually pretty simple once you understand why they matter. It’s not about getting overly technical—it’s about making sure your vision translates perfectly from the screen to the fabric without any nasty surprises.
The Non-Negotiables for Perfect Prints
To get those sharp lines, vibrant colors, and that soft feel DTF is known for, your artwork has to meet a few key standards. These aren't just friendly suggestions; they're the absolute foundation for a flawless print.
Here are the three core elements you have to get right:
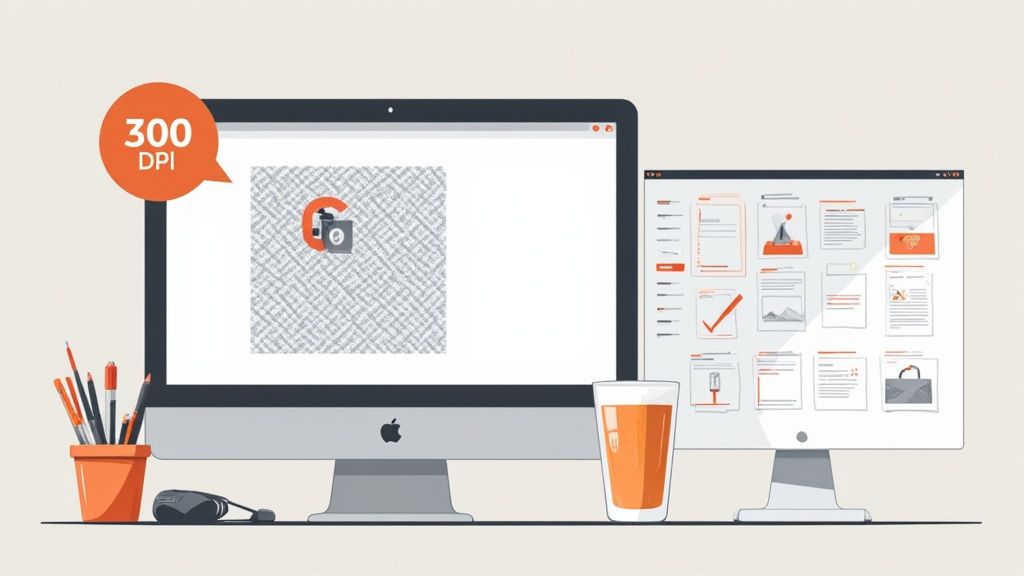
- Resolution (300 DPI): DPI stands for "dots per inch." Think of it as the amount of detail packed into your design. An image might look fine on your screen at 72 DPI, but it will come out blurry and pixelated when printed. Submitting a 300 DPI file is the non-negotiable industry standard for crisp, professional results.
- File Type (Transparent PNG): You must save your file as a PNG with a transparent background. If you upload a JPG or a PNG with a white background still attached, the printer will print that white box right onto your garment. A transparent background ensures only your actual artwork gets printed.
- Color Mode (CMYK Recommended): Your computer screen uses an RGB (Red, Green, Blue) profile, which is based on light. Printers use a CMYK (Cyan, Magenta, Yellow, Black) profile, which is based on ink. Sending us a file in CMYK helps guarantee the colors you see on screen are as close as possible to the final printed colors.
Nailing these details from the start prevents the most common issues we see—fuzzy edges, unwanted background boxes, and weird color shifts. It's the difference between a shirt that looks homemade and one that looks like it came from a retail shelf.
The Smart Way to Build Your DTF Gang Sheet
Manually arranging dozens of different designs onto a single sheet can be a nightmare, even for seasoned graphic designers. You have to check every single file’s resolution, remove each background, and then painstakingly play Tetris to avoid wasting space. This is where a little automation goes a long way.
Our Auto-build gang sheet builder was designed to completely eliminate that headache. Think of it as your expert assistant, handling all the tedious technical work so you can stay focused on the creative side of things.
By automating file checks and optimizing the layout, a smart gang sheet builder not only saves you hours of manual work but also maximizes every inch of film. This directly reduces your cost per print and prevents expensive mistakes.
The tool makes the entire prep process a breeze. When you upload your images, it automatically checks them to make sure they meet our print requirements. It can even remove backgrounds for you, which is a huge time-saver. Then, its algorithm nests your designs together, fitting them perfectly to maximize every square inch of your DTF gang sheet.
This kind of automation is a massive advantage, making your workflow faster, cheaper, and way more efficient. To see just how much it can simplify things, you can learn more about how the new auto-builder feature is changing DTF gang sheet creation.
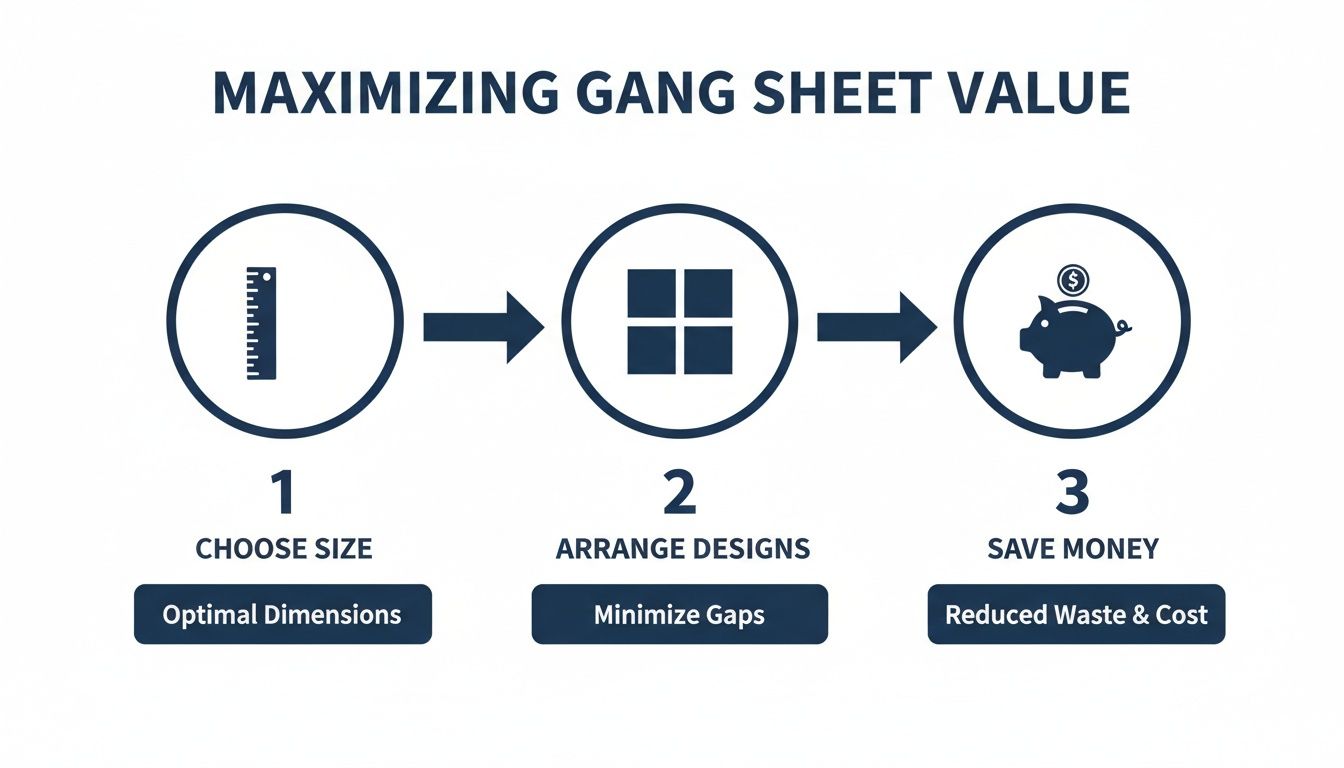
How To Maximize Value With Smart Sizing
Getting the most out of a DTF gang sheet is all about strategy. It’s not just about getting your designs printed; it’s about making every single square inch of film work for you, driving down your costs and boosting your profits. The first, and most important, move you’ll make is choosing the right sheet size.
Whether you’re printing five shirts for a family reunion or 500 for a big wholesale order, the goal is always the same: lock in the lowest cost-per-print possible. A smaller sheet might look cheaper at first glance, but if you’re left with a bunch of wasted space, you're actually losing money. On the flip side, ordering a massive sheet for a tiny job is just as inefficient. The real key is matching the sheet size to the scale of your project.
Choosing Your Ideal Gang Sheet Size
The right sheet size comes down to the number and dimensions of the designs you need to run. A project with a few huge back graphics has totally different needs than one with dozens of small pocket logos. A little planning here goes a long way.
To make this simple, just think in terms of your job volume:
- Small Projects (e.g., 22x24 inches): This size is perfect for testing a few new designs, knocking out some samples, or fulfilling a small custom order. It’s the ideal choice when you just have a handful of standard adult-sized shirt logos.
- Medium Projects (e.g., 22x60 inches): This is a fantastic all-rounder for small businesses and growing brands. You get enough room to mix several larger designs with smaller graphics like neck tags and sleeve art, all on one sheet.
- Large Projects (e.g., 22x120 inches or more): This is the go-to for bulk orders, full production runs, and squeezing out every drop of value. When you fill up a sheet this big, your cost-per-print plummets.
Getting a handle on these options is the first step. For a much deeper dive into how different sizes can completely change your workflow, our guide on what gang sheet size means breaks it all down with more detail.
Choosing Your Ideal DTF Gang Sheet Size
Use this guide to select the most cost-effective gang sheet size for your project's scale.
| Sheet Size (Inches) | Typical Logo Count (Adult) | Best For | Cost-Effectiveness |
|---|---|---|---|
| 22x24 | 4-6 logos | Samples, small custom orders, design testing | Good for low volume |
| 22x60 | 10-15 logos | Small business runs, mixing logo sizes | Better per-print cost |
| 22x120 | 20-30+ logos | Bulk orders, full production, stock inventory | Best per-print cost |
| 22x180 | 35-50+ logos | High-volume production, maximizing profits | Maximum savings |
Selecting the right size from the start ensures you aren't paying for film you don't use, directly impacting your bottom line on every single order.
Tactical Tips For Artwork Arrangement
Once you’ve picked your sheet size, the next move is arranging your artwork. This is where you can truly master the economics of the DTF gang sheet. The guiding principle couldn't be simpler: waste no space.
Think of your gang sheet like a game of Tetris. Your big, primary designs are the main pieces, but it’s the smaller graphics that fill in the gaps and complete the puzzle. You can pair a large 11-inch chest logo with a few 4-inch pocket logos, some 1.5-inch sleeve details, and a couple of 2-inch neck tags. This tactical nesting ensures you’re getting the absolute maximum number of prints for your money. When you're trying to get everything to fit just right, using bulk image resizer tools can be a huge help in arranging designs efficiently and making the most of your film.
Maximizing value isn't just about fitting more designs on a sheet; it's about strategically combining different sizes to eliminate empty film, effectively making your smaller prints almost free.
This strategic approach has a massive impact on your bottom line. In fact, optimizing production with gang sheets is a key reason why in-house DTF printing can yield profit margins far superior to outsourcing. While ordering pre-printed sheets is convenient, producing them in-house can drop expenses from $15–$30 per sheet down to just $2.50–$5.50, completely changing the profitability of your operation.
This is exactly why we built our Auto-build gang sheet builder. It automates this entire optimization process, acting like an expert assistant right at your fingertips. You just upload your designs, and it intelligently rotates and nests them to guarantee you get the most value from every single sheet you order. It turns a complex, time-consuming task into a simple, cost-saving step.
Your Step-By-Step Guide to a Perfect Press
Once your custom DTF gang sheet arrives, it's time for the fun part—bringing your designs to life. This is where your digital art becomes a tangible product, and a solid pressing technique is what separates an amateur-looking shirt from a professional one.
It might seem like a lot of steps, but pressing is actually a simple process to master. With a little practice, you'll be turning out transfers that are vibrant, durable, and so soft you can barely feel them on the shirt. Most importantly, they'll be built to last through dozens of washes without cracking or peeling.
Step 1: Pre-Press Your Garment
Before you even think about placing that transfer, your first move is a quick pre-press. Just place your shirt, hoodie, or whatever you're printing on the heat press and give it a quick 5-10 second press at your target temperature.
This step might seem small, but it’s a game-changer. It instantly removes any hidden moisture trapped in the fabric and smooths out every wrinkle. Skipping this can trap steam under the transfer, which weakens the adhesive and leads to peeling down the road.
Step 2: Position Your Transfer
With a perfectly flat, dry garment, you're ready to place the design. Carefully cut your transfer from the gang sheet, leaving a small border around the artwork. Position it on the garment with the ink-side down (the part that feels slightly rubbery) and the clear film facing up.
Take your time here. This is your one shot to get it right, so use a t-shirt ruler or an alignment tool to make sure it’s perfectly centered and straight. A well-placed design is the hallmark of a professional job.
Step 3: The First Press and Peel
Now for the main event. Cover the transfer with a Teflon sheet or a piece of parchment paper. This protects both your transfer and the heat press platen, ensuring heat is distributed evenly.
Press your garment using these settings:
- Temperature: 240-280°F
- Time: 10 seconds
- Pressure: Medium to heavy
When the timer beeps, open the press. Our transfers are designed for a hot peel, which means you don't wait for it to cool down. While it's still hot, grab a corner of the film and peel it back in one smooth, confident motion. No hesitation!
The image above shows exactly how this workflow—choosing the right sheet size and packing your designs efficiently—is the key to getting the most value out of every order.
Step 4: The Final Press for Durability
Your design is on the shirt and looking great, but we're not quite done. There’s one final, crucial step to lock it in for good. This finishing press is what gives the transfer that signature soft-hand feel and incredible durability.
Pro Tip: If you're pressing over anything with zippers, buttons, or thick seams, slide a pressing pillow inside the garment first. This foam pad elevates the print area, guaranteeing your heat press makes full, even contact with every part of the transfer.
Cover the exposed design again with your Teflon sheet or parchment paper and give it a final press for another 5-7 seconds. This second press cures the ink completely, bonding the adhesive deep into the fabric's fibers. It’s what makes the final product feel less like a sticker and more like part of the shirt itself.
Want to learn more? We've got even more tips and tricks in our complete guide to applying DTF ready-to-press transfers.
Who Is Using DTF Gang Sheets Right Now?
The real magic of a DTF gang sheet isn't just theory—it's what entrepreneurs, creators, and organizers are using every single day to build their brands from scratch. This technology is the ultimate equalizer, handing small-scale operations the same professional firepower as massive production houses.
From buzzing Etsy shops to local sports teams, people are using gang sheets to bring their ideas to life without breaking the bank. A huge part of the appeal is how versatile these transfers are. They stick flawlessly to almost anything—cotton, polyester, blends—and can even work on hard goods, opening the door for endless creative projects.
The E-Commerce Entrepreneur
Let’s think about an Etsy seller launching a new line of graphic tees. If she used a traditional print-on-demand service, her profit margins would be paper-thin. But with a DTF gang sheet, she can print 15 different designs for her new collection all at once, which dramatically cuts down her cost per shirt.
She can test out new slogans, offer a bunch of color variations, and even throw in small branded neck tags, all printed on the same sheet. This lets her build up a little inventory and ship orders instantly, without getting locked into a huge minimum order for any one design. It's a low-risk, high-reward strategy that lets her hang with the bigger brands.
By packing different designs onto a single sheet, a small business can pump out a wide variety of products in one cost-effective run. It flips inventory management from a major headache into a strategic edge.
The market data backs this up. On Amazon, sales for DTF gang sheets are exploding, with units sold expected to jump 183% from 120 in January 2024 to 340 by November 2025. This surge is coming directly from e-commerce creators and indie fashion brands. You can dig deeper into the explosive trend of DTF gang sheets to see just how big this is getting.
Teams, Events, and Small Businesses
Now, picture a local youth sports team. They need 25 jerseys, each with a team logo on the front, the player's name and number on the back, and a sponsor's logo on the sleeve. Trying to order all those pieces as separate transfers would be a nightmare, both logistically and financially.
With a DTF gang sheet, the coach can lay out all those elements—every logo, name, and number for the whole team—onto just one or two big sheets. This simplifies everything, making sure every jersey looks uniform and professional. The same idea works for a small business making branded tote bags for a trade show or a family getting custom shirts for a reunion.
For these kinds of projects, our Auto-build gang sheet builder is a game-changer. You don't need to be a designer to get your layout perfect. Just upload all the different names, logos, and numbers, and the tool intelligently arranges them to use every inch of space and keep your costs down. It’s the easiest, most cost-effective way to manage complex, multi-part jobs and get pro results without the pro price tag.
Got Questions About DTF Gang Sheets? We Have Answers.
Even after you get the hang of how a DTF gang sheet works, a few questions usually pop up. We get it. This last section is all about tackling the most common things we hear from customers, giving you straight, simple answers so you can order with total confidence.
Think of this as your quick-reference guide. We’ll clear up any final thoughts on durability, how to press them, and how fast you’ll get your order, making sure you have everything you need to get started.
How Durable Are These Transfers? And How Do I Wash Them?
One of the best things about DTF transfers is that they’re incredibly resilient. When you press them correctly, they’re rated to handle 50+ washes without cracking, peeling, or fading. This kind of durability makes them a perfect fit for apparel that gets worn day in and day out.
To get the most life out of your print, just follow these simple care instructions:
- Wash the garment inside-out in cold water.
- Tumble dry on a low heat setting.
- Steer clear of bleach and fabric softeners—they can break down the print’s adhesive over time.
Can I Just Use a Regular Iron to Apply These?
We’re going to be direct here: please don't use a home iron. A standard iron just can’t deliver the consistent, high temperature and heavy, even pressure that a heat press provides. Without that control, the transfer will almost always peel or fail to stick properly.
A heat press is non-negotiable for professional, long-lasting results. It guarantees the even heat and pressure needed to cure the adhesive, permanently bonding your design right into the fabric's fibers.
If you want a reliable and durable application, a quality heat press is an essential tool for the job.
What's the Typical Turnaround Time?
We know speed is everything. Most of our DTF gang sheet orders are printed and shipped out within 24-48 hours. This quick turnaround helps you keep your projects on track and your customers happy.
One of the best ways to keep things moving fast is by using our Auto-build gang sheet builder. It helps you set up your files correctly right from the start, avoiding those common artwork hiccups that can cause delays in production. It's a simple, cost-effective tool that makes the whole process smoother.
Do I Need to Mirror My Images Before I Upload Them?
Nope, you can skip that step. Our printing software and the Auto-build gang sheet builder handle the mirroring for you automatically. Just upload your designs exactly as you want them to look, and we’ll take care of the rest. They’ll show up at your door perfectly prepped and ready to press.
Ready to create your own high-quality custom apparel with unmatched ease and efficiency? Head over to Lion DTF Transfers and use our Auto-build gang sheet builder to get your project rolling today.